This is the greatest difference between Roger Dodger Aviation and the other guys: my customers actually complete their projects! My online courses include instructions for each step of the project including video clips, diagrams, pictures, and printouts. You can build a FSX cockpit DIY project like these guys!
DIY Deluxe Desktop Flight Sim
First of all, look at this beautiful DIY Deluxe Desktop Flight Sim item #D250. It was built by Greg in Savannah Georgia, USA. This is one of my favorite designs because it is so versatile. Builders can create exactly the type of home cockpit they need to match their flying interests. You can install a yoke and throttle quadrant in the #D250. On the other hand, you can also use a HOTAS joystick and throttle or even a helicopter collective.
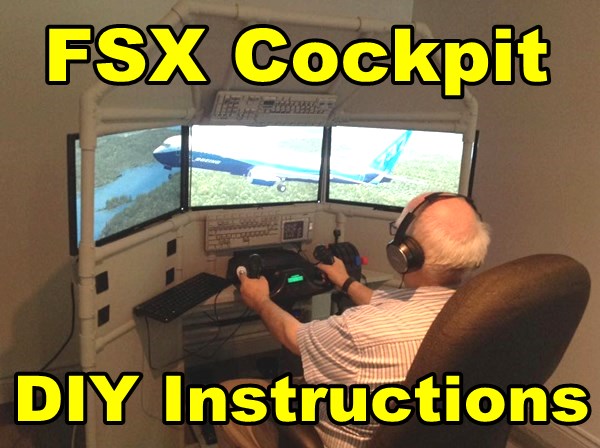
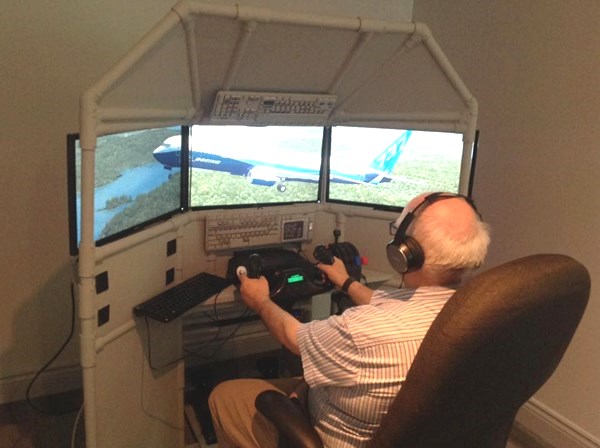
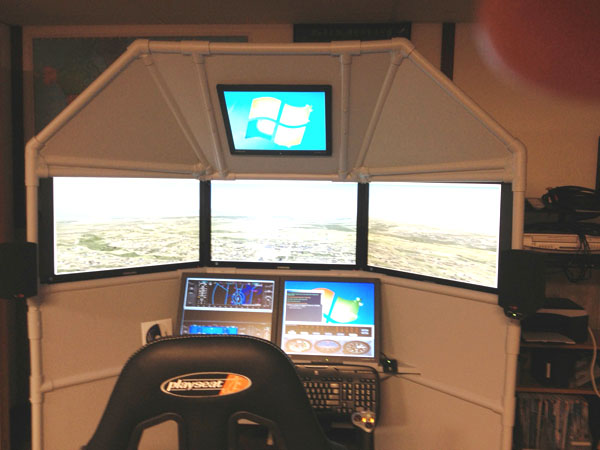
The DIY Triple Screen Flight Sim, item #T440 is still my most popular DIY course. As a result, I get more T440 pictures than any other project. Two customers recently sent me pictures of their completed projects (see below). Wayne and Richard both build the same project but built it to suit their particular simulation requirements.
DIY Triple Screen Flight Sim built by Wayne
DIY Triple Screen Flight Sim built by Richard
Help Spread the Word: FSX Cockpit DIY Projects
Don’t let Facebook bury these success stories! These men worked hard on their FSX cockpit DIY projects and deserve to be congratulated. When I post on Facebook, the message only goes out to 10% of my fans. Please LIKE, COMMENT, and SHARE to spread the word. If you are reading this as a blog post, please link to it or share it with friends. Let’s show these guys our community appreciates a job well done.
I get this question a lot. It is a valid question, but it’s difficult to answer. People will often ask, “How much does it cost to build a flight simulator?” Does that mean they’re talking about the DIY framework of PVC pipe, lumber, and Styrofoam? Or do they really mean they are starting at zero, where they don’t even own a PC and a monitor? Or are they actually asking about the flight controls and switch panels?
In reality, DIY Flight Sim builders have a wide variety of choices for equipping their home cockpit to match their needs. They may start with a single display now, and then add more displays later. They may start with just a yoke and rudder pedals, but add switch panels later. So when we ask how much does it cost to build a flight simulator, are we talking about how much it costs on day one, or how much it costs after slowly adding and upgrading components after a few years?
DIY Flight Sim Budget Tool
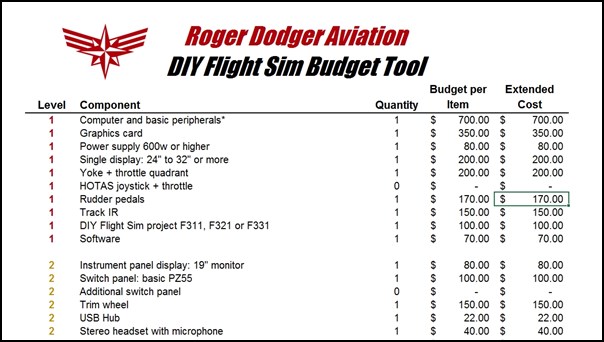
I decided the best way to answer this question is to customize the answer just as each individual builder customizes their home cockpit. I built a Budgeting Tool to help determine the total price for a home flight sim setup. The Budget Tool shows how much to budget for each component and then adds those costs for a grand total. You decide how much you need to spend on your DIY Flight Sim.
But what is an acceptable home flight sim? Some people require three screens or more to consider it a real flight simulator, some people are happy with just one. So, I also introduced three phases (levels) of progression in the Budget Tool. Phase 1 is the bare-bones minimum amount of equipment you need to have a functioning flight sim. I’m assuming a fairly decent computer and graphics card (with power supply). You also have the choice of flight controls: either a yoke + throttle quadrant or HOTAS joystick + throttle. In addition, you really need Track IR if you only run one display. And don’t forget the rudder pedals. Airplanes have rudder pedals, so you should too.
At Phase 2 and Phase 3, I added more components to the Budget Tool. Each component gives the pilot more functionality and a better flight experience, but also adds cost. This is the trade-off you see in any budget. For any given component you can either budget an amount, or zero if you don’t need it yet.
How much does it cost to build a flight simulator?
Where to Purchase Components
People tend to have their favorite sources for computer equipment and flight gear, and I’m no different. For computers, I normally go to a local place called Micro Center where I’ll typically buy a computer, but immediately upgrade the graphics card with power supply. However, the last computer I purchased was from Cybertron. The Cybertron rig was already built for gaming, so I didn’t have to upgrade anything, which was very nice. They also sent me a free t-shirt!
You have a staggering amount of choices for displays. TVs are high-definition so you can use them for your flight sim, but make sure they have a fast refresh rate. Just Google for prices on HDTVs or monitors, and get the best deal you find.
I used to always shop Amazon for flight controls and switch panels, but now they don’t always have the best price. I recommend starting at Amazon, but also check prices at other online retailers like FlightSim Pilot Shop. Some guys buy their gear from E-bay, so that’s always an option too.
Ok, so How Much Does it Cost to Build a Flight Simulator?
I recommend that you customize the Budget Tool for you. The Budget Tool is only a starting point. I posted it here as an Excel file… DIY Flight Sim Budget Tool v1.2 so you can change it, add to it, do whatever you need to make it useful for you. This is my first attempt at a Budget Tool, so please let me know your thoughts on this. It’s probably not perfect and I anticipate making improvements to it.
I’m always impressed by the many ways my customers modify the DIY Flight Sim projects to meet their needs. It’s one of the best things about this gig. Customers change the home cockpit plans a little or a lot depending on their needs and resources. Check out these innovative DIY cockpit solutions from the Customer Gallery.
Rich’s Quad Screen Flight Sim
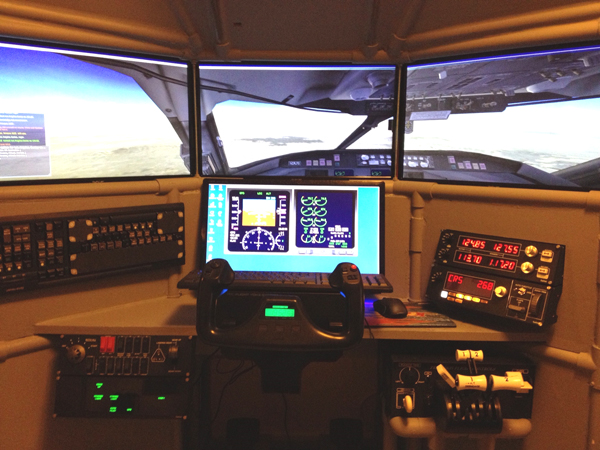
My customer Rich built a T440 DIY Triple Screen Flight Sim and installed an additional screen for the flight instruments. This creates a stunning degree of realism because your instruments are positioned close and you focus your vision outside to see the surrounding environment. Similarly, I demonstrated a quad display setup with the DIY Deluxe Desktop Flight Sim and Air Managerpowering the instruments.
You can see Rich added four Saitek switch panels and the K140 DIY Airliner Keyboard Mod. Do you think that is a Go Flight TQ6-ADV throttle quadrant? It’s not. It might be two Saitek throttle quadrants with after-market replacement handles attached. You can find such handles from FlightSimPM and others for your own innovative DIY cockpit.
Quad screen flight sim with switch panels, throttle quad by Rich
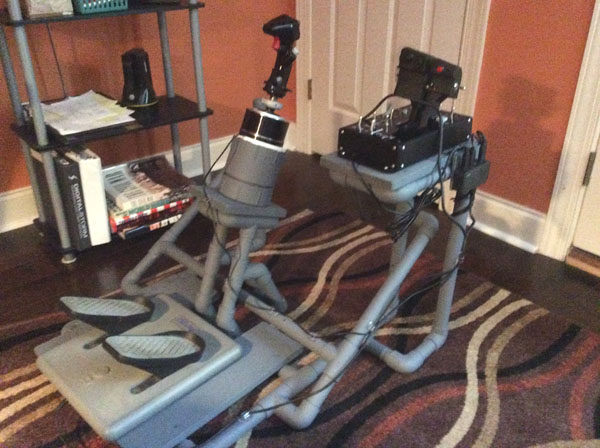
Thrustmaster Warthog HOTAS for Flight Sims
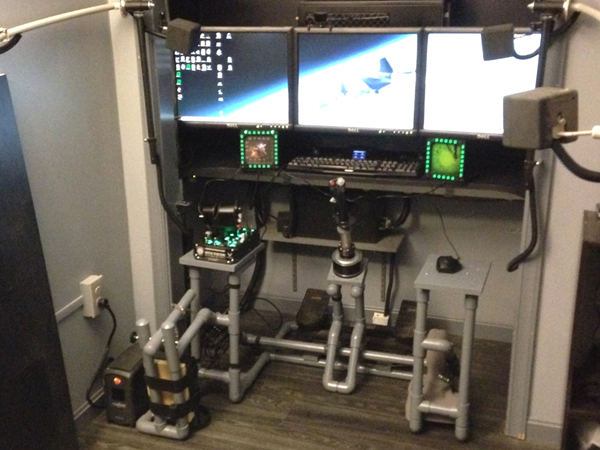
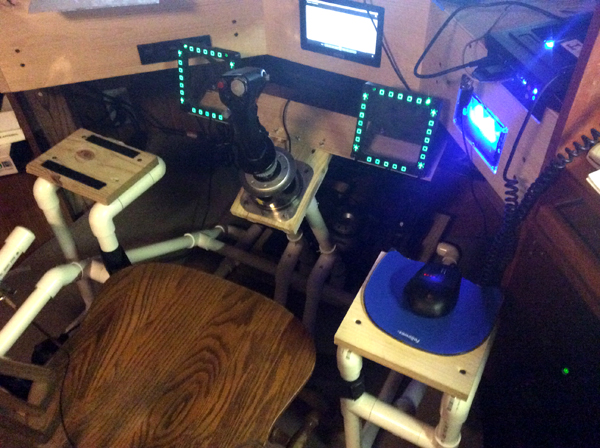
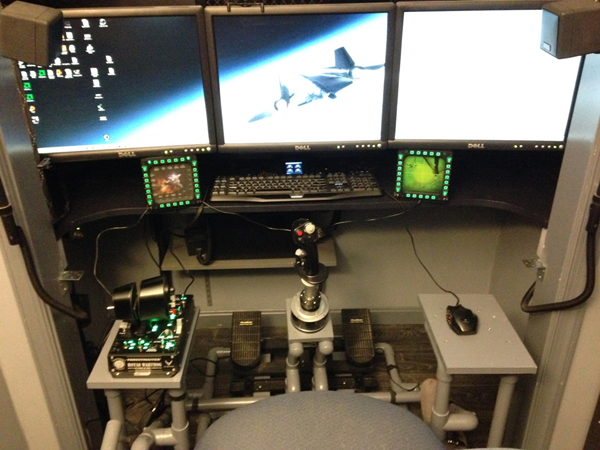
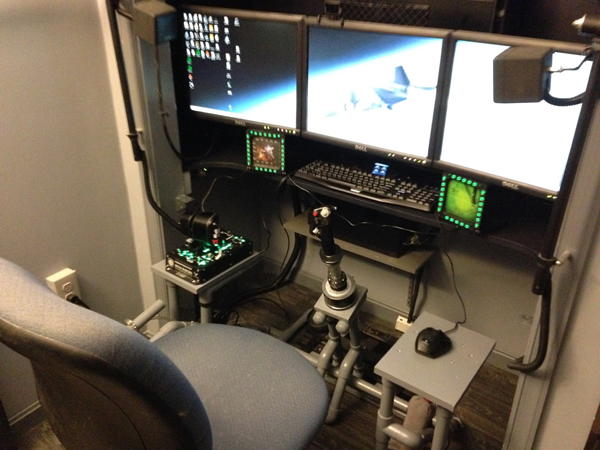
You can also see more usage of the Thrustmaster Warthog joystick and throttle with these projects. Here George modified the F331 DIY Easy Helicopter Collective to also include the Thrustmaster throttle. He can use it to simulate airplanes or spaceships in its shown configuration. He can also relocate the throttle to a platform below the collective handle and effectively simulate helicopters. Here is another example of flight sim builders buying quality hardware to equip their creations. Most of all, he built the whole simulator in a closet and included triple screens and Thrustmaster Cougar Multi-Function Panels (MFPs) for this innovative DIY cockpit.
Home flight sim helicopter collective, triple screens by George
A Very Special Triple Screen Flight Sim
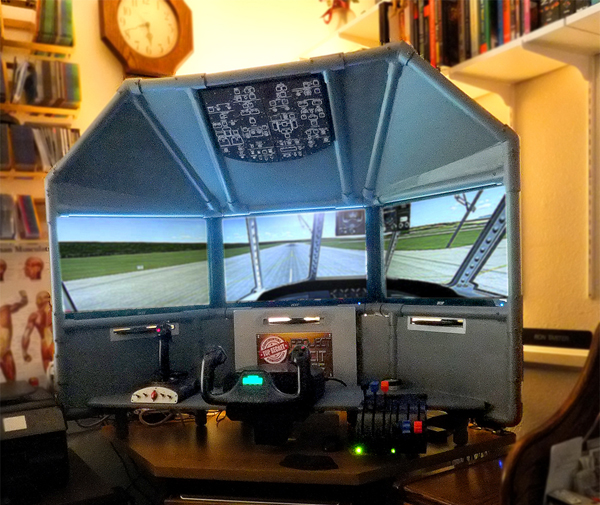
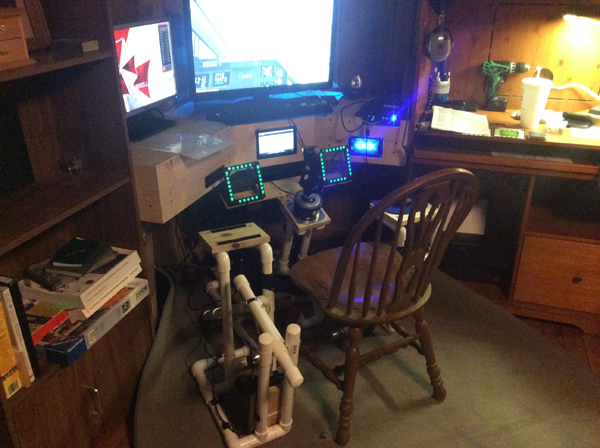
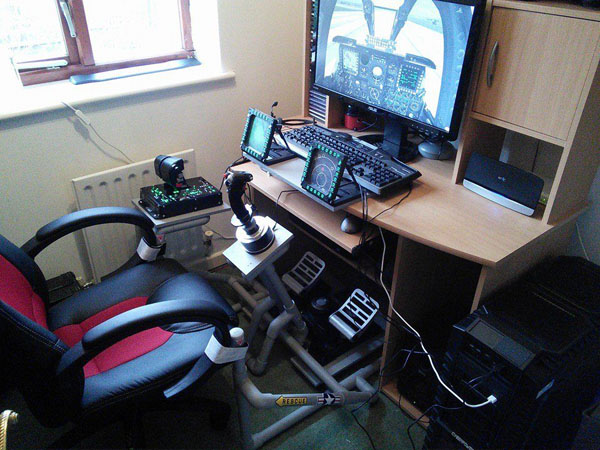
Customer Ron built his T440 Triple Screen Flight Sim so it would fit on his desk. Keep in mind, the original plans are for a self-standing frame. Ron was able to modify the frame extensively so it fit neatly on his corner desk. He also added the Saitek yoke and throttle quadrant that we see so often in home flight simulators. Finally, the virtual cockpit you see there is from a Lockheed Constellation which is exactly what we use in the flight sim I built for the National Airline History Museum.
Desktop triple screen flight sim by Ron
More Innovative DIY Cockpit Solutions
Enjoy these other customer projects that I recently added to the Customer Galleries. More multi-screen projects and more modified frames for HOTAS and helicopter collectives. In addition, I have many more pictures to add to the gallery and I hope to do that in the coming weeks. Happy Landings!
If you like this post, please leave a comment. That will enable the mystical internet algorithms to spread it to more people.
Home helicopter collective by Joshua
Home helicopter collective by Joshua
WW2 flight sim keyboard mod by Michael
Home helicopter collective with mods by Robert
DIY Triple Screen Flight Sim by Chris
Home flight sim helicopter collective, triple screens by George
Home flight sim helicopter collective, triple screens by George
DIY flight sim helicopter collective and triple screens by George
Quad screen flight sim with switch panels, throttle quad by Rich
Desktop triple screen flight sim construction by Ron
I added more pictures of DIY Flight Sim completions to the new expanded Customer Gallery. Note there are now three distinct examples of customers adding the popular Thrustmaster Warthog HOTAS joystick to the #F321 DIY Center Joystick Frame.
Thrustmaster Warthog and other Additions
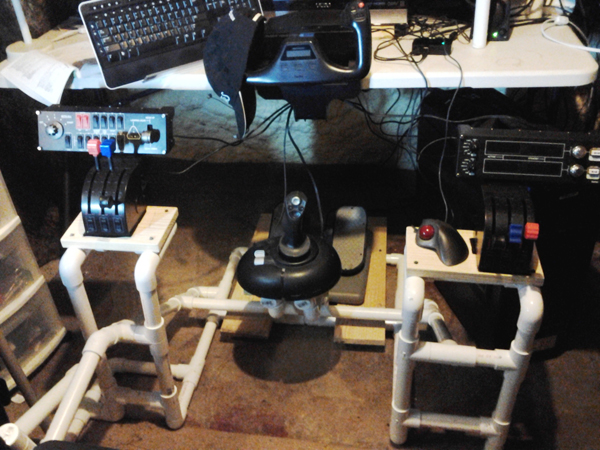
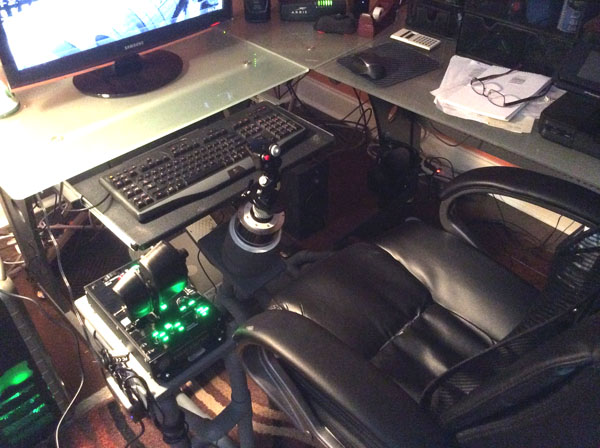
Several customers modified the #F321 Center Joystick project slightly to accommodate the Thrustmaster Warthog joystick. They did this by shortening the center joystick stand by several inches and then bolting on the joystick. The Thrustmaster Warthog originally comes with a flat, square base which can be easily removed. Notice that the DIY Center Joystick Frame works well with Saitek rudder pedals because of their wide stance. You can comfortably straddle the center joystick to reach the pedals. Note the Saitek Combat Rudder Pedals installed on the #F321, but you can also use the Saitek Cessna Rudder Pedals. I originally designed the #F321 project around the early model Saitek Pro Flight Rudder Pedals, witch still work well. You can use the CH Rudder Pedals but they are difficult to use because they are narrow and makes it harder to straddle the center joystick stand.
Center Joystick or Side Joystick?
Check out Craig’s pictures in the new Customer Gallery 2. Craig created one of the most attractive DIY Flight Sim completions. He built the #F321 with a removable center stand and with side stands on both sides. He can now switch between a traditional center joystick and a HOTAS side joystick. Notice the D-ring fasteners he uses to attach the center stand.
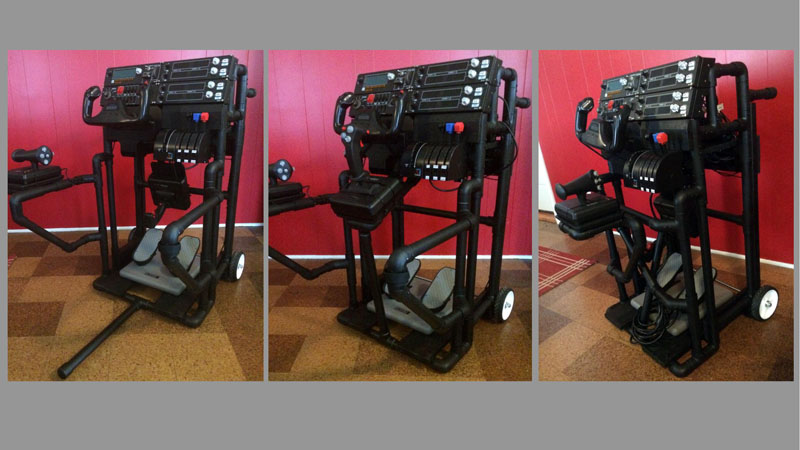
Rob modified the #E420 DIY Roll-Away Flight Sim to match his needs and style of flying. He added an expanded mid-shelf for the Saitek yoke and throttle quadrant and a swing-out platform for the compact mini-keyboard. Also note the additional platform for the mouse and mouse pad. The Roll-Away Flight Sim frame is wonderfully mobile because Rob installed four castering wheels to it. Two of the castering wheels can be locked in place so he can comfortably use the rudder pedals without worrying about the frame rolling away. You should always use rudder pedals, they are an important part of DIY Flight Sim completions.
People around the world are building home flight simulators this winter. These guys find inexpensive materials at home improvement stores and build their own airplane cockpit at home.
January is BUILD MONTH
Why is January a great time to build a DIY (Do It Yourself) flight sim project? First of all, many people get new flight simulator software and computer equipment for Christmas and are ready to upgrade their home cockpit. Also, the holidays are over and now people are returning to their hobbies. Flight simulation is a great way to learn about aviation during the cold winter months. Consequently, I typically see an increase in DIY Flight Sim business and website traffic starting in January.
You don’t necessarily need a workshop for building home flight simulators, so many people build their project in an apartment or even a dorm room. You don’t need outside ventilation because no harsh chemicals, paints, or adhesives are used with these projects so you can build indoors. Let it snow!
Six Screen Home Flight Simulator
DIY Flight Sim Pod build by Russ
Transforming Roll-Away Flight Sim by Dan
T440 Triple Screen Flight Sim customer completion
Matt Thomas building home flight simulators
Inexpensive Components and Materials
Is your home flight simulator nothing more than a desk with a few monitors and a joystick? You can make a more realistic airplane cockpit with inexpensive materials from a home improvement store. These guys build home flight sims with PVC pipes, lumber, and Styrofoam insulation panels. Notice they also painted their projects because painting is also inexpensive, easy, and gives the project a truly finished appearance.
We are fortunate to live in a time when we have so many affordable choices for computer equipment and flight controls. For example, it is now possible to use multiple high-definition HDTVs as displays for a flight simulator. In addition, computers and graphics cards are more powerful than ever. We have more choices than ever for flight sim control yokes, rudder pedals, throttle quadrants, switch panels, and more. Finally, the flight sim software of today is better than ever. Lockheed Prepar3D, X-Plane 11, FSX Steam, and Aerofly FS2 all boast improved performance and functionality.
Combine inexpensive building materials with affordable computer equipment and you can have a powerful and realistic flight simulator for your home.
Customizing and Building Home Flight Simulators
Builders modify their projects to match their needs and resources. For example, they can scale a frame to fit around 24″ monitors, or 27″, or 32″ or whatever. Also, they can use one large display, or multiple displays. Some builders add modified keyboards, additional lights, or even drink holders. Are you building in a spare room or just a spare closet? These guys can fit a fully functional flight sim just about anywhere. If you typically fly airplanes with a yoke and throttle quadrant, then that is what you will want to build. On the other hand, if you use a HOTAS joystick and throttle, then you will want a DIY frame that supports those flight controls. If you fly helicopters, there’s a helicopter collective project for you too. See all these examples of customized flight sim projects in the Customer Gallery.
Get Started!
The most difficult part of any building project is just getting started, so get going now. You may make some mistakes along the way, but they will be inconsequential because you’re using inexpensive materials. Get building and get done, so you can get flying!
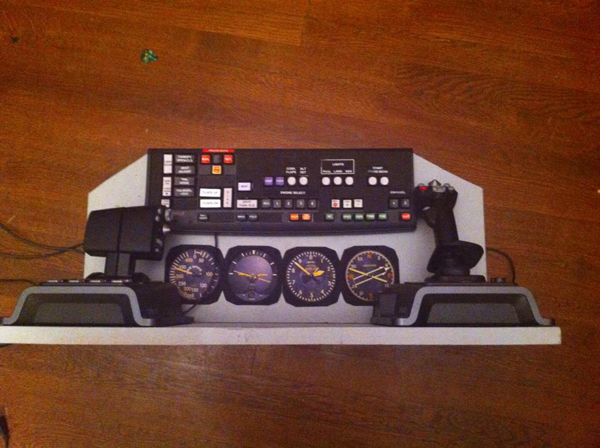
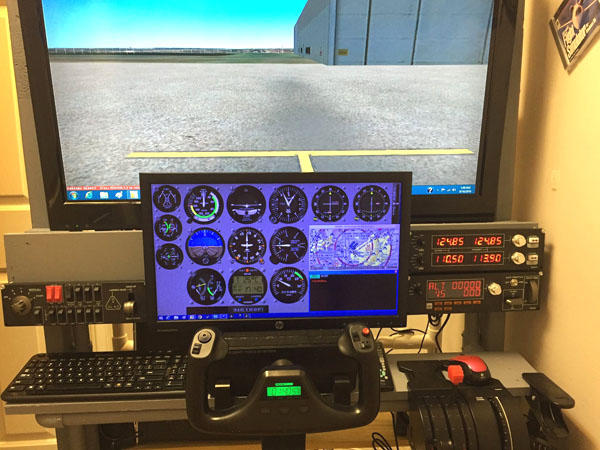
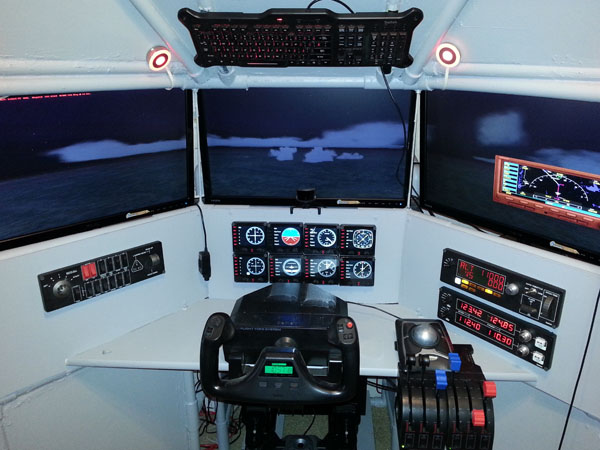
Our customer, Tom, sent in these pictures of his completed project. He installed a Saitek Pro Flight Instrument Panel in a DIY Triple Screen Flight Sim. Actually these are eight separate units that combine to work as a complete instrument panel, therefore he has the standard six flight gauges, plus two VOR displays.
T440 Triple Screen Flight Sim customer completion
Saitek Pro Flight Instrument Panel
The Saitek Pro Flight Instrument Panel you see in the picture is eight separate flight instruments. Each unit can be set individually to display whatever instrument you choose, in addition, you have 15 different displays to choose from. The units cost $170 to $190 USD depending on where you purchase from.
The instrument panel is the perfect addition to Tom’s DIY Flight Sim. He says: “Had great fun building this triple screen, with your instructions and videos even I couldn’t mess it up!”
Out of Stock. There is a massive, world-wide, back-order situation on all Saitek Pro Flight merchandise. All orders will be filled on a first-come, first-served basis. Order now to reserve your spot in line. You will not be charged until the order ships and you can cancel at any time prior to shipment. Orders placed now are expected to be shipped in 6 to 12 weeks.
MadCatz recently sold Saitek to Logitech. Gameindustry.biz reports that MadCatz purchased Saitek in 2007 for $30 million, but is now selling it to Logitech for only $13 million. We can only hope that Logitech can keep the Saitek product line in production and going strong for years to come. I’ve owned several Logitech products (keyboards, mice, etc.) and I’ve always been happy with their reliability and functionality. I know that there have been concerns lately about the workmanship in Saitek products and consequently I hope the sale to Logitech improves the reliability of the entire Saitek product line.
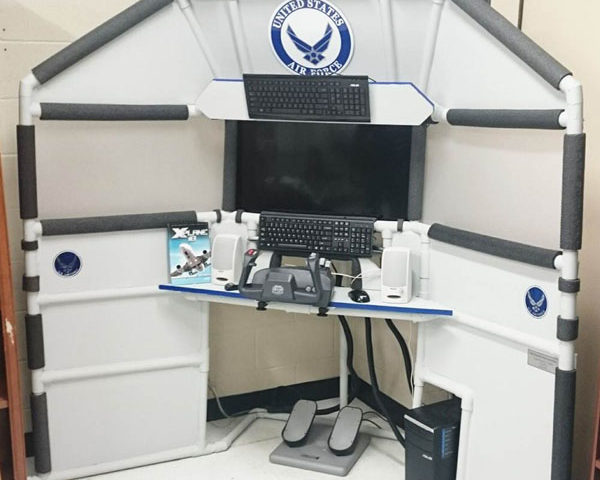
A young man named Ryan built this flight simulator for an Eagle Scout Service project. You might be wondering how a Flight Simulator Eagle Scout Project comes into being. If you are unfamiliar with service projects, the Scout must demonstrate that he has a plan for funding and building the project and he must also show that it’s a benefit to the community.
(Let’s be real: ALL flight simulators benefit the community, but I digress).
Ryan reached out to me and requested a donation of the T440 Triple Screen Flight Sim project video/manual and I granted his request. He raised enough money or donations to build the DIY flight sim as you see in the picture. He also modified the design to match his resources and needs. After completing the project, Ryan donated it to his Junior Reserve Officer Training Corps (JROTC) classroom. This is the official JROTC for the United States Air Force and the cadets use this flight simulator to learn about flying and careers in the USAF.
Quote from Ryan:
“Thank you so much for your flight sim plan donation for my Eagle Scout Project. As you can see I had to make some changes due to the equipment and available space in the JROTC class room… Thank you for making this project possible through your donation and helping me make the Air Force JROTC program at my high school more fun for the cadets learning about flight.”
Charitable Donations
I get requests regularly from people asking for free stuff, but I rarely fulfill those requests, even from people claiming to represent charitable groups.
There are several reasons I rarely give away free stuff
My videos and instruction manuals are the least expensive part of your project. If you really want to save money, try getting discounts on your displays, computer, or controls.
I do not receive follow-up from the people I donate to 99% of the time. All I ask for is a picture of the completed project and a description of how it’s being used. I have received a follow-up message only two times in nine years and both times they were Eagle Scouts that completed their service projects.
It’s more work for me. I have to manually generate download emails when I fulfill a donation. On the other hand, regular purchases are automatic and instant.
I regularly offer huge sales on all my products. If you sign up for my monthly newsletter, you will be the first to know about upcoming sales.
Roger Dodger Aviation does not make enough money. As long as I have to work at a day job, I probably won’t have the time to seriously consider the donations requests I receive.
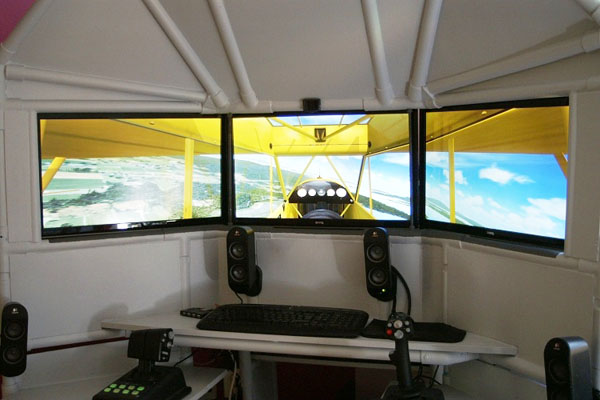
DIY triple screen flight simulator with HOTAS by Ola
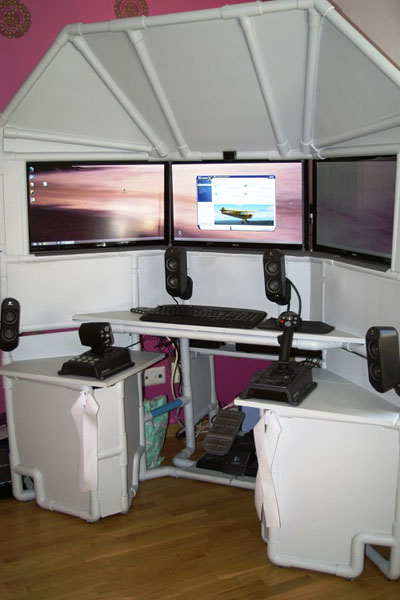
Great to see this innovative build from Ola! He made several modifications to the DIY Triple Screen Flight Simulator project to better match the type of flying he enjoys. You can see from the screen shot he is flying a Piper Cub over the summer countryside. He is also running Flight Simulator X. The stock project from DIY Flight Sims calls for a yoke and throttle quadrant, but Ola designed two podiums on either side that support HOTAS (Hands On Throttle and Stick) flight controls. I fully support modifying the designs to match your needs. It’s exciting to see all the variations that builders can create. I never predicted I would see a Triple Screen Flight Simulator with HOTAS.
Logitech G940
Ola is using the Logitech G940 HOTAS flight system with his home flight sim cockpit. I’ve always wanted to try out this system but I haven’t had the opportunity yet. I’ve owned lots of Logitech products and I’ve always been pleased with their reliability and affordability. For some reason, I’m not finding this available on Amazon or Newegg. Amazon actually does have it listed at $620 USD, which is way too expensive, but could be an indication this product is discontinued. I hope it’s not discontinued, but it is a force-feedback joystick, and it’s hard for those to sell successfully in the already competitive joystick market.
Especially relevant are the 2″ Velcro strips on either side of the triple screen flight simulator with HOTAS. You might not know this unless you’ve experienced it, but if you use rudder pedals while sitting in an office chair, you immediately find that pushing on the pedals, results in you rolling away in the chair. The remedy is to strap the chair in place with sturdy Velcro strips. Most of all, you literally get to “strap in” when preparing to fly your simulator.
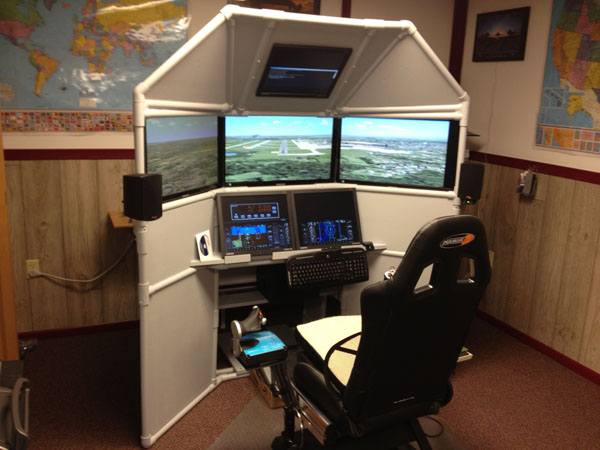
One of the best things about the Do-It-Yourself ethos is seeing all the ways people adapt the designs to fit their specific needs. Most noteworthy is this DIY six screen home cockpit built by my customer, Ted. He started with the stock DIY Triple Screen Flight Sim plans and adapted it to include larger monitors, and he added two auxiliary monitors for the instruments and a top monitor for the overhead switches.
It looks like he also built a custom gaming chair from a racing seat.
Want to know more? Ted says: “I’m only using one computer. I have a Matrox triple head to go for the three, 27inch monitors. The top monitor is operated with the second output on my main video card. I also have another video card that runs the bottom monitors… I made some adjustments because of the 27 inch monitors but it worked out ok. Thanks for your help with this.”
Look at the PVC pipe frame and how it is not restricted to only 90-degree and 45-degree angles as is so often the case with PVC projects. I invented a new building process for joining the PVC pipes together which opens up a world of options for innovative design.
The DIY Triple Screen Flight Sim video and instruction manual has grown over the years. Originally, I produced it and donated it to the National Airline History Museum. It is a fun, interactive, hands-on experience for the museum guests to fly a simulated vintage airliner. Most noteworthy, they are still using it after 5 years!
I also spearheaded the first successful flight simulator Kickstarter fund-raising drive in history, as a result, the museum did not have to purchase the simulator. Rafaela threw a pie in my face at a party celebrating the victorious campaign.
I love adding pictures to the Customer Gallery! Check out this customer-built DIY Flight Sim Pod that was completed by Russ in North Carolina. He has it set up to simulate general aviation airplanes and regularly uses it for cross-country flights that he posts about on his Facebook fan page. You can see it features a large HDTV as the primary display, an auxiliary monitor for the flight instruments, Saitek switch panels, and the Saitek Pro-Flight yoke/throttle quadrant.
It’s a great build and I would like to point out some details that Russ included that contribute greatly to a quality home flight sim project:
He painted it. A lot of people want to skip painting, but it’s such an important part of a truly finished project
Note the trackball mouse. I recommend this handy feature for any flight sim.
Rudder pedals! No twisty joysticks for us, we’re pilots.
Trim wheel: this is a great product from Saitek that I think is overlooked by way too many people in the flight sim community.
Trackball mouse and Saitek trim wheel
Rudder pedals and a quality headset
DIY Flight Sim Pod build by Russ
DIY Flight Sim Pod Size Comparison to Smart Car
Customer-Built DIY Flight Sim Pod
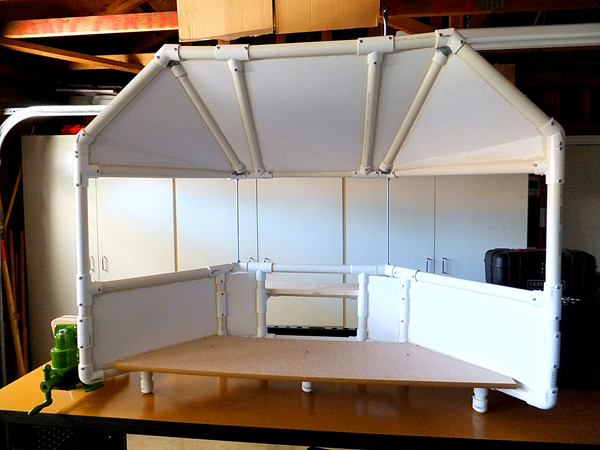
I’m happy to see pictures of a completed DIY Flight Sim Pod. This is one of my favorite projects but after I published it, I started to realize many people probably didn’t have room for a home flight simulator this large. The Pod is about the size of a Smart Car. Russ found a way to work with limited space by leaving off the Pod’s side walls. You can see in his video here that the walls of this room actually serve as the side walls for the flight sim …. smart!


Recent Comments