I was so excited to receive my new X52 Pro HOTAS joystick and throttle, but then I discovered they just don’t make them like they used to. So I bought the Logitech Saitek X52 Joystick Spring Modification kit from Ebay.
Why Use the Logitech Saitek X52 Joystick Spring Modification?
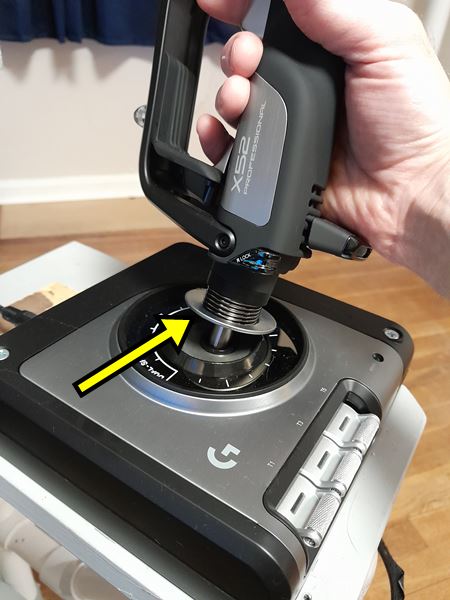
I bought a brand new X52 Pro joystick and discovered it is way too loose in the center of the joystick travel where the spring tension is the weakest. The weak spring tension causes the pilot to overshoot control inputs right where they need to make precise adjustments. Fortunately, TerraVestra’s Spring Plate kit was the remedy I needed. The kit is inexpensive, 3D printed, easy to install, and made in the USA.
How to Install the Logitech Saitek X52 Joystick Spring Mod
The kit includes four spacers of different widths that correspond to four different spring tensions. I used the 5mm wide spacer, which is the widest. If you need more spring tension than that, you can also stack the spacers on top of each other. The spacers fit on both the Logitech X52 and the X52 Pro. The manufacturer includes a handy installation tool. Bonus: this does not void the warranty and you don’t have to disassemble anything.
Here is the installation video, which is also available on their Ebay listing.
Let’s Go Flying!
The increased spring tension helps a lot! The spacer pushes down on the spring which increases tension between the spring plate and the joystick housing. But the increased tension also brings increased friction. I easily remedied this by applying a thin coat of bearing grease to the bottom of the spring plate (see picture). If you don’t have bearing grease, try lithium grease. Lithium grease is probably better for plastic anyway.
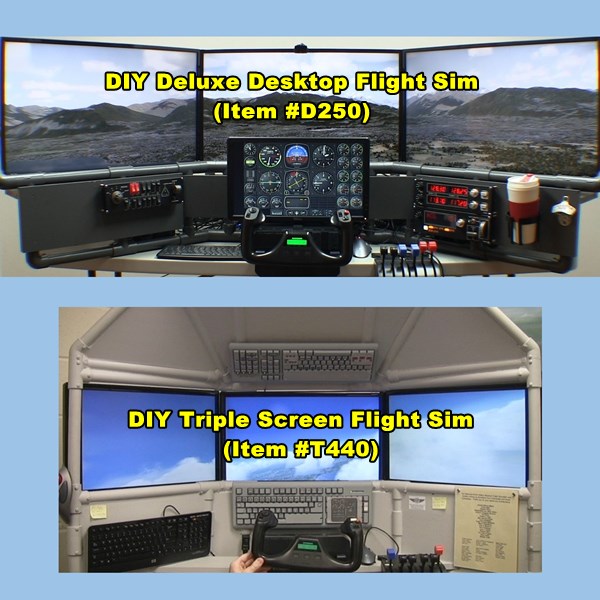
You’re looking for a home flight simulator for sale and you come across two similar DIY projects. How do you tell the two apart? The DIY Deluxe Desktop Flight Sim and the DIY Triple Screen Flight Sim are similar, but there are some significant differences too. Here are 7 ways to choose the best multi-screen DIY Flight Sim for you.
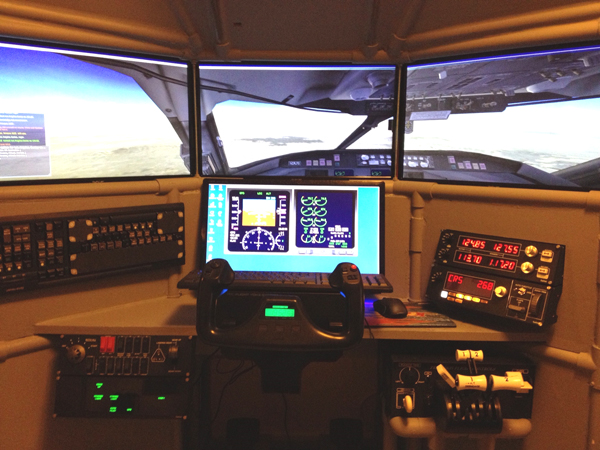
The D250 Deluxe is much more adaptable than the T440 Triple Screen.
D250: You can build the D250 with a yoke and throttle quadrant, or pair it with one of the DIY floor frames so you can use HOTAS style controls or even a helicopter collective. Match the D250 with the #F311 Side Joystick Frame, the #F321 Center Joystick Frame, or the #F331 Easy Helicopter Collective.
T440: On the other hand, the T440 is great with a yoke and throttle quadrant as originally designed. But if you want a joystick and side throttle, you would need to invent some modifications.
2. Recent Work
The D250 instructional video is much newer than the T440.
T440: I produced the T440 video in 2011 as a part of a successful Kickstarter campaign. I had a very short amount of time to design and build the project and a short time to film, edit, and publish the video. It’s still a great project though.
D250: I produced the D250 video in 2016 so it has better lighting, better sound, I used a better camera, and I had more experience editing than I did in 2011.
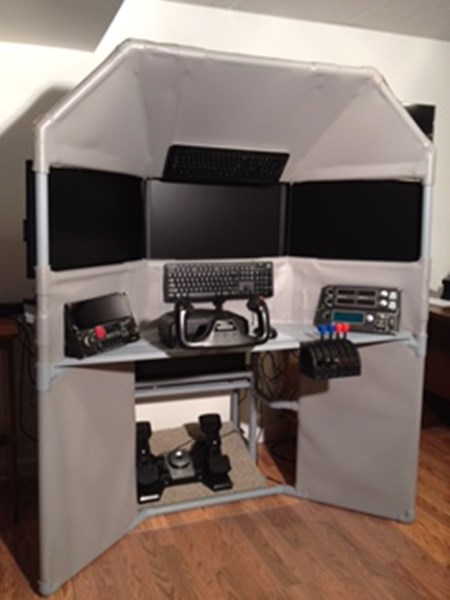
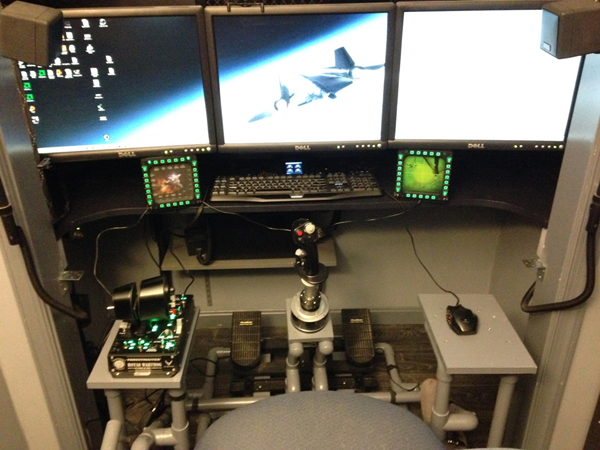
Deluxe Desktop Flight Sim with Side Joystick Frame
3. Displays
The D250 has larger screens.
D250: I used 32” HDTVs for the three main displays. The combined screen width is over 6 feet wide.
T440: I used 24” monitors for the three main displays. The combined screen width is less than the D250, but still impressive.
4. Keyboard Modification
The T440 was designed to have an overhead panel like an airliner. For this reason, the T440 Triple Screen bundle includes the DIY Airliner Keyboard Modification. The D250 doesn’t have a place for an overhead panel.
Home flight simulator for sale
5. Styrofoam
The T440 has Styrofoam, the D250 does not.
Builders use ½” styrofoam sheets when constructing the T440 Triple Screen project. Styrofoam may be cheap or expensive depending on where you live in the world.
6. Instrument Panel on a 4th Monitor
T440: You will see several builders in the Customer Gallery added a 4th monitor to display the flight instruments. I didn’t include anything about that in the instructions, those clever builders modified their projects on their own.
D250: I included instructions to add an optional 4th monitor for the flight instruments.
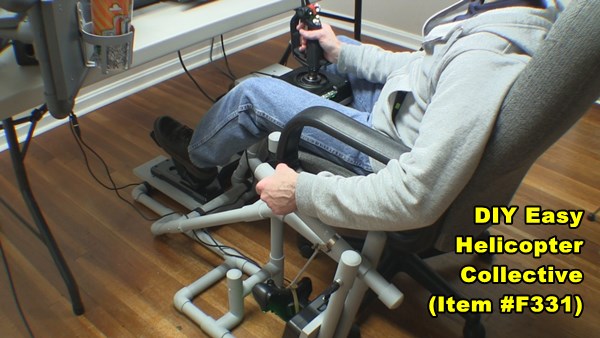
DIY Easy Helicopter Collective paired with the Deluxe Desktop Flight sim
7. Ease of construction
I think the D250 is easier to build than the T440.
D250: The project doesn’t require gluing any Styrofoam panels in place. But the D250 does include 1×8 boards. If your saw won’t cut 1×8 boards, you’ll need to get that done at the store when you buy them.
T440: The project doesn’t require you to cut any lumber wider than a 1×6. You do cut Styrofoam with a utility knife, but it is not difficult just a little time-consuming.
Home Flight Simulator for Sale
You have a lot of choices when it comes to your home flight sim project. I hope this comparison helps you.
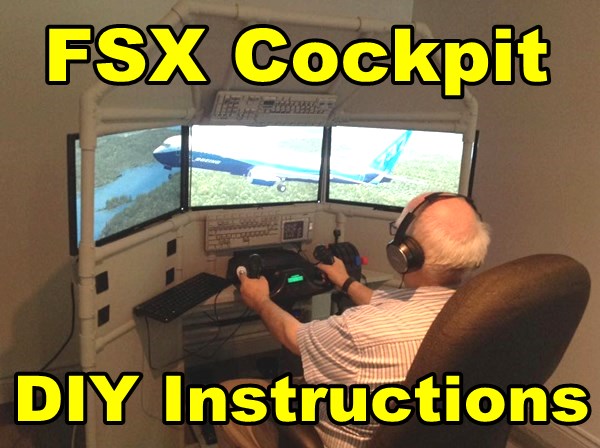
This is the greatest difference between Roger Dodger Aviation and the other guys: my customers actually complete their projects! My online courses include instructions for each step of the project including video clips, diagrams, pictures, and printouts. You can build a FSX cockpit DIY project like these guys!
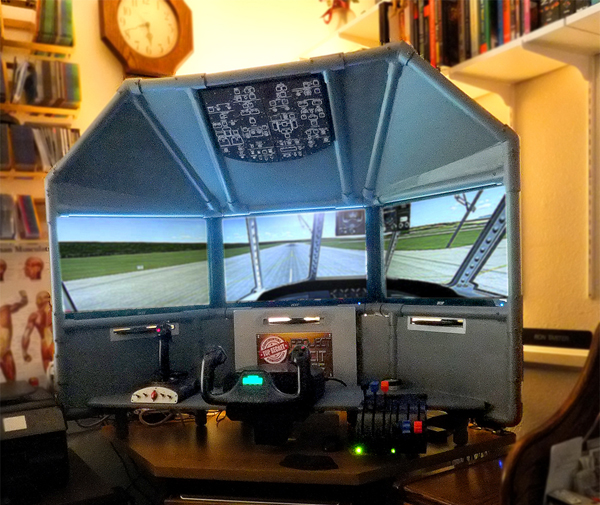
DIY Deluxe Desktop Flight Sim
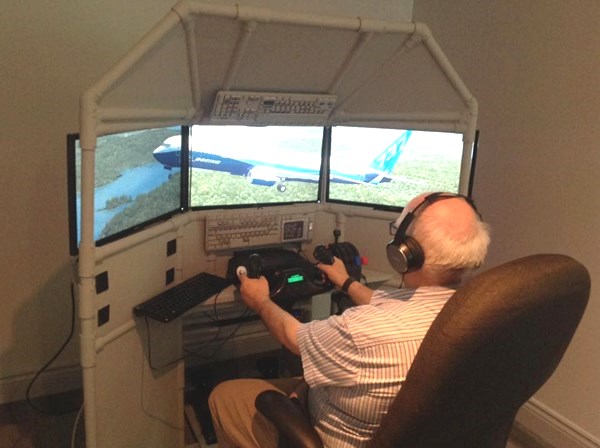
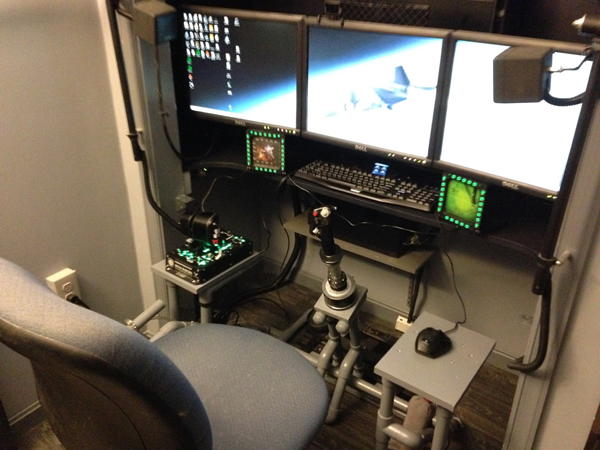
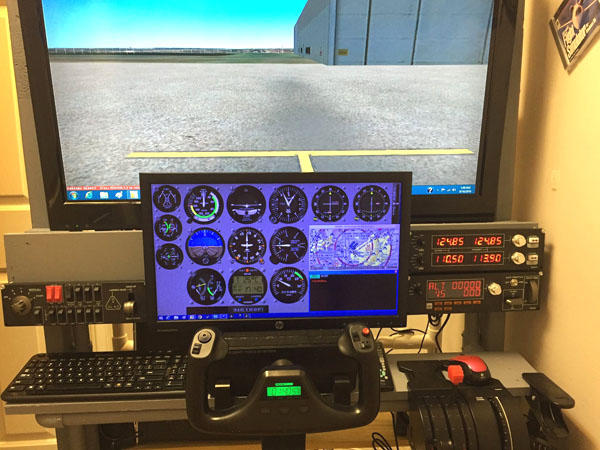
First of all, look at this beautiful DIY Deluxe Desktop Flight Sim item #D250. It was built by Greg in Savannah Georgia, USA. This is one of my favorite designs because it is so versatile. Builders can create exactly the type of home cockpit they need to match their flying interests. You can install a yoke and throttle quadrant in the #D250. On the other hand, you can also use a HOTAS joystick and throttle or even a helicopter collective.
The DIY Triple Screen Flight Sim, item #T440 is still my most popular DIY course. As a result, I get more T440 pictures than any other project. Two customers recently sent me pictures of their completed projects (see below). Wayne and Richard both build the same project but built it to suit their particular simulation requirements.
DIY Triple Screen Flight Sim built by Wayne
DIY Triple Screen Flight Sim built by Richard
Help Spread the Word: FSX Cockpit DIY Projects
Don’t let Facebook bury these success stories! These men worked hard on their FSX cockpit DIY projects and deserve to be congratulated. When I post on Facebook, the message only goes out to 10% of my fans. Please LIKE, COMMENT, and SHARE to spread the word. If you are reading this as a blog post, please link to it or share it with friends. Let’s show these guys our community appreciates a job well done.
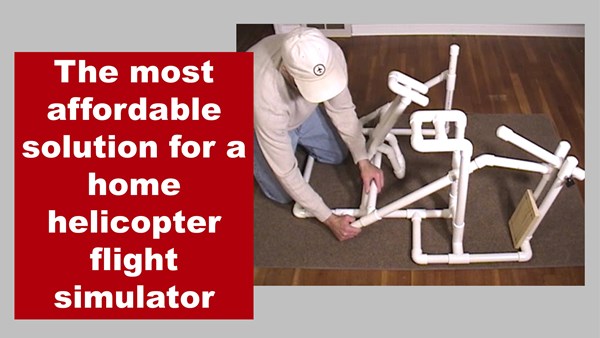
When you try to fly helicopters with regular HOTAS flight sim controls one thing is perfectly clear: a throttle is definitely not a collective. A legitimate helicopter collective control is essential if you fly (or are learning to fly) helicopters. Unfortunately, retail collective controls are surprisingly expensive. Consequently, I created an online course that shows you how to build your own helicopter simulator controls.
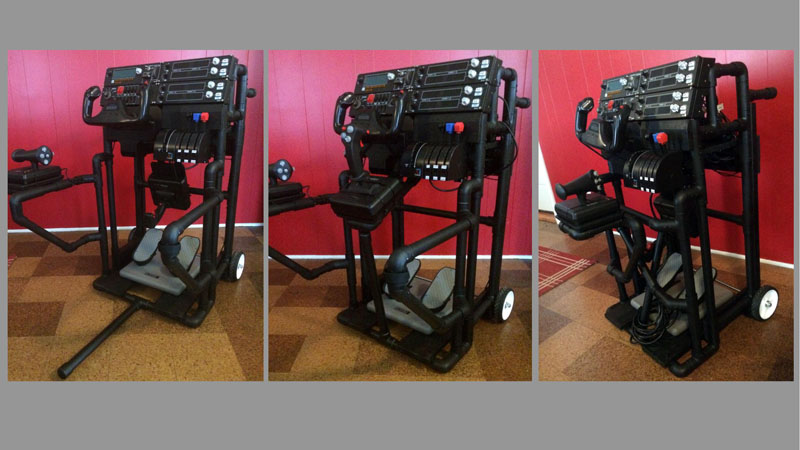
The DIY Easy Helicopter Collective
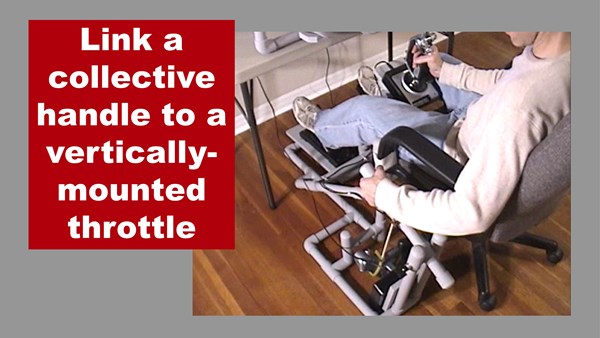
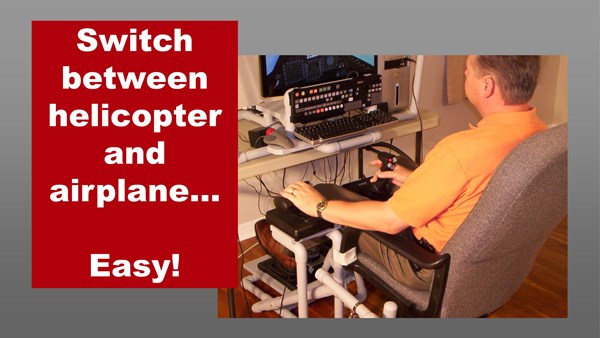
This project does two major things. Firstly, it allows you to use a standard HOTAS throttle as a collective. The PVC pipe framework suspends the throttle vertically and connects it to a collective lever via a linkage. Most noteworthy: you don’t have to modify the throttle because the linkage straps onto the throttle handle without harming it. You can adjust the sensitivity of the collective by moving the linkage. Also, you can adjust the collective resistance with a friction knob.
The second thing this project does is make it easy to switch back to airplane configuration. Maybe you still want to fly an airplane once in a while. You can add the optional throttle stand and easily move the throttle for a HOTAS (hands on throttle and stick) control configuration. Best of all, you don’t have to change the control assignments in the flight sim software. It’s so easy! It’s also easy to build your own helicopter simulator collective. That’s why I named this project the DIY Easy Helicopter Collective.
DIY Easy Helicopter Sim Collective
For your Helicopter Sim
Link to a Vertical Throttle
Most affordable helicopter sim collective
DIY Easy Helicopter Collective
Build with inexpensive materials
Easy to build
Online course
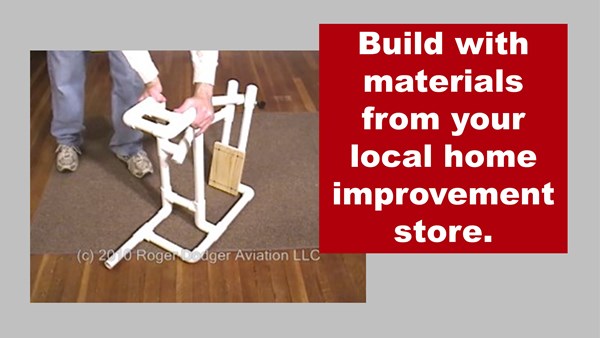
I produced an affordable, online course that shows you how to build your own helicopter simulator collective. I show you how to build this project with inexpensive materials from your local home improvement store. We’ll be working with PVC pipe, lumber, paint, and other materials.
This comprehensive course includes:
Video clips
Full text instructions
Diagrams and pictures
Pipe frame maps in US and Metric measurements
Printouts
You can view the course on nearly any device even smart phones and tablets. See the full curriculum and a free trial at this link. Most noteworthy, the DIY Easy Helicopter Collective course is available now at a new lower price!
The F331 DIY Easy Helicopter Collective is one of my favorite projects because it fills an urgent need in the flight sim community. Try to find a helicopter collective control for a reasonable price. You will not find one, they are all hundreds of dollars. My DIY Helicopter Simulator Controls are still, after several years, the most cost-effective solution for home flight sim pilots. My tutorials show you how to build a framework from PVC pipe. You then attach standard HOTAS joystick/throttle and rudder pedals. The new, upgraded version of these tutorials are completely online and can be accessed with any device. No more cumbersome downloads!
DIY Helicopter Simulator Controls and flight sim
This is how to build DIY Helicopter Simulator Controls
DIY Easy Helicopter Collective you can build
DIY Helicopter Simulator Controls online tutorial
This is how you build the DIY Easy Helicopter Collective
How do you get the Upgrade?
This new online version is FREE if you’ve already bought the F331 DIY Easy Helicopter Collective. Email me at DIYflightsims@rogerdodger.net to get your upgraded version. Be sure to tell me what email address you used when you ordered so I can look you up. Then, I’ll send you a coupon code that will allow you access to the online lessons for free. You can then build your own DIY Helicopter Simulator Controls and get flying… and hovering.
More about the DIY Helicopter Simulator Controls
Have you ever tried to fly a helicopter with a regular flight sim throttle? It’s not enjoyable. There is a reason why helicopter controls look different than airplane controls – they ARE different. Once you try a helicopter collective, you will never want to go back to a regular throttle. When you use a collective, the movement is completely natural, you don’t have to even think about the controls any more, just make the helicopter do what you need it to do. I could never hover, or even land a helicopter before I built my collective. Now everything is easier.
Below is a demonstration of the DIY Easy Helicopter Collective, among other things…
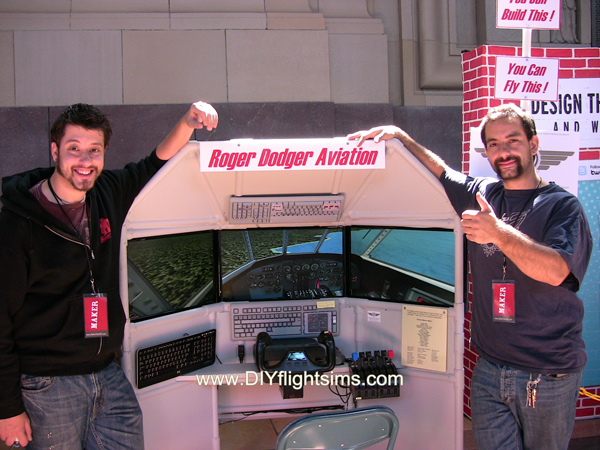
A Maker Faire is a festival of invention and creativity. In the words of Make Magazine it is, “an all-ages gathering of tech enthusiasts, crafters, educators, tinkerers, engineers, science clubs…” You would totally expect to find a DIY Flight Simulator at Maker Faire. We didn’t just bring one, we’ve brought four flight sims to Maker Faire so far. I say “we” because several friends helped me. There’s no way I could have done this alone.
DIY Flight Simulator at Maker Faire
Flight Sim and Arc Attack at Maker Faire
Flight Simulator and Super Awesome Sylvia
Flight Simulator at Maker Faire
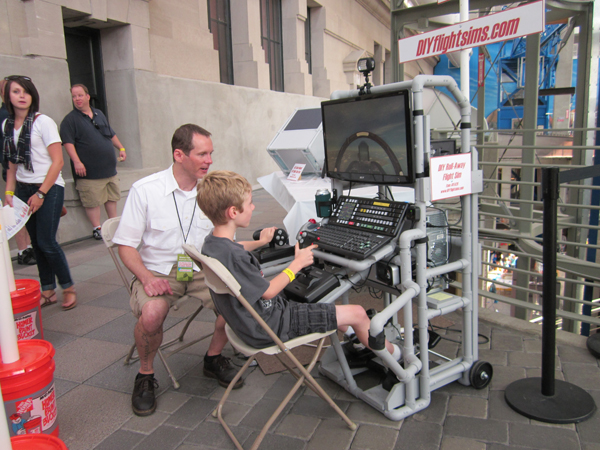
Roll-Away Flight Sim at Maker Faire
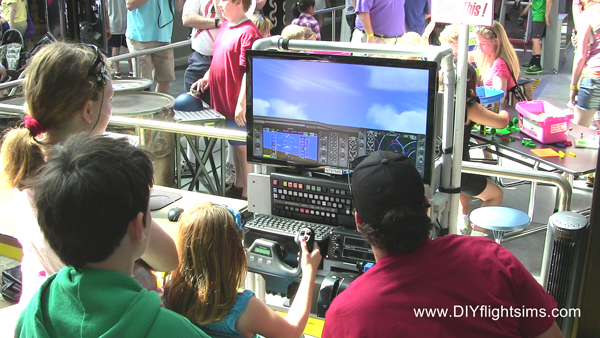
Flight Simulator at maker Faire
Space Flight Simulator at Maker Faire
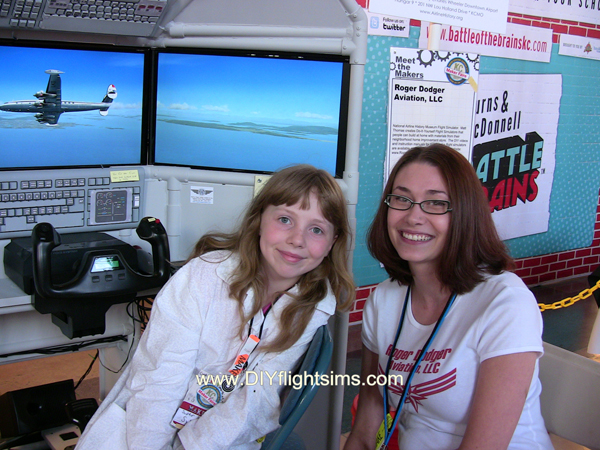
Triple Screen Flight Sim and Shannon at Maker Faire
Two flight sims at Maker Faire from Roger Dodger Aviation
DIY Triple Screen Flight Sim at Maker Faire
I funded the development of the T440 Triple Screen Flight Sim with a successful Kickstarter Campaign and I barely finished it in time for Maker Faire. Transporting a flight sim of this size was a terrible logistical challenge, but we did it. The T440 worked perfectly and it was a huge thrill for me to see a crowd of people around the simulator all weekend. So many people, young and old got to try it out.
My goal was to deploy a flight simulator at Maker Faire and I did it, but it was way too difficult to transport for just a weekend event. This experience at inspired me to develop a much more mobile flight simulator.
DIY Roll-Away Flight Sim: Three Versions!
Problem: it was too difficult to transport a flight simulator at Maker Faire. Solution: I developed a much more mobile flight simulator that could be moved as a single unit… on wheels! A Roll-Away Flight Simulator! The first version of the E420 Roll-Away was basically a HOTAS set up to fly a jet fighter. The kids at Maker Faire loved it and is was super easy to transport. I was so pleased with this that I brought two Roll-Away Flight Sims to the next Maker Faire. The second version had a yoke and throttle quadrant and later became the E430C. You can build either of these two types of Roll-Away Flight Sims with the instruction manuals and videos I created for you.
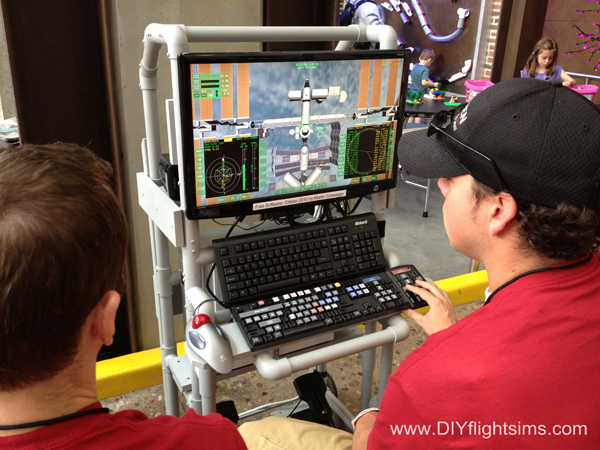
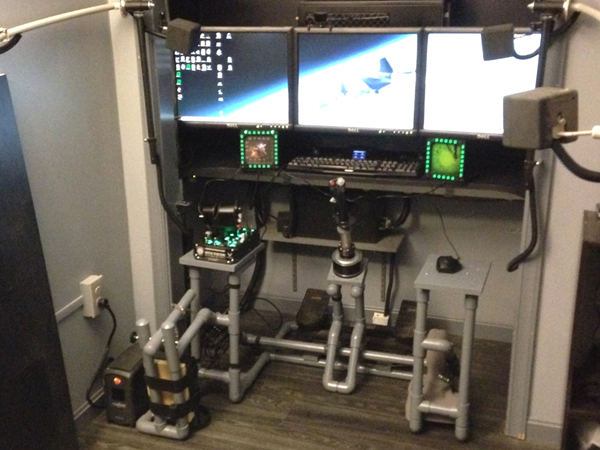
The third version of the Roll-Away Flight Sim was a specialized type I created for kids at a science camp. I later brought it to Maker Faire. This version had no flight controls, only buttons to control a simulated spaceship. We used Martin Schweiger’s Orbiter as the demonstration software. The simulator is very realistic and teaches you a lot about Newtonian physics when controlling a spaceship in zero gravity.
Big Help from Friends
Notice there are several people in these pictures that are not me. I could not have done this alone. We helped hundreds of people try out these flight simulators, and had a lot of fun while we were at it. Many thanks to Aaron, Nick, Jim, Lindsy, Julie, Joe, Jason, Shannon, Michael, and Jennifer!
I’m always impressed by the many ways my customers modify the DIY Flight Sim projects to meet their needs. It’s one of the best things about this gig. Customers change the home cockpit plans a little or a lot depending on their needs and resources. Check out these innovative DIY cockpit solutions from the Customer Gallery.
Rich’s Quad Screen Flight Sim
My customer Rich built a T440 DIY Triple Screen Flight Sim and installed an additional screen for the flight instruments. This creates a stunning degree of realism because your instruments are positioned close and you focus your vision outside to see the surrounding environment. Similarly, I demonstrated a quad display setup with the DIY Deluxe Desktop Flight Sim and Air Managerpowering the instruments.
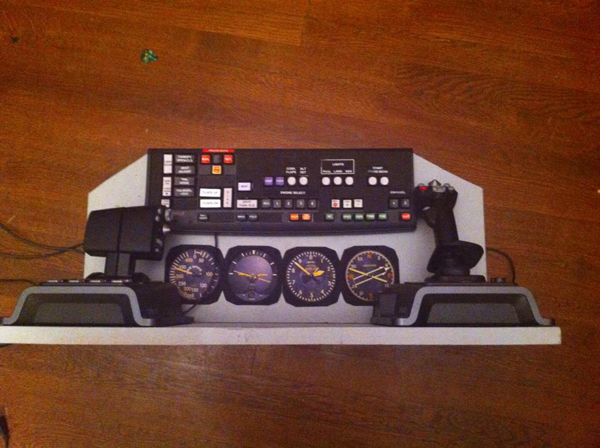
You can see Rich added four Saitek switch panels and the K140 DIY Airliner Keyboard Mod. Do you think that is a Go Flight TQ6-ADV throttle quadrant? It’s not. It might be two Saitek throttle quadrants with after-market replacement handles attached. You can find such handles from FlightSimPM and others for your own innovative DIY cockpit.
Quad screen flight sim with switch panels, throttle quad by Rich
Thrustmaster Warthog HOTAS for Flight Sims
You can also see more usage of the Thrustmaster Warthog joystick and throttle with these projects. Here George modified the F331 DIY Easy Helicopter Collective to also include the Thrustmaster throttle. He can use it to simulate airplanes or spaceships in its shown configuration. He can also relocate the throttle to a platform below the collective handle and effectively simulate helicopters. Here is another example of flight sim builders buying quality hardware to equip their creations. Most of all, he built the whole simulator in a closet and included triple screens and Thrustmaster Cougar Multi-Function Panels (MFPs) for this innovative DIY cockpit.
Home flight sim helicopter collective, triple screens by George
A Very Special Triple Screen Flight Sim
Customer Ron built his T440 Triple Screen Flight Sim so it would fit on his desk. Keep in mind, the original plans are for a self-standing frame. Ron was able to modify the frame extensively so it fit neatly on his corner desk. He also added the Saitek yoke and throttle quadrant that we see so often in home flight simulators. Finally, the virtual cockpit you see there is from a Lockheed Constellation which is exactly what we use in the flight sim I built for the National Airline History Museum.
Desktop triple screen flight sim by Ron
More Innovative DIY Cockpit Solutions
Enjoy these other customer projects that I recently added to the Customer Galleries. More multi-screen projects and more modified frames for HOTAS and helicopter collectives. In addition, I have many more pictures to add to the gallery and I hope to do that in the coming weeks. Happy Landings!
If you like this post, please leave a comment. That will enable the mystical internet algorithms to spread it to more people.
Home helicopter collective by Joshua
Home helicopter collective by Joshua
WW2 flight sim keyboard mod by Michael
Home helicopter collective with mods by Robert
DIY Triple Screen Flight Sim by Chris
Home flight sim helicopter collective, triple screens by George
Home flight sim helicopter collective, triple screens by George
DIY flight sim helicopter collective and triple screens by George
Quad screen flight sim with switch panels, throttle quad by Rich
Desktop triple screen flight sim construction by Ron
I added more pictures of DIY Flight Sim completions to the new expanded Customer Gallery. Note there are now three distinct examples of customers adding the popular Thrustmaster Warthog HOTAS joystick to the #F321 DIY Center Joystick Frame.
Thrustmaster Warthog and other Additions
Several customers modified the #F321 Center Joystick project slightly to accommodate the Thrustmaster Warthog joystick. They did this by shortening the center joystick stand by several inches and then bolting on the joystick. The Thrustmaster Warthog originally comes with a flat, square base which can be easily removed. Notice that the DIY Center Joystick Frame works well with Saitek rudder pedals because of their wide stance. You can comfortably straddle the center joystick to reach the pedals. Note the Saitek Combat Rudder Pedals installed on the #F321, but you can also use the Saitek Cessna Rudder Pedals. I originally designed the #F321 project around the early model Saitek Pro Flight Rudder Pedals, witch still work well. You can use the CH Rudder Pedals but they are difficult to use because they are narrow and makes it harder to straddle the center joystick stand.
Center Joystick or Side Joystick?
Check out Craig’s pictures in the new Customer Gallery 2. Craig created one of the most attractive DIY Flight Sim completions. He built the #F321 with a removable center stand and with side stands on both sides. He can now switch between a traditional center joystick and a HOTAS side joystick. Notice the D-ring fasteners he uses to attach the center stand.
Rob modified the #E420 DIY Roll-Away Flight Sim to match his needs and style of flying. He added an expanded mid-shelf for the Saitek yoke and throttle quadrant and a swing-out platform for the compact mini-keyboard. Also note the additional platform for the mouse and mouse pad. The Roll-Away Flight Sim frame is wonderfully mobile because Rob installed four castering wheels to it. Two of the castering wheels can be locked in place so he can comfortably use the rudder pedals without worrying about the frame rolling away. You should always use rudder pedals, they are an important part of DIY Flight Sim completions.
People around the world are building home flight simulators this winter. These guys find inexpensive materials at home improvement stores and build their own airplane cockpit at home.
January is BUILD MONTH
Why is January a great time to build a DIY (Do It Yourself) flight sim project? First of all, many people get new flight simulator software and computer equipment for Christmas and are ready to upgrade their home cockpit. Also, the holidays are over and now people are returning to their hobbies. Flight simulation is a great way to learn about aviation during the cold winter months. Consequently, I typically see an increase in DIY Flight Sim business and website traffic starting in January.
You don’t necessarily need a workshop for building home flight simulators, so many people build their project in an apartment or even a dorm room. You don’t need outside ventilation because no harsh chemicals, paints, or adhesives are used with these projects so you can build indoors. Let it snow!
Six Screen Home Flight Simulator
DIY Flight Sim Pod build by Russ
Transforming Roll-Away Flight Sim by Dan
T440 Triple Screen Flight Sim customer completion
Matt Thomas building home flight simulators
Inexpensive Components and Materials
Is your home flight simulator nothing more than a desk with a few monitors and a joystick? You can make a more realistic airplane cockpit with inexpensive materials from a home improvement store. These guys build home flight sims with PVC pipes, lumber, and Styrofoam insulation panels. Notice they also painted their projects because painting is also inexpensive, easy, and gives the project a truly finished appearance.
We are fortunate to live in a time when we have so many affordable choices for computer equipment and flight controls. For example, it is now possible to use multiple high-definition HDTVs as displays for a flight simulator. In addition, computers and graphics cards are more powerful than ever. We have more choices than ever for flight sim control yokes, rudder pedals, throttle quadrants, switch panels, and more. Finally, the flight sim software of today is better than ever. Lockheed Prepar3D, X-Plane 11, FSX Steam, and Aerofly FS2 all boast improved performance and functionality.
Combine inexpensive building materials with affordable computer equipment and you can have a powerful and realistic flight simulator for your home.
Customizing and Building Home Flight Simulators
Builders modify their projects to match their needs and resources. For example, they can scale a frame to fit around 24″ monitors, or 27″, or 32″ or whatever. Also, they can use one large display, or multiple displays. Some builders add modified keyboards, additional lights, or even drink holders. Are you building in a spare room or just a spare closet? These guys can fit a fully functional flight sim just about anywhere. If you typically fly airplanes with a yoke and throttle quadrant, then that is what you will want to build. On the other hand, if you use a HOTAS joystick and throttle, then you will want a DIY frame that supports those flight controls. If you fly helicopters, there’s a helicopter collective project for you too. See all these examples of customized flight sim projects in the Customer Gallery.
Get Started!
The most difficult part of any building project is just getting started, so get going now. You may make some mistakes along the way, but they will be inconsequential because you’re using inexpensive materials. Get building and get done, so you can get flying!
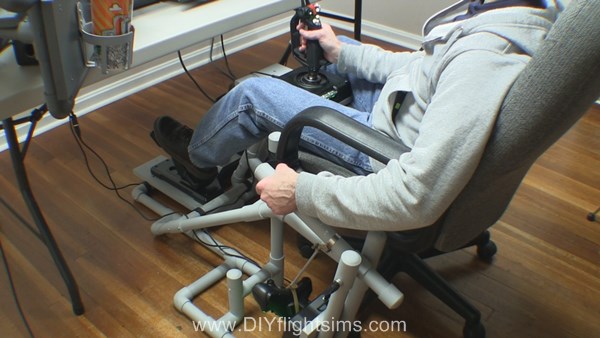
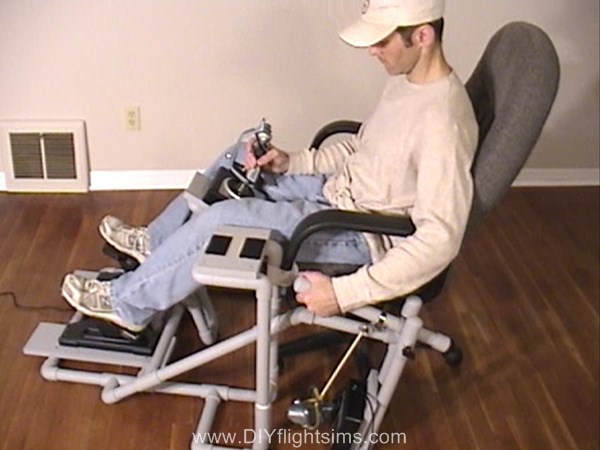
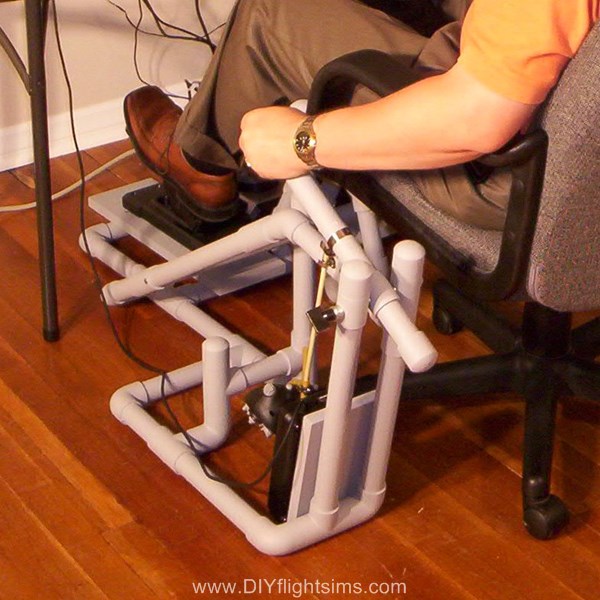
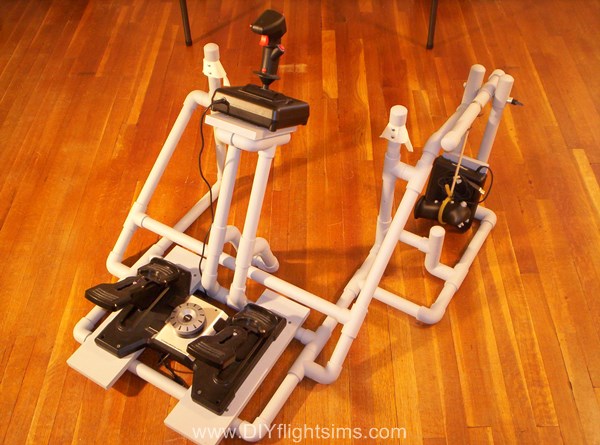
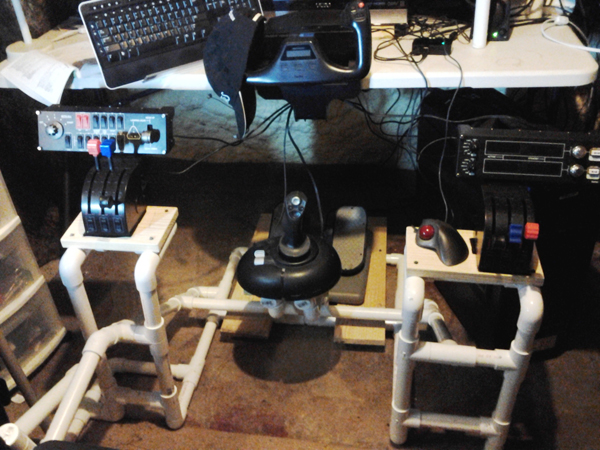
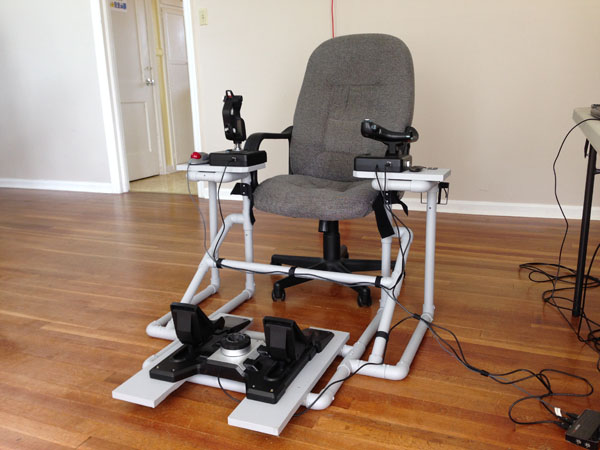
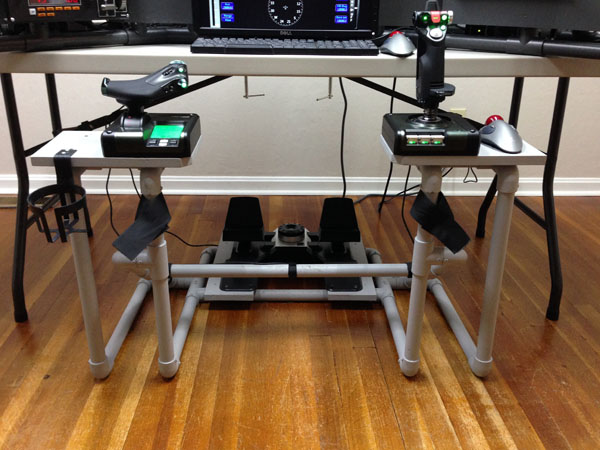
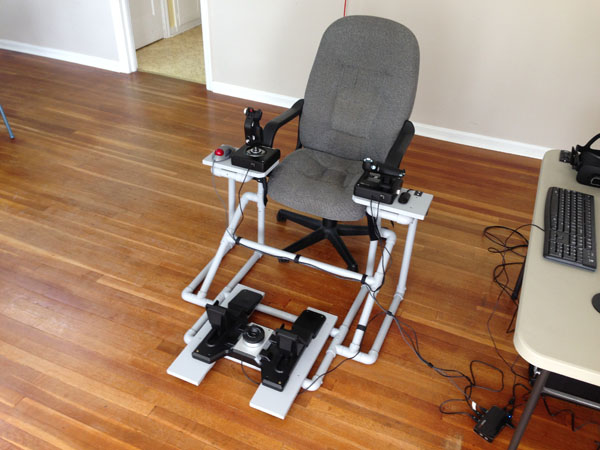
The DIY Side Joystick Frame is one of my most popular projects, and it’s very versatile. Even though I published this project 6 years ago, the design has stood the test of time. Yet, as great as it is, I have recently made a few modifications to the design that you might find helpful for your project. Read on for 5 Modifications for a DIY HOTAS Chair for Virtual Reality and More.
A True HOTAS for your Flight Sim
The DIY Side Joystick Frame, Item #F311, makes a true HOTAS (Hands On Throttle And Stick) possible for your flight simulator because the project also includes rudder pedals. True pilots use rudder pedals, not joystick twisty grips so always remember that. I originally envisioned the F311 as useful primarily for jet fighter simulators, but now, many customers are using it for space sims like Elite Dangerous and Star Citizen.
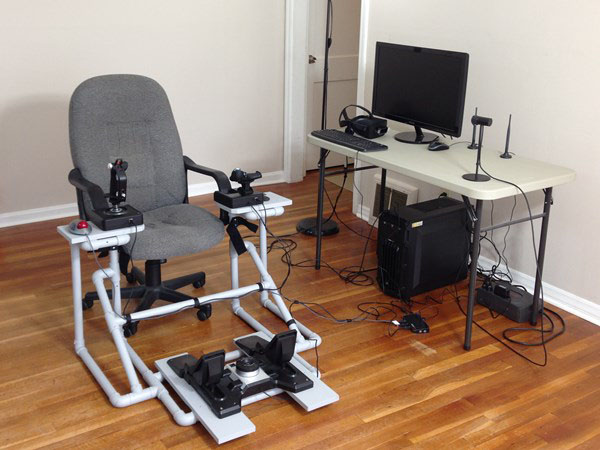
Use the F311 in combination with a Virtual Reality headset. Remember, when you wear a VR headset, you can’t see your keyboard any more and any functions you have assigned to your keyboard keys are literally out of sight. You can also use the F311 with a traditional multi-monitor setup like the DIY Deluxe Desktop Flight Sim (Item D250). The F311 is delightfully versatile and useful. Use these 5 Modifications for a DIY HOTAS Chair to update the F311.
5 Modifications for a DIY HOTAS Chair
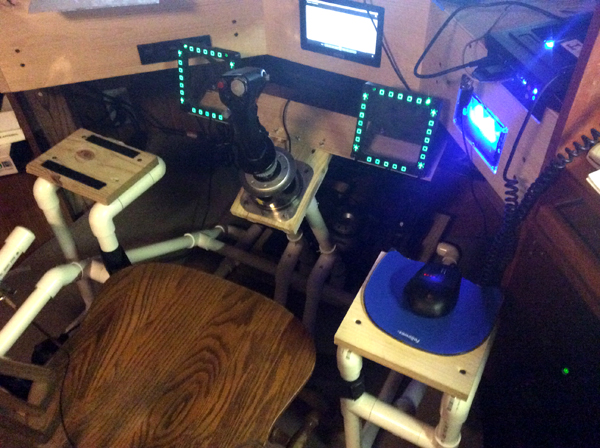
F311 HOTAS with a multiple screen flight simulator
F311 HOTAS in combination with VR
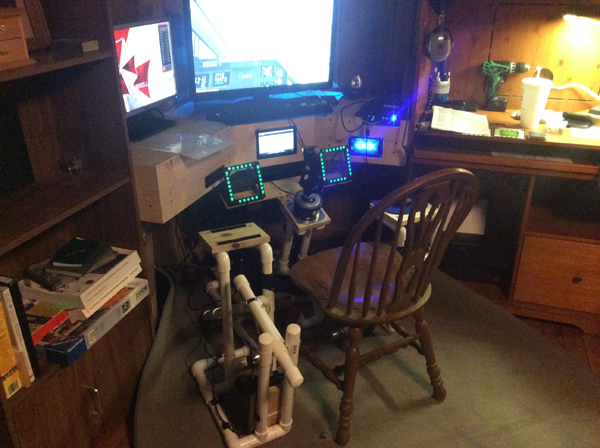
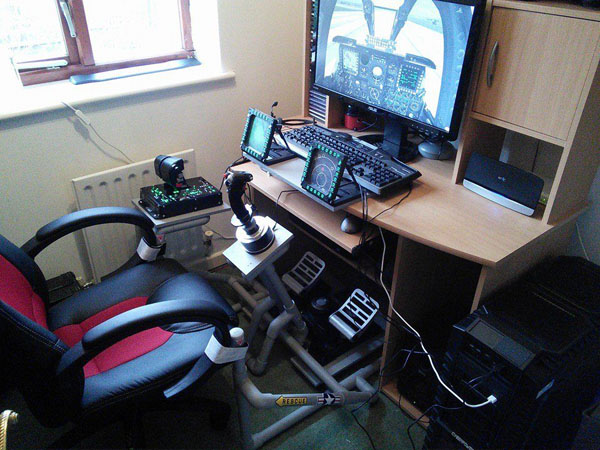
DIY Side Joystick frame with a quad screen flight sim
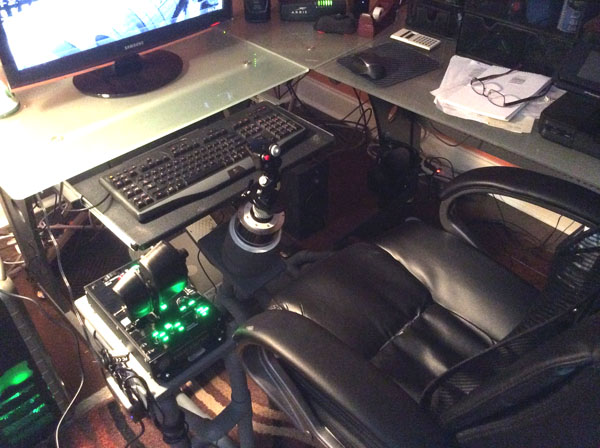
F311 HOTAS chair for flight sims, Saitek X52 and trackball mouse
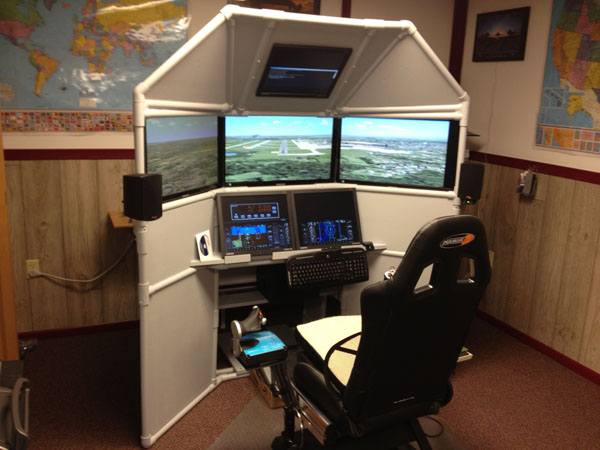
F311 Side Joystick Frame with D250 Deluxe Desktop Flight Sim
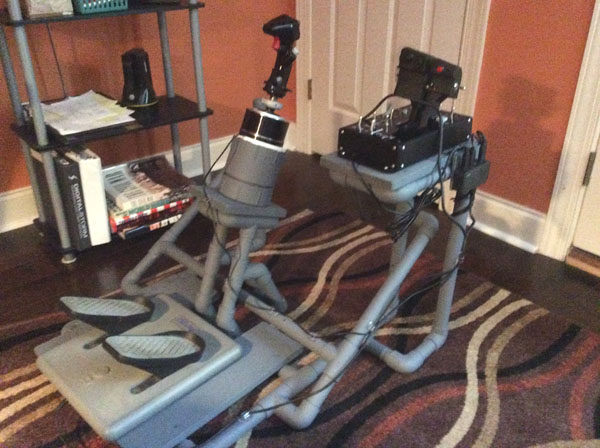
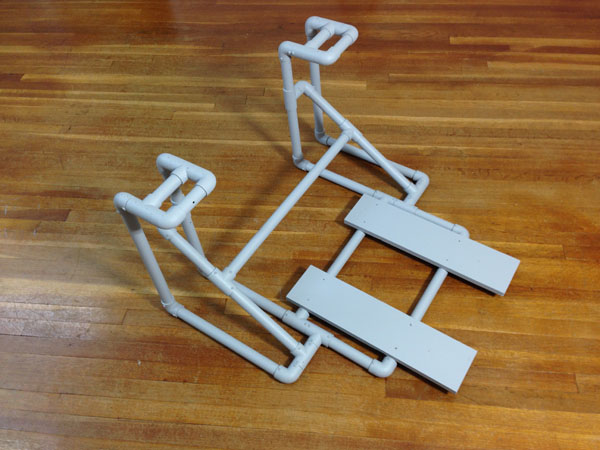
F311 Side Joystick frame without the Side Stand platforms
5 Modifications for a DIY HOTAS Chair
I made five main modifications to adapt the F311 Side Joystick Frame for my current requirements. None of these modifications are difficult. If you can build the F311 in the first place, you can certainly make these modifications or include these changes during the initial build.
1. Wider Side Stand Platforms
First of all, I installed wider side stand platforms, cut from 1×8 boards. To be clear, the PVC pipe side stands did not change, just the the boards that attach to the top of the stands. I topped the side stands with 1×8 boards, 12″ long. The wider boards give you room for a trackball mouse next to the joystick and give you room next to the throttle to set down your phone or whatever. Most importantly, you can place the controls in a more ergonomic location. This means placing the joystick and throttle in line with the chair’s arm rests. This is so important! Place the joystick and throttle so that your arms sit straight on the chair’s arm rests. This will allow you to fly comfortably for hours.
In addition, I attached the joystick and throttle with wood screws instead of Velcro. I also trimmed the inside corners of the 1×8 boards by 1″ and sanded the edges so my legs wouldn’t get caught on the corners.
2. Longer floor boards
I use the Saitek Pro Flight Cessna Rudder Pedals, and I really like them, but they have to be positioned further away from the pilot. The rudder pedals attach to the Floor Boards with Velcro, but the original boards were too short. Therefore, I replaced them with two 1×6 boards, 22″ long. You might not need to make this change for your rudder pedals.
3. Raised center stabilizer
I also raised the center stabilizer bar to allow room for the Saitek Pro Flight Cessna Rudder Pedals. Specifically, the back of my ankles banged into the stabilizer bar, so I had to move it. It is now 6.5″ higher than it was before.
4. Self-drilling screws
I now use self-drilling screws in everything I build. Back in 2010 when I designed this project, I used Liquid Nails Project Glue to attach all the PVC pipes and fittings. This allowed for some cost-savings, but self-drilling screws are far superior. The screws allow for a simpler assembly with no overnight dry time. In addition, the screws create a much stronger frame. Lastly, you can remove the screws later if you decide to modify the frame. I absolutely recommend using 1/2″ self-drilling screws to build DIY Flight Sims from PVC pipe.
Don’t fly thirsty! I include a cup holder with almost every project I design. The cup holder is located next to the throttle and it’s easy to find it, even when wearing a VR headset. I use these inexpensive cup holders from Amazon.
If you’ve already built the DIY Side Joystick Frame, Item F311, or if you haven’t built one yet, these 5 Modifications for a DIY HOTAS Chair can enhance your home flight simulator experience for years to come.


Recent Comments