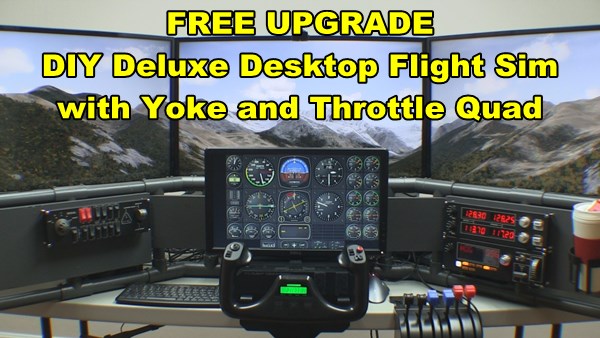
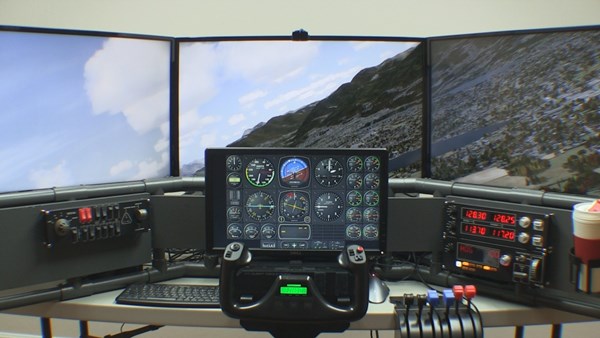
The D250 DIY Deluxe Desktop Flight Sim project shows you how to build a multiple monitor flight simulator for your home. Until now the project was only used with a joystick and side throttle. However, this update makes it possible to use the D250 frame with an airplane yoke and throttle quadrant. The instructions show you how to raise the center instrument panel to make room for the yoke. Also, the Saitek switch panels are mounted in a different configuration which are detailed in the new plan drawings. The new switch panel placement is better for a pilot that is flying with a yoke. Use the D250 home cockpit with your FSX multiple monitors setup… or P3D, or X-plane, or Flight Sim World. The project is platform independent so you can use it with any flight sim program.
Flight Sim FSX multiple monitors
online DIY flight sim training
FSX multiple monitors
View the Builder Academy on your phone or tablet or anything
How To Get Your Upgrade
This is a FREE upgrade if you already purchased the D250 Deluxe Desktop Flight Sim. Email me at DIYflightsims@rogerdodger.net to get your update. Tell me what email address you used when you ordered the project so I can verify your order. I’ll send you a coupon that will allow you free access to the project.
You can get the updated D250 project here and then access the plans on any device. The D250 instructions are now 100% online, so there are no downloads to worry about. The instructions, videos, pictures, and printouts are all categorized for easy access. You will receive ALL of the instructions, so scroll down to “Instrument Panels: Yoke and Throttle Quadrant” to see the updated material.
FSX Multiple Monitors
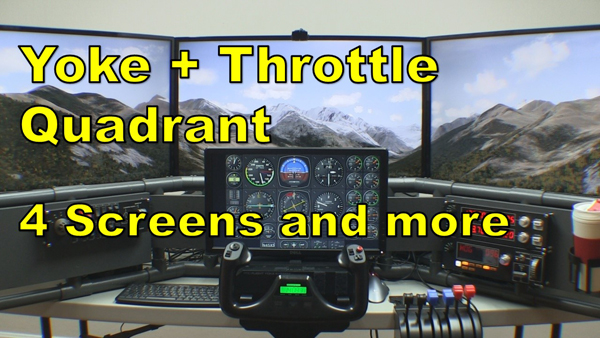
The new upgrade means that the DIY Deluxe Desktop can be combined with the F311 Side Joystick HOTAS Frame, the F321 Center Joystick Frame, or utilize the yoke + throttle quadrant option. It’s a multiple monitors flight simulator project that works with three screens. In addition, you can add a fourth smaller screen for the flight instruments. This project is one of the most versatile DIY Flight Sim projects I’ve ever created. I’m very excited to present it to you in this new mobile format.
The Builder Academy is a comprehensive resource for learning all the basic flight sim building skills. What is it like to build a DIY Flight Sim project? The Builder Academy will show you. In addition, you can also learn about modifying the existing DIY Flight Sims projects. If you’re wondering how to build a flight simulator, this is your first, best resource. By the way, it’s free!
Building a flight simulator from PVC pipe
View the Builder Academy on your phone or tablet or anything
How to display flight instruments in your simulator
How to modify the Saitek yoke
Introducing the Builder Academy
How to install Saitek Switch Panels
Builder Academy Content
What is in the Builder Academy? Some of the videos in the Builder Academy were formerly a part of the “Free Videos” folder included with some purchases. Other videos were first published on YouTube, but are now only available in the Builder Academy. Some of the content is new and available only at the Builder Academy. Finally, all of the content assists you in different ways when you’re learning how to build a flight simulator. This is an overview of the course curriculum:
Recommended Tools
Building with PVC Pipe (new)
Self-Drilling Screws
Add a Monitor for the Flight Instruments
Display Flight Instruments with Air Manager
Install Saitek Switch Panels
Styrofoam Body Panels
Prototyping – How to Modify DIY Flight Sim Projects
Saitek Trim Wheel Adapter
X52 Saitek Throttle Fix
Saitek Yoke Modifications
CH Yoke Modifications
Paint for Home Flight Simulators
USB Cable Management
Change Log
Training Available Wherever You Are
The Builder Academy is available on nearly any device. As a result, you can view the training on a tablet or phone while you’re in your workshop or view it on a laptop or desktop. Also, there are some printouts and templates for certain projects, so you might need a printer at some point. I periodically add new content, so be sure to check the Change Log if you haven’t been there in a while. The Builder Academy is my platform to show everyone how easy it can be to build a home flight simulator. Even the most complex projects are really just a series of relatively easy steps. Visit the Builder Academy today and let me know what you think of it.
View the Builder Academy on your phone or tablet or anything
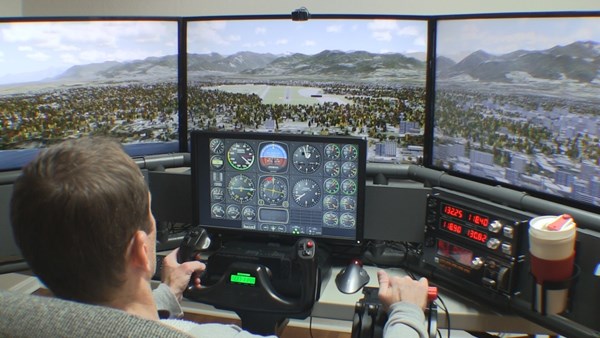
I made four simple, yet significant changes to the D250 Deluxe Desktop home built flight simulators. Consequently, these changes bring me back into the beloved world of general aviation. See me in the video flying a Beechcraft Baron once agian.
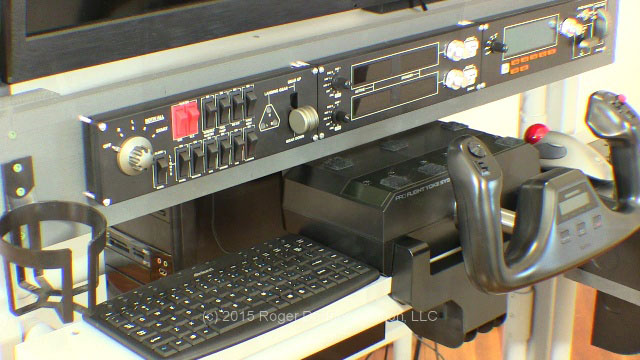
1. Added a Yoke and Throttle Quadrant
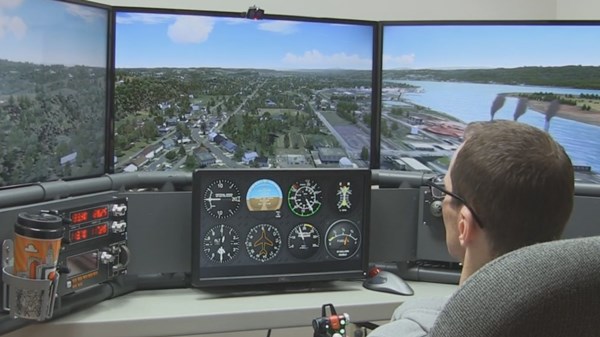
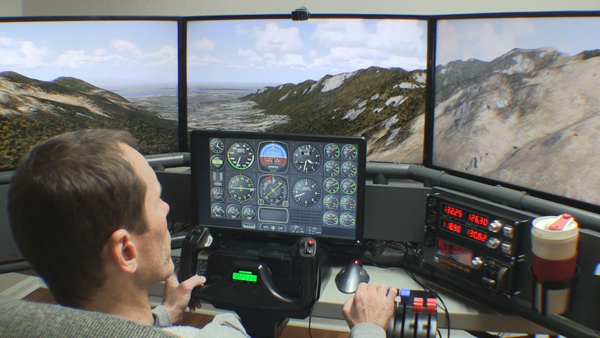
I removed the side-mounted HOTAS joystick and throttle and added a Saitek flight yoke and throttle quadrant. I attached the trim wheel underneath the throttle quadrants, and that is the perfect location. Once again, I can fly multi-engine airplanes like the Beech Baron, or light general aviation airplanes like the Cessna 172.
Home built flight simulators with new mods
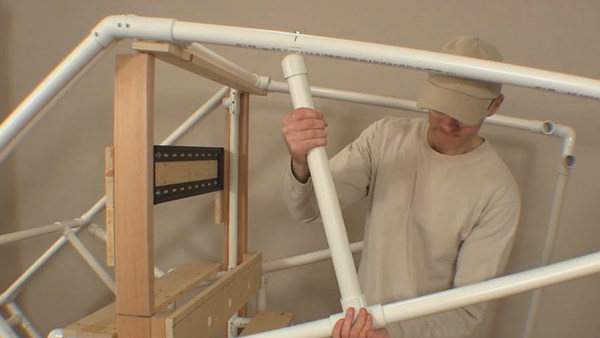
2. Raised the Instrument Panel Display
I use an inexpensive 19″ monitor to display the flight instruments on the D250. The yoke housing did not fit under the 19″ monitor, so I raised the monitor mount a few inches. I simply replaced the board for the Center Instrument Panel and attached an adapter board for the monitor mount.
Raised monitor mount for instrument display
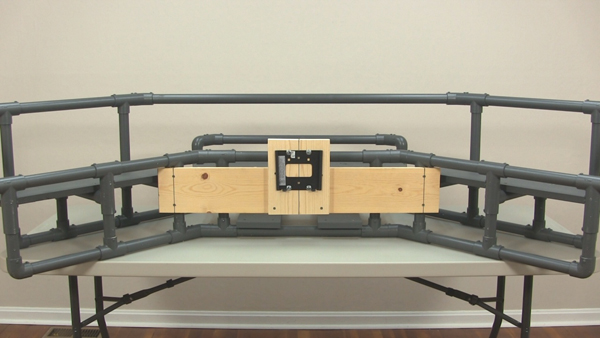
3. Moved all Saitek Switch Panels
When you fly an airplane with a yoke, your left hand is typically on the yoke and your right hand is free to adjust the radio frequencies, dial in nav headings, and more. The D250 wasn’t set up like this because I used it to fly helicopters. As a result, the radios were on the left side of the cockpit, because a helicopter pilot typically keeps his right hand on the cyclic (joystick) and the left hand is free. I cut new 1×8 boards for the Left and Right Side Instrument Panels and re-arranged, and re-mounted the Saitek switch panels.
Yoke and throttle quadrant mod for the DIY flight sim
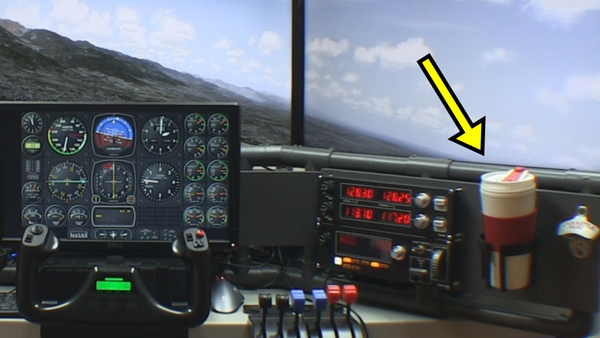
4. I Moved the Drink Holder
Don’t fly thirsty! I moved the drink holder to the right side of the cockpit so I could easily reach it with my right hand. The drink holder is the right size for a travel mug or a bottle with a drink coozie.
Important drink holder in the home flight sim
Plans for Home Built Flight Simulators
Do you want to build this same flight simulator for your home? If I get enough interest from my DIY community then I will create an additional Instruction Manual and include it with the original plans. In addition, customers who have already purchased this project will get the new plans for free.
System Specs and Peripherals
Notice these computers are not especially strong or new. You don’t have to spend $2000 on a computer to have great home built flight simulators.
DIY Deluxe Desktop Flight Sim, item #D250 Primary computer: Powerspec B634 with Intel i5-3450 Nvidia GeForce GTX 950 SSC Windows 7, 64 bit Flight yoke: Saitek Pro Flight Saitek throttle quadrant Saitek Pro Flight trim wheel Pro Flight Cessna rudder pedals from Saitek
Switch panels: Saitek PZ55, PZ69, PZ70
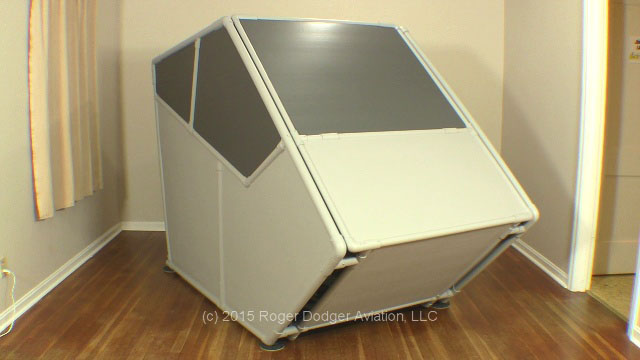
DIY Flight Sim Pod Final Assembly Video Transcript
This is an excerpt from the DIY Flight Sim Pod instructional video. The video and associated manual show you every step in building this home flight simulator project.
In this final section, we’re going to populate the Inner Frame with computer hardware. Furthermore, we will assemble all the pieces of the Flight Sim Pod. Your new flight simulator will soon be finished!
We see here the Inner Frame, all painted and masking tape removed, lt’s look at the right side of the frame. Here on the Computer Shelf we can set a desktop computer, and a powerstrip on the Top Shelf.
Next: the monitor or HDTV. It is a very good idea to get help from a friend while mounting the HDTV. You can’t actually see the bracket when you clip onto it, so it helps to have a second pair of eyes watching. Make sure it’s centered in the frame also.
Install the switch panels and then add the yoke, and beside the yoke, the throttle quadrant. I have attached Velcro to the top of the throttle quadrant for the trackball mouse. There is enough room on the yoke housing for a mini-keyboard, or it can go beside the yoke. Don’t forget a drink holder!
Attach the rudder pedals, and add the speakers. Remember the Chair Staytheres? I painted these also. They have Velcro that loops over this horizontal bar. Notice when you use the Chair Staythere you have to reach way down to get it and you might want an easier way. I simply measured 7” from the end of the pipe and drilled two holes and then I tied on a piece of boot string and hung it from the pipe above. I did this on both sides.
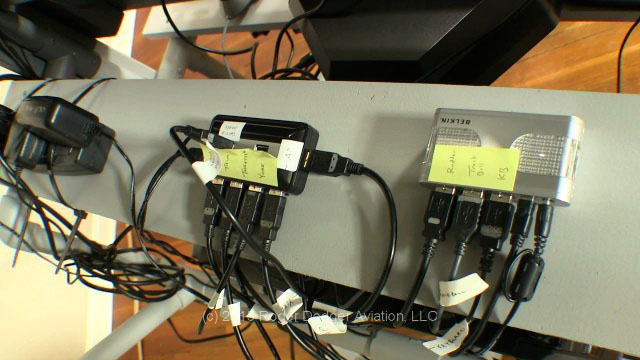
Now I don’t have to reach down so far. With all the peripheral equipment on this machine, we end up with a lot of wires. I loop the wires and use strips of Velcro to keep them organized. If I need a USB extension, I use Velcro straps to help keep it secure. Use it for the rudder pedals so the wire won’t get tangled up with your feet. I secured the USB hubs with Velcro too. I recommend labeling the USB wires, there are so many of them
Once everything is hooked up, it’s time for a test drive! Make sure all the peripherals work correctly.
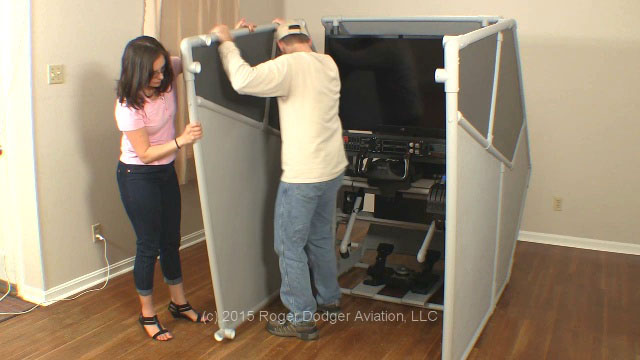
We’re almost finished with the DIY Flight Sim Pod Final Assembly. For the final step, I really recommend you get help from a friend because you’ll need someone to hold the Side Wall in place while you attach it to the three interface points. The first point is near the Side Boards. There are two points in the front that slide into place also
Secure each interface point with a self-drilling screw. That Side Wall will stand by itself so you can attach the other Side Wall. Attach all three interface points with self-drilling screws. Next replace this bottom support pipe, or the tail end extension, your choice. Secure with self-drilling screws.
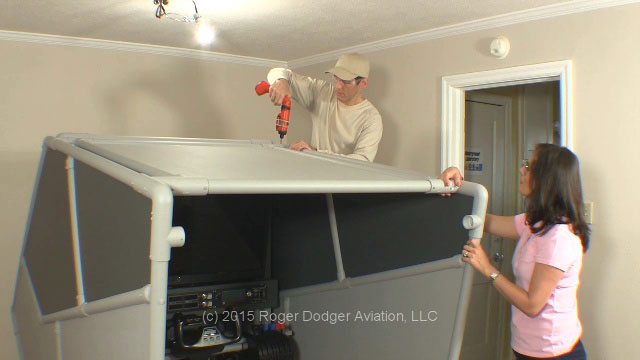
Carry in the Top Canopy, and set the 1×4 board on the ledge near the top of the support pillars. Have your partner hold the back of the Top Canopy while you attach the front. Once the front two corners are in, you can attach one of the back corners. Secure the front two corners with self-drilling screws.
Now we can attach the top support pipe. First insert it in the left side. Remember, we left the right side of the Top Canopy loose for this reason. Attach both pipes simultaneously. Attach four self-drilling screws: The two back corners of the Top Canopy, and both sides of the top support pipe.
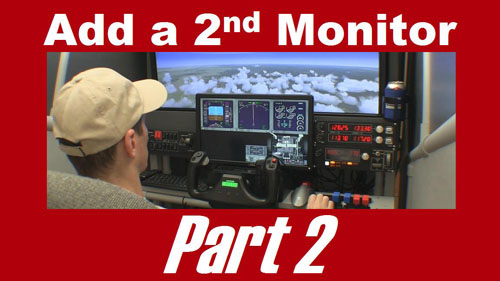
Now we will paint the board, install the monitor, and configure Microsoft Flight Simulator X to run on two monitors
Video Transcript
This is where we left off. Now I know all the components will fit correctly, so next I’ll paint the board.
I removed the mounting bracket and all components, but I left the tee nuts in place. I’m painting with tinted primer like I do with all my projects.
After one side has dried, flip it over and paint the other side.
The paint is dry to the touch, but it can still stick to the support boards when it sits overnight so I’m putting a few screws between the boards to allow the paint to dry completely.
I want a layer of masking tape (or something similar) between the new board and this attachment board. If I don’t separate the two boards like this, the paint will stick the boards together almost like glue.
Attach the board with deck screws,
Test fit the monitor to make sure it fits correctly.
You may or may not need an adapter for the monitor cable. This cheap little monitor only has a VGA plug.
Now that the monitor cable and power are hooked up, we can slide the monitor into place and turn on the computer.
The operating system should be smart enough to recognize the second monitor.
If not, right-click the desktop and choose “Screen Resolution” you may need to prompt the operating system to detect the monitors.
I recommend setting the large screen as Display 1
Also select “Extend these displays” here.
You know it’s working correctly if you can drag a window from one monitor to another.
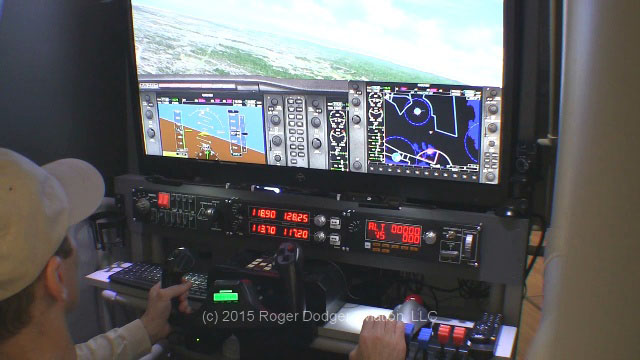
Start Microsoft FSX. For this example, I’ll use the default G1000 Beechcraft Baron.
Select the 2D cockpit view. Right-click just above the instrument panel and select “Close window”
Next, select Shift + 4 to show the Primary Flight Display in a more manageable shape.
Now I can left click and drag it over to the smaller monitor and drag the edges to re-size the window.
Next, do the same thing with the Multi Function Display
I also like to display the Landing Gear Panel because it shows the elevator trim setting. Check out the Saitek trim wheel (I love this thing). Now I can see the trim setting for takeoff.
A quirky thing about this setup is that even if you save the flight, and exit, FSX will not save the locations of the instruments. The next time you start the flight, the instruments will have to be moved and re-sized again. You can remedy this by using Air Manager from Sim Innovations to display the instruments on your second monitor.
If you use TrackIR, a second monitor can still help you. Here I have the Virtual Cockpit on the main screen and the flight instruments on the small monitor. It works quite well. It was a great experience to add a second monitor to my flight simulator and I hope your project goes well too.
This was a great project and really enhanced the Flight Sim Pod. Dual monitors allow you to display the flight instruments on a smaller screen and show the outside view on a large monitor, or even an HDTV as shown here. Most noteworthy: quality flat panel monitors are wonderfully inexpensive now!
Video Transcript
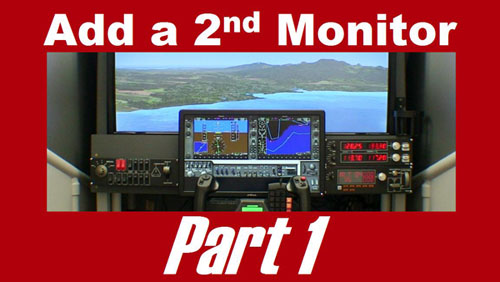
You can display your flight instruments on an auxiliary monitor and use your main monitor for the outside view. This increases your outside visibility and makes it easier to read the instruments.
This is nothing new. People have been running flight simulator on multiple monitors for years, but I wanted to show you some specific issues for mounting a second monitor.
I’ll literally show you the nuts and bolts of this process.
Part 2 of this video will show you what to expect when you run Microsoft Flight Simulator X on two monitors.
To start off, I removed the 1×6 board from the flight simulator and used a 1×8 board instead. I needed this taller board to mount these two Saitek switch panels vertically.
If you don’t have a miter saw that can cut a 1×8 board you can usually get that done at the store. Many home improvement stores will cut lumber for you.
Now lets look at the monitor mounting bracket. This small bracket is appropriate for this size monitor. One half of the bracket attaches to the monitor, the other half will attach to the board.
This is the Dell 19 inch monitor that I’m using for this project. It was very inexpensive.
This is how the bracket will fit on the monitor…. but look here: the bottom edge of the monitor can not hang below the bottom edge of the board….
Because, I have to allow room for the Saitek yoke below it.
Unfortunately, that puts the top attachment holes on the bracket too close to the top edge of the board, so we can’t use those holes.
No problem. We will simply drill new holes into the steel bracket! It’s not difficult. First, I measure where the new holes will be: three quarters of an inch on center, below the existing holes.
Next I tap the center points with a punch and hammer.
I drilled pilot holes first with a 1/8” drill bit. Use cutting fluid if you have it, or a lubricant like WD-40.
Next, use a ¼” drill bit to make the holes larger. Notice that I clamped the bracket in place.
The drill bit generates a lot of heat, so take your time. Drill a little, then back off for a moment to allow the bit to cool. Then repeat.
The drill press I’m using is not expensive or fancy. You could probably even do this with a hand drill if you clamped the bracket to a work bench. Either way, remember to take your time and be safe.
Use a 5/16” drill bit to make the holes larger one last time. So yes, I used three different drill bits for these holes. Yes, there is an easier way, a step bit will allow you drill holes in steel without changing drill bits.
Wear safety glasses. Wear safety glasses. Look, you can actually see bits of hot metal shooting in different directions.
Are dual monitors worth going through all this trouble? Yes! You will love having your flight instruments on a separate monitor.
Be sure to clean up the bracket after you’re done drilling.
Attach the mounting bracket to the back of the monitor according to the manufacturer’s instructions. This model already has mounting screws for this purpose.
The bracket slides on easily.
Measure the distance from the bottom edge of the monitor to the top edge of the bracket. In this case, it’s 7 ½”
I want the monitor in the center of the board, so I’m measuring the halfway point here.
Again, I want the top of the mounting bracket to be 7 ½” above the bottom of the board.
Hold the bracket in place and trace where your four mounting holes will be.
Drill pilot holes with a 1/8” drill bit, then final holes with a 5/16” drill bit
Now we can use ¼-20 screws to attach the bracket…. However, there’s another issue to address.
The ends of these screws will be too close to my 40” HDTV. I’m not comfortable with that.
So I used these ¼” tee nuts for the top two holes.
Flip the board over, and bang in the tee nuts with a hammer and a block of wood.
You can use shorter screws now. 1 inch long ¼-20 screws with washers.
Make sure the bracket is straight and attach ¼-20 screws to the bottom two holes. These screws are an inch and a half long, attach with nuts, washers and lock washers.
Slide on the monitor and see how it fits.
This is how it will sit in relation to the switch panels.
In part 2 of this video, we will paint the board and attach it to the flight simulator. I’ll also show you how to relocate the aircraft instruments to your new monitor in Microsoft Flight Simulator X.


Recent Comments