I designed the DIY Kinetic Motion Flight Sim as a direct-control moving platform. As a result, it works with all flight simulation software. It is the only inexpensive motion flight simulator for Aerofly FS2.
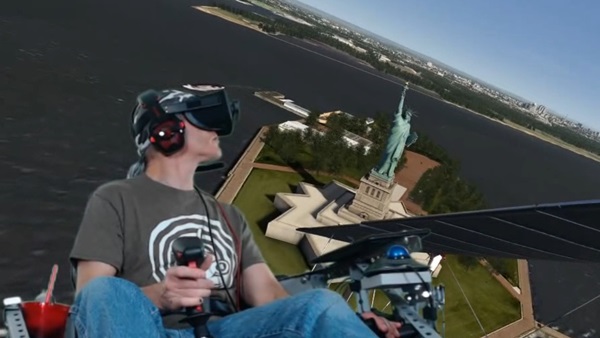
Statue of Liberty in Aerofly FS2 looks magnificent
Inexpensive Motion Flight Sims for Everyone
My dream is to create a DIY tutorial that shows how to build a motion flight sim. The most inexpensive way to build a one is to use materials from a home improvement store. As a result, you can build a motion flight sim for just a few hundred dollars instead of a few thousand.
Would the flight sim community embrace such an idea? I posted several demonstration videos to gauge people’s reaction. Unfortunately, when I posted a video to the Aerofly FS2 fan group, I only received negative comments. This makes no sense when you consider how a motion flight simulator for Aerofly FS2 improves the flying experience exponentially.
Motion Flight Simulator for Aerofly FS2
Aerofly FS2 is one of the lesser-known flight sim titles, but it has two things that are essential for virtual reality. Namely, high frame rates with dense, quality scenery. Take a look at the embedded video. I’m flying over New York City over hundreds of buildings, yet the frame rates remain smooth.
Next, imagine what it feels like to add a motion flight simulator for Aerofly FS2. The experience is totally immersive. I thought the Aerofly FS2 user base would recognize how this inexpensive DIY project could enhance their flight experience. I guess I was wrong.
What’s Next
Obviously I won’t be posting any more demonstration videos for Aerofly FS2. However, I’ll gladly continue to use Aerofly FS2 with my motion flight simulator because it’s so enjoyable.
I give extra time and effort to set up the lights, camera, OBS software, etc. when I make a video, and I only want to spend the effort for people that will appreciate my work. It didn’t work out for Aerofly FS2, consequently I will focus on other sim titles like X-Plane 11, DCS World, and IL-2 Battle of Stalingrad.
The Elite Dangerous fans are greatly supportive, so I will post more videos for them also.
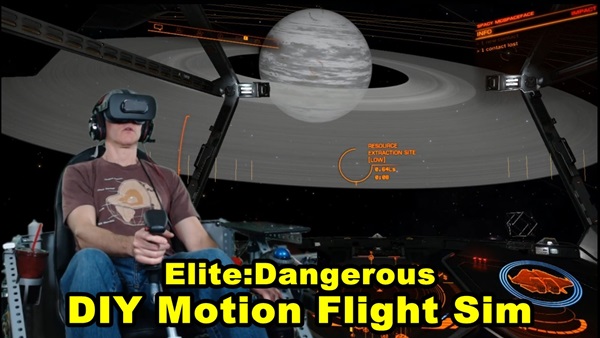
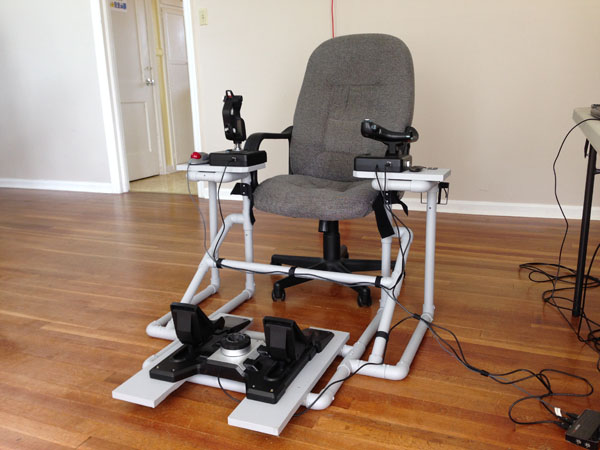
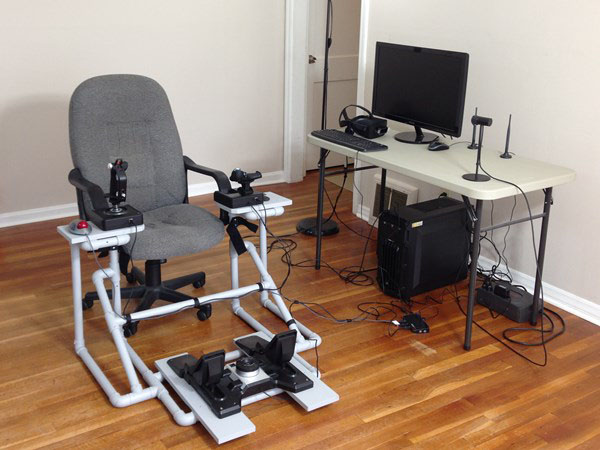
I built my DIY Elite Dangerous Motion Flight Simulator with supplies from a home improvement store. It works with a variety of flight simulator titles, not just Elite:D. I call this motion rig the “Kinetic Flight Sim.”
How it Moves
I designed the movement system by examining the control linkages of actual Sport Aviation aircraft. Nearly all small airplanes have control systems consisting of cables, pulleys, bell cranks, and levers. The Kinetic Flight Sim uses similar technology.
The motion system is not software-specific. Not only is this an Elite Dangerous Motion Flight Simulator, it will work with any flight simulator software. I’ve already tested it with AeroflyFS2 (see video), War Thunder, and DCS World. I plan to test it with X-plane 11 and IL-2 Battle of Stalingrad once I upgrade the computer’s video card.
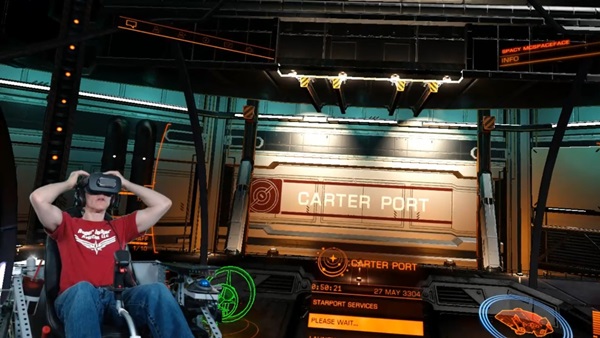
DIY Elite Dangerous Motion Flight Sim leaving dock
HOTAS Controls
The Kinetic’s controls are HOTAS (Hands On Throttle And Stick). The joystick is a CH Products Combatstick. I used this type of joystick because I have experience modifying this type and simply because I had one available for use. The throttle is the Saitek/Logitech X52, and the pedals are Saitek Pro Flight rudder pedals. I plan to upgrade to Thrustmaster Warthog controls if I receive adequate funding.
The HOTAS controls are especially important because of virtual reality. When the pilot wears the Oculus Rift VR Headset, he can only see the virtual cockpit. The controls are not visible (and neither is my drink holder).
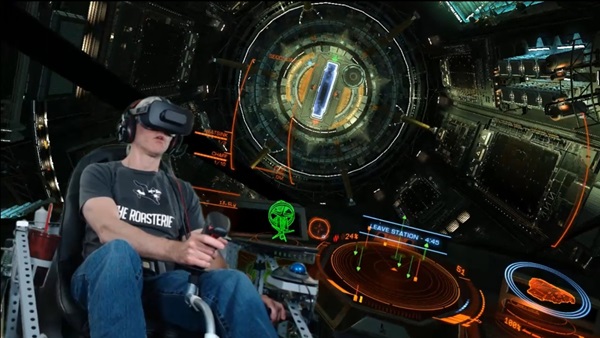
Elite Dangerous Motion Flight Sim at a space station
Elite Dangerous Motion Flight Simulator
Check out these demonstration videos. I’m using the Kinetic flight sim with Elite Dangerous and flying the new Krait MkII. Elite:D works particularly well with my gaming computer and VR headset. It’s an absolute joy to fly in space with a motion flight sim. I could produce longer videos but I’m not sure if people really want to see that.
Should I livestream longer flights? I hope to try that soon.
The following video is an exclusive! It’s only available to the readers of this blog article. I call it “Dodging Icebergs” Enjoy ! ! !
First of all, as I introduce the subject of motion flight sim theory, it helps to start with a foundational understanding of how our bodies sense movement and orientation. Movement is our sense of acceleration/deceleration and the notion that we are traveling through a space. Orientation is our attitude in space, our sense of pitch, roll, and yaw. The quality of a motion flight sim is in its ability to fool the human sensation of movement and orientation. For many normal flight attitudes in an airplane, there is a corresponding flight sim action that can emulate how it should look and feel from the cockpit. Consequently, this is the basis of motion flight sim theory.
Motion Flight Sim Theory: How do we know we’re moving?
The human body has three systems that inform the brain about movement and orientation:
Visual system – the eyes that sense position by what is seen
Vestibular system – the inner ear organs that senses balance and orientation
Somatosensory system – the nerves in your body that sense position and movement. For example, when you accelerate forward, you feel pressed back into your seat.
Valid motion flight sim theory states that a moving rig, like the Kinetic motion flight sim, does specific things to fool each of these systems.
Visual System
A pilot recognizes his position in space by seeing the simulated environment produced by the flight sim software. It is vital that the pilot only sees the simulated environment, and nothing else. For example, imagine you’re looking at the flight sim displays, but you can also see the walls of the room in your peripheral vision. As a result, your brain will not be fooled.
One way to create an immersive visual experience is to seat the pilot in an enclosed cabin like the expensive flight sims used by airlines. Even when a pilot uses an inexpensive DIY rig like the DIY Flight Sim Pod he can feel immersion because all he sees is the simulated flight environment. The other option is to use a high-quality virtual reality headset. In either case, the pilot must not see the room beyond the flight sim.
Even with a static flight sim, an effective visual system can give you a feeling of movement… or even motion sickness if you are prone to it.
Vestibular System (the Inner Ear)
In our airplane, we control movement around the pitch axis, the roll axis, and the yaw axis. Coincidentally, the inner ear contains three semicircular canals that are aligned roughly the same way – pitch, roll, and yaw. How do we fool the inner ear? You already know at least one way to do it. We discover as little kids that if we spin around and around, we get dizzy and lose our balance. The effect is so profound that even when we stop spinning, we still stagger around for a bit before fully regaining our balance.
The semicircular canals contain tiny hairs and a special fluid. When the fluid is displaced by movement, the hairs are pushed around by the moving fluid. The brain interprets this signal as motion.
In a motion flight sim that moves in pitch, roll, and yaw, the inner ear will also detect that same movement. In real airplanes, there are certain scenarios that can confuse a pilot’s inner ear and cause spatial disorientation. Furthermore, some of these scenarios can be emulated in a simulator.
Motion Flight Sim Theory – Semicircular Canals
Somatosensory System
Imagine accelerating down a runway. You can feel yourself being pressed back into your seat. Now imagine you’re in a regular chair and you simply lean back in it. You can feel yourself being pressed into the back of that seat too. Your somatosensory system will give you a similar feeling for the two situations, to a certain extent. A motion flight sim can fool your somatosensory system for mild maneuvers and mile acceleration/deceleration.
When you’re in a real airplane, and you’re making a steep bank, your somatosensory system will tell you when you’re starting to pull G forces. In a 60 degree bank, you will feel two G’s as you are pressed down in your seat. If you fly inverted, you will feel one negative G as you hang upside-down from your seatbelt. Unfortunately, we can’t simulate G forces like that in a simulator. But certain motion flight sims can simulate heave, like turbulence, or like a hard landing.
Putting it All Together: Motion Flight Sim Theory
For example, imagine a pilot is in the Kinetic motion flight sim and he starts a climbing turn. He can see the simulated horizon and as he banks the wings, he can see the corresponding bank angle. Also, shadows inside the cockpit move as the airplane turns. This is a climbing turn, so the pilot also pulls back on the joystick. His inner ear detects that he is pitching nose up. The pilot also feels that he is being pressed back in his seat slightly, that’s his somatosensory system.
The pilot should feel like he’s flying. If the pilot is in a quality motion flight sim, then the machine is able to fool the pilot’s sense of motion and orientation.
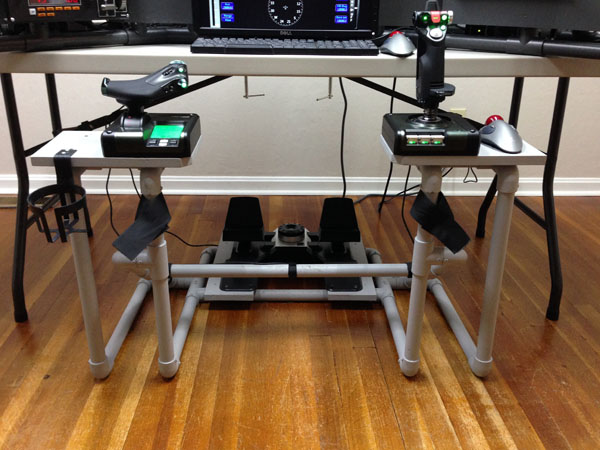
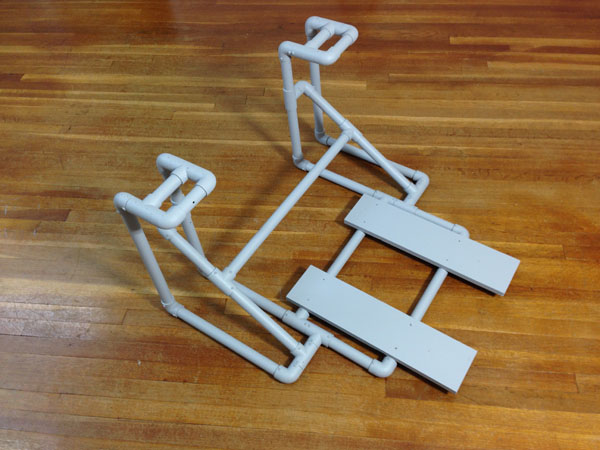
The DIY Side Joystick Frame is one of my most popular projects, and it’s very versatile. Even though I published this project 6 years ago, the design has stood the test of time. Yet, as great as it is, I have recently made a few modifications to the design that you might find helpful for your project. Read on for 5 Modifications for a DIY HOTAS Chair for Virtual Reality and More.
A True HOTAS for your Flight Sim
The DIY Side Joystick Frame, Item #F311, makes a true HOTAS (Hands On Throttle And Stick) possible for your flight simulator because the project also includes rudder pedals. True pilots use rudder pedals, not joystick twisty grips so always remember that. I originally envisioned the F311 as useful primarily for jet fighter simulators, but now, many customers are using it for space sims like Elite Dangerous and Star Citizen.
Use the F311 in combination with a Virtual Reality headset. Remember, when you wear a VR headset, you can’t see your keyboard any more and any functions you have assigned to your keyboard keys are literally out of sight. You can also use the F311 with a traditional multi-monitor setup like the DIY Deluxe Desktop Flight Sim (Item D250). The F311 is delightfully versatile and useful. Use these 5 Modifications for a DIY HOTAS Chair to update the F311.
5 Modifications for a DIY HOTAS Chair
F311 HOTAS with a multiple screen flight simulator
F311 HOTAS in combination with VR
DIY Side Joystick frame with a quad screen flight sim
F311 HOTAS chair for flight sims, Saitek X52 and trackball mouse
F311 Side Joystick Frame with D250 Deluxe Desktop Flight Sim
F311 Side Joystick frame without the Side Stand platforms
5 Modifications for a DIY HOTAS Chair
I made five main modifications to adapt the F311 Side Joystick Frame for my current requirements. None of these modifications are difficult. If you can build the F311 in the first place, you can certainly make these modifications or include these changes during the initial build.
1. Wider Side Stand Platforms
First of all, I installed wider side stand platforms, cut from 1×8 boards. To be clear, the PVC pipe side stands did not change, just the the boards that attach to the top of the stands. I topped the side stands with 1×8 boards, 12″ long. The wider boards give you room for a trackball mouse next to the joystick and give you room next to the throttle to set down your phone or whatever. Most importantly, you can place the controls in a more ergonomic location. This means placing the joystick and throttle in line with the chair’s arm rests. This is so important! Place the joystick and throttle so that your arms sit straight on the chair’s arm rests. This will allow you to fly comfortably for hours.
In addition, I attached the joystick and throttle with wood screws instead of Velcro. I also trimmed the inside corners of the 1×8 boards by 1″ and sanded the edges so my legs wouldn’t get caught on the corners.
2. Longer floor boards
I use the Saitek Pro Flight Cessna Rudder Pedals, and I really like them, but they have to be positioned further away from the pilot. The rudder pedals attach to the Floor Boards with Velcro, but the original boards were too short. Therefore, I replaced them with two 1×6 boards, 22″ long. You might not need to make this change for your rudder pedals.
3. Raised center stabilizer
I also raised the center stabilizer bar to allow room for the Saitek Pro Flight Cessna Rudder Pedals. Specifically, the back of my ankles banged into the stabilizer bar, so I had to move it. It is now 6.5″ higher than it was before.
4. Self-drilling screws
I now use self-drilling screws in everything I build. Back in 2010 when I designed this project, I used Liquid Nails Project Glue to attach all the PVC pipes and fittings. This allowed for some cost-savings, but self-drilling screws are far superior. The screws allow for a simpler assembly with no overnight dry time. In addition, the screws create a much stronger frame. Lastly, you can remove the screws later if you decide to modify the frame. I absolutely recommend using 1/2″ self-drilling screws to build DIY Flight Sims from PVC pipe.
Don’t fly thirsty! I include a cup holder with almost every project I design. The cup holder is located next to the throttle and it’s easy to find it, even when wearing a VR headset. I use these inexpensive cup holders from Amazon.
If you’ve already built the DIY Side Joystick Frame, Item F311, or if you haven’t built one yet, these 5 Modifications for a DIY HOTAS Chair can enhance your home flight simulator experience for years to come.
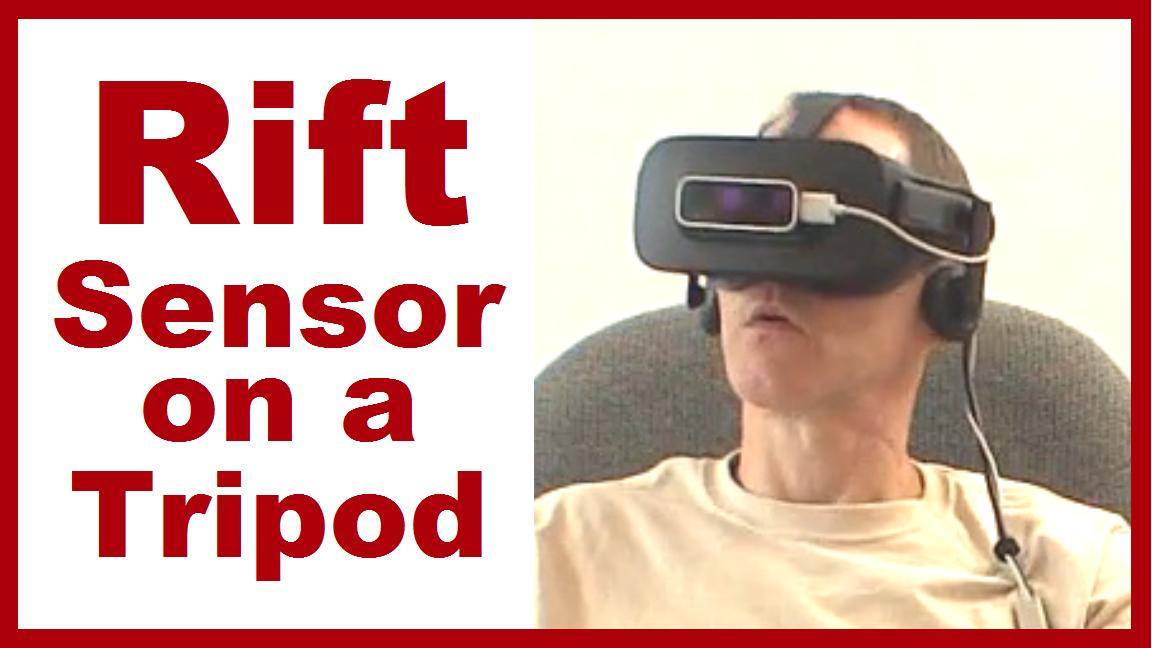
It’s easy to mount the Oculus Rift sensor on a tripod.
The Oculus Rift sensor is designed to sit on a desk or table, but sometimes it is much more convenient to mount the sensor on a tripod. For example, my flight simulator does not have a table sitting in front of but this tripod works nicely. It’s easy to mount the sensor on a tripod, I’ll show you how.
This is an old, spare tripod that I wasn’t using any more. You can see where I repaired the crank many years ago. I’ll use this tripod for my Oculus Rift now.
Quick note: You’ll notice I covered the Rift sensor. I did that because the sensor is quite sensitive to bright light and I’m using some pretty bright lights to film this video. You probably won’t need to worry about covering the sensor like I did.
Instructions
If you currently use the Oculus Rift with the sensor sitting on a desk, take a moment to measure the distance from the floor to the sensor. Unclip the wire and let’s take a look at the base of the stand. The base will not unscrew here… look farther up toward the sensor. This is where it unscrews. That’s actually a lot better for us than unscrewing the base. Remove the quick release plate from the tripod. Screw the sensor onto the plate. The threads should match perfectly. Both the sensor and the plate have standard quarter-twenty threads. Return the quick release plate to the tripod. Adjust the height so the sensor is the same distance from the floor as it was before. If you need to re-calibrate the location of the sensor, you can do that in the Oculus Rift software. I recommend using some small strips of Velcro to attach the wire to the tripod.
Simply position the sensor so it points at your headset and take off ! ! !
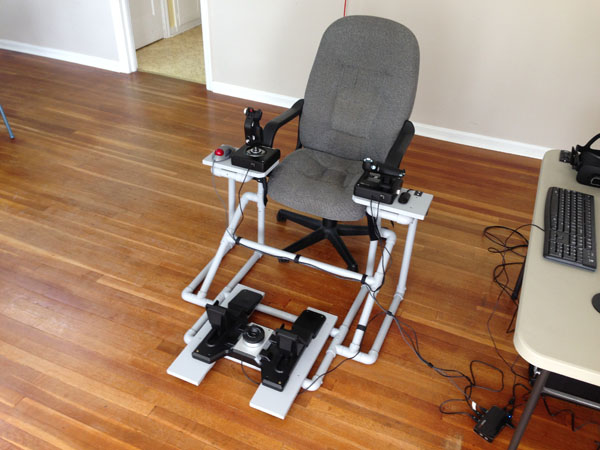
My joystick, throttle and rudder pedals are secured in place with a framework of PVC pipes and lumber. It is item F311, the Side Joystick Frame and I can help you build one for yourself.


Recent Comments