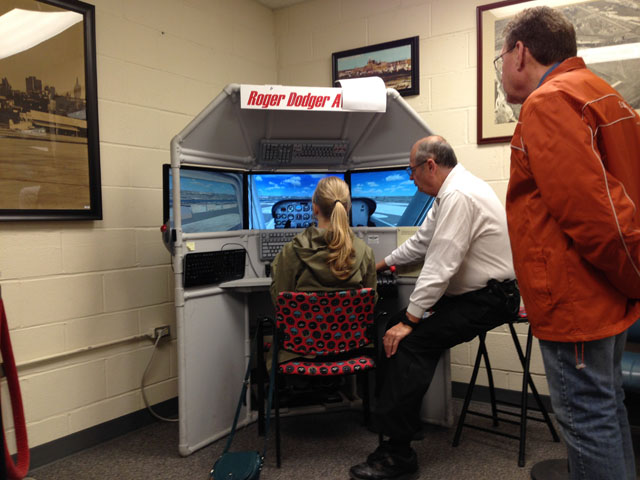
I built a flight simulator and donated it to a local aviation museum. The museum guests enjoy a hands-on experience because they get to fly the simulator. Some people say the Triple Screen Flight Sim at the National Airline History Museum is their favorite part of the museum.
National Airline History Museum
The NAHM is the only airline-specific museum in the United States. The museum has several airliners but the Lockheed Constellation is the crown jewel of the collection. The Triple Screen Flight Sim allows visitors to fly a simulated Constellation just like the one in the museum.
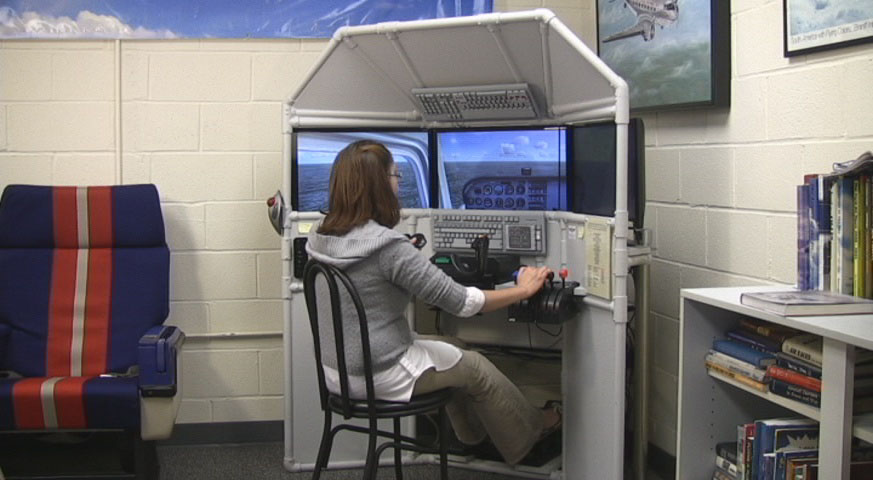
The Triple Screen Flight Sim at the National Airline History Museum is also used as a introduction to general aviation. Visitors receive a flight “lesson” as they fly a simulated Cessna 172. A museum volunteer personally teaches some basic flight maneuvers while the guest tries them in the sim. The simulator is such an excellent teaching tool because you can pause the flight to answer questions or explain something in more detail.
Triple Screen Flight Sim for guests at NAHM
Flying the Constellation in the Triple Screen Flight Sim
Triple Screen Flight Sim in National Airline History Museum
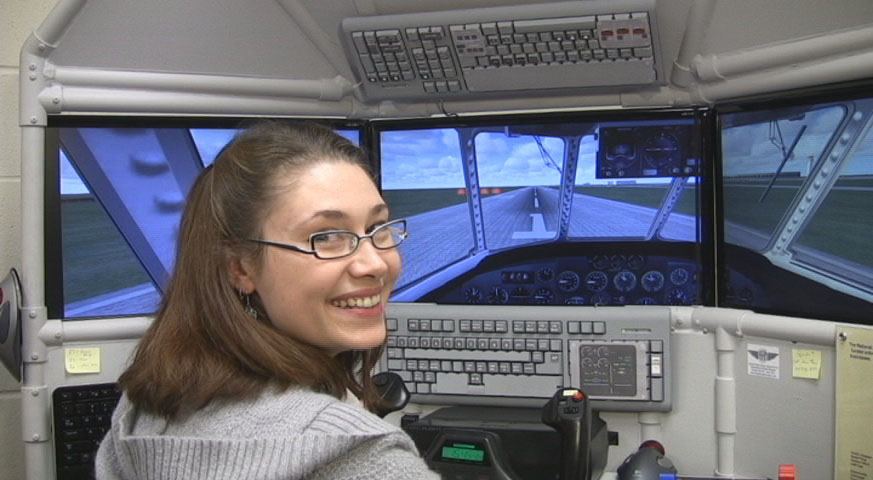
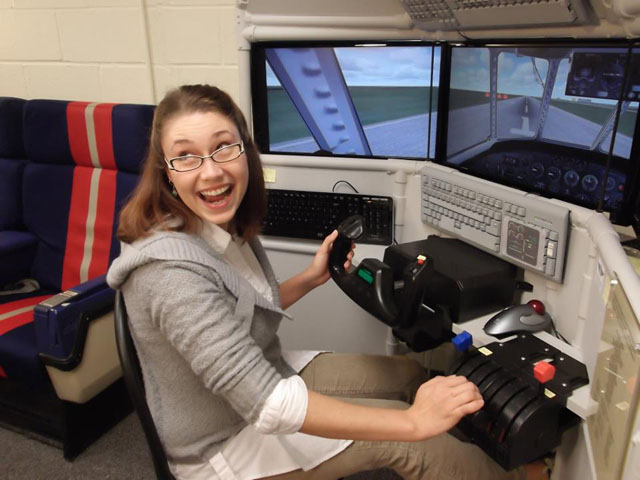
Shannon flying the Triple Screen Flight Sim at the NAHM
The Triple Screen Flight Sim intro to aviation
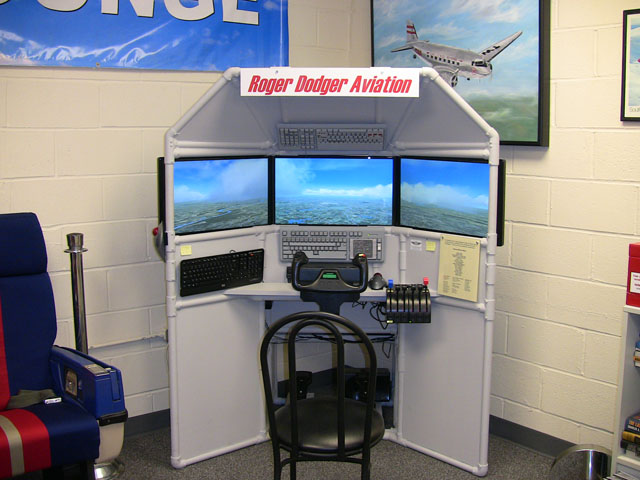
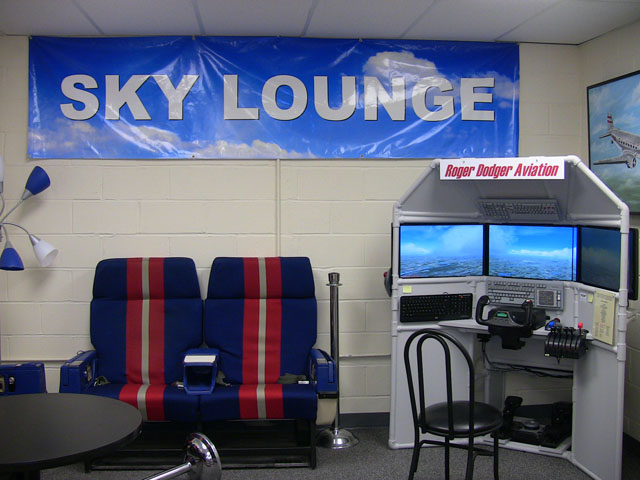
Triple Screen Flight Sim looks great in the Sky Lounge
Triple Screen Flight Sim at the National Airline History Museum
Lockheed Constellation at the National Airline History Museum
Triple Screen Flight Sim
The pictures here show a stock version of the DIY Triple Screen Flight Sim at the National Airline History Museum. My DIY video and instruction manual show you how to build this same project from PVC pipes, lumber, and foam insulation. I installed a Saitek Pro Flight yoke, throttle and rudder pedals in this particular project. The painted keyboards are stock versions of the DIY Keyboard Mod: Airliner project.
The DIY Triple Screen Flight Sim is the perfect addition to the Sky Lounge at the NAHM, and it would be a perfect addition to your home.
Kickstarter Fund-Raiser
This project was the first successful flight simulator project ever funded through Kickstarter. It is truly historical. The fund raising campaign paid for the supplies and materials I needed to build the project from scratch. After I built it, I brought it to the Kansas City Maker Faire and then to the NAHM.
The Triple Screen Flight Sim at the National Airline History Museum
Here’s wishing you and yours a very Merry Christmas from Roger Dodger Aviation. I’m lucky for my opportunities to share aviation (both real and simulated) with people.
Merry Christmas from Roger Dodger Aviation
Christmas Lights on a Flight Simulator!
Let’s deck the flight sims with boughs of holly, tinsel, and colored lights! I like to decorate my flight simulator for Christmas and it’s one of my favorite holiday traditions. I think I’m the only flight simulator entrepreneur that currently does this. All of my decorating efforts go into the simulator because more people see it than see my house. December is so busy I rarely have people over to visit, however many people see my pictures and videos online.
I like to fly some of the old winter missions in FSX like the apple delivery missions or the Alaska missions. I drink hot chocolate and fly my simulator, it’s a wonderful time. Often I’m bundled up in a hoodie and scarf since I can’t afford to run the furnace at a reasonable temperature.
Matt Thomas, Plaza Flight pilot in Kansas City
Plaza Flights in Kansas City
Many of you don’t know this but I am a real pilot with 1200 hours. I used to provide scenic flight in an actual Cessna 172 over Kansas City. Each year, the Plaza decorates all of its buildings with brilliant lights throughout the entire holiday season. I provided night flights to the public from the KC Downtown Wheeler Airport over the Plaza Lights. For many people this was their first experience in a small airplane. I even awarded certificates and aviator wings after the flights since this was a special occasion. Season after season I provided these flights and it became an important part of Christmas to me and for this city. I did more Plaza Flights than anyone else in the city during the years I offered them.
Merry Christmas from Roger Dodger Aviation
I wish you the best this holiday season. Get ready because January is Build Month! Many customers build DIY Flight Sims projects during January. It’s a great time to do it.
Long before I started making the DIY Flight Sims videos, I provided aviation training and simulator rental out of my home. This wasn’t as odd as it may seem at first. I remember as a kid, my mom would go to a stylist that had a salon built into her house. A lot of people run small businesses from their home and so I started an aviation training center in my living room. We did a lot of good training at the Roger Dodger Aviation Headquarters from 2005 to 2009.
Roger Dodger Aviation Headquarters
I had one flight simulator, the Roger Dodger Aviation Training System (RDATS). I used this simulator to teach people about flying that was very similar to the approach I used when I instructed in actual airplanes. We started each lesson by briefing at the table, and then moved to the simulator to perform an abbreviated preflight. Next, we flew the lesson and performed the maneuvers from the FAA Practical Test Standards booklet. I demonstrated each maneuver while describing it, and then the student attempted the same maneuver while I verbally coached them. The Roger Dodger Aviation Headquarters had actual training videos for students to view. I always had a selection of free sodas available for students.
Simulator at the old Roger Dodger Aviation headquarters
We did our pre- and post-flight briefings here
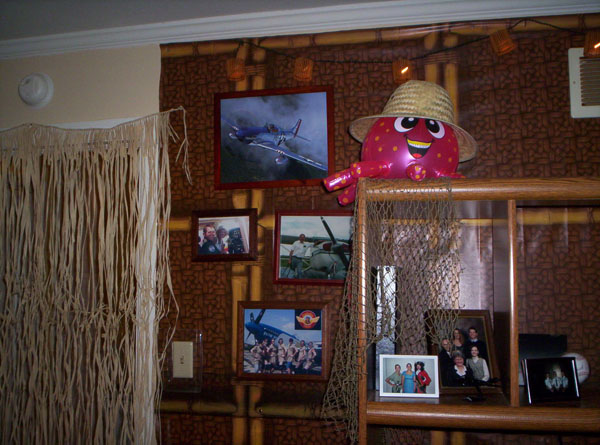
Tacky island party decorations
South Pacific island theme
TrackIR For a Dual Seat Flight Sim
The TrackIR view tracking system was a revolutionary technology at the time. Furthermore, I wouldn’t have had any interest in flight simulators without it. TrackIR allows you to look around the virtual cockpit by simply moving your head. It is an infrared camera that sees reflectors on your cap. TrackIR was vitally important to my lessons because the students needed the ability to look around their virtual environment. In real airplanes, we are always looking around, scanning for traffic, and maintaining situational awareness so this had to be included in the simulation too.
TrackIR was designed to detect one pilot only, so how did I adapt it for two? I attached the TrackIR camera on a sliding pedestal. We would simply move the pedestal in front of whichever pilot was flying at that moment. As a result, this was just a part of the positive exchange of controls that is an important part of instruction. In other words, we always verbally designate which pilot is flying.
I decorated the Roger Dodger Aviation Headquarters in tacky island-theme party decorations. I wanted it to feel like you had traveled to someplace different than Kansas. Look at the walls, they are covered with a thatch-weave paper, as well as fish nets, plastic sea creatures, airplane pictures, and more. The island theme also worked well with the addition of the Air Combat Training Simulators (ACTS) that I was also developing. We later flew the ACTS sims in a lot of South Pacific WW2 missions.
I’m a real Certified Flight Instructor but we didn’t log this as credit towards any actual license. I found that people were naturally curious about aviation and simply wanted to learn more about it. The FAA does not allow anyone to log simulator time in a home-built flight simulator.
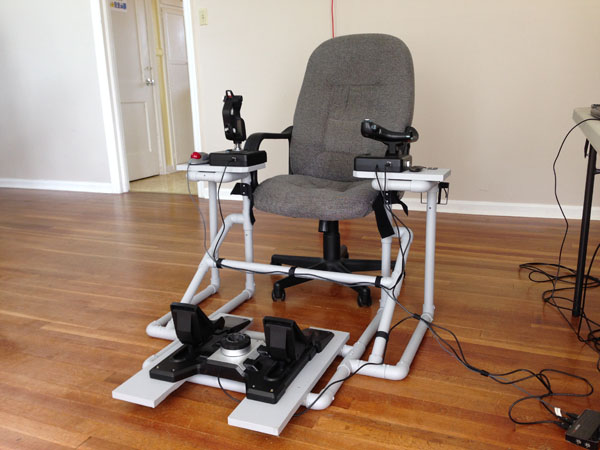
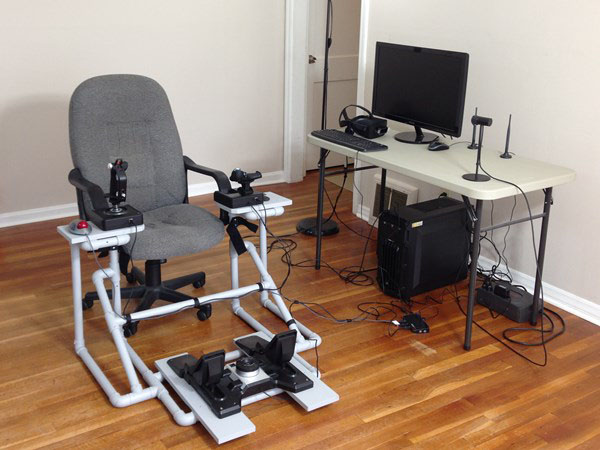
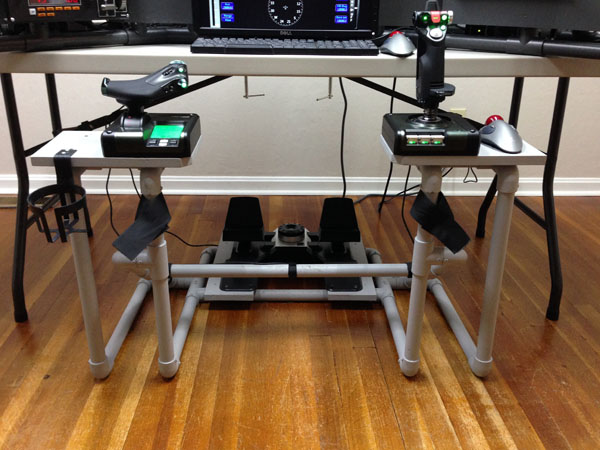
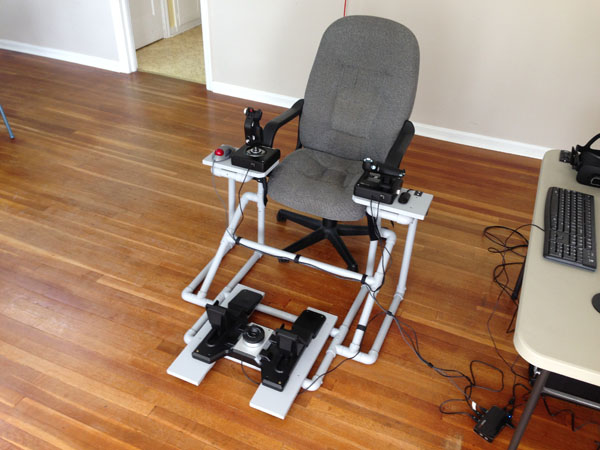
The DIY Side Joystick Frame is one of my most popular projects, and it’s very versatile. Even though I published this project 6 years ago, the design has stood the test of time. Yet, as great as it is, I have recently made a few modifications to the design that you might find helpful for your project. Read on for 5 Modifications for a DIY HOTAS Chair for Virtual Reality and More.
A True HOTAS for your Flight Sim
The DIY Side Joystick Frame, Item #F311, makes a true HOTAS (Hands On Throttle And Stick) possible for your flight simulator because the project also includes rudder pedals. True pilots use rudder pedals, not joystick twisty grips so always remember that. I originally envisioned the F311 as useful primarily for jet fighter simulators, but now, many customers are using it for space sims like Elite Dangerous and Star Citizen.
Use the F311 in combination with a Virtual Reality headset. Remember, when you wear a VR headset, you can’t see your keyboard any more and any functions you have assigned to your keyboard keys are literally out of sight. You can also use the F311 with a traditional multi-monitor setup like the DIY Deluxe Desktop Flight Sim (Item D250). The F311 is delightfully versatile and useful. Use these 5 Modifications for a DIY HOTAS Chair to update the F311.
5 Modifications for a DIY HOTAS Chair
F311 HOTAS with a multiple screen flight simulator
F311 HOTAS in combination with VR
DIY Side Joystick frame with a quad screen flight sim
F311 HOTAS chair for flight sims, Saitek X52 and trackball mouse
F311 Side Joystick Frame with D250 Deluxe Desktop Flight Sim
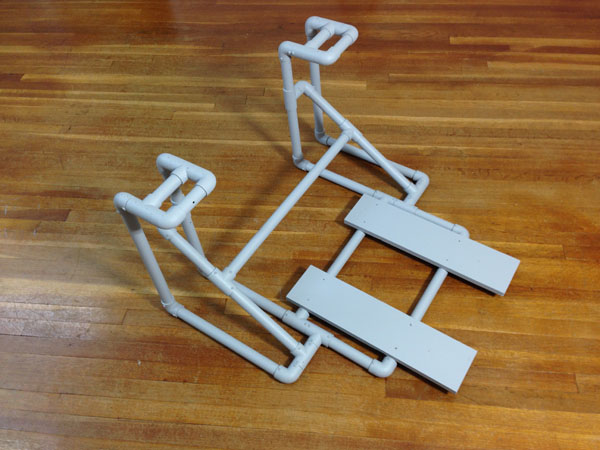
F311 Side Joystick frame without the Side Stand platforms
5 Modifications for a DIY HOTAS Chair
I made five main modifications to adapt the F311 Side Joystick Frame for my current requirements. None of these modifications are difficult. If you can build the F311 in the first place, you can certainly make these modifications or include these changes during the initial build.
1. Wider Side Stand Platforms
First of all, I installed wider side stand platforms, cut from 1×8 boards. To be clear, the PVC pipe side stands did not change, just the the boards that attach to the top of the stands. I topped the side stands with 1×8 boards, 12″ long. The wider boards give you room for a trackball mouse next to the joystick and give you room next to the throttle to set down your phone or whatever. Most importantly, you can place the controls in a more ergonomic location. This means placing the joystick and throttle in line with the chair’s arm rests. This is so important! Place the joystick and throttle so that your arms sit straight on the chair’s arm rests. This will allow you to fly comfortably for hours.
In addition, I attached the joystick and throttle with wood screws instead of Velcro. I also trimmed the inside corners of the 1×8 boards by 1″ and sanded the edges so my legs wouldn’t get caught on the corners.
2. Longer floor boards
I use the Saitek Pro Flight Cessna Rudder Pedals, and I really like them, but they have to be positioned further away from the pilot. The rudder pedals attach to the Floor Boards with Velcro, but the original boards were too short. Therefore, I replaced them with two 1×6 boards, 22″ long. You might not need to make this change for your rudder pedals.
3. Raised center stabilizer
I also raised the center stabilizer bar to allow room for the Saitek Pro Flight Cessna Rudder Pedals. Specifically, the back of my ankles banged into the stabilizer bar, so I had to move it. It is now 6.5″ higher than it was before.
4. Self-drilling screws
I now use self-drilling screws in everything I build. Back in 2010 when I designed this project, I used Liquid Nails Project Glue to attach all the PVC pipes and fittings. This allowed for some cost-savings, but self-drilling screws are far superior. The screws allow for a simpler assembly with no overnight dry time. In addition, the screws create a much stronger frame. Lastly, you can remove the screws later if you decide to modify the frame. I absolutely recommend using 1/2″ self-drilling screws to build DIY Flight Sims from PVC pipe.
Don’t fly thirsty! I include a cup holder with almost every project I design. The cup holder is located next to the throttle and it’s easy to find it, even when wearing a VR headset. I use these inexpensive cup holders from Amazon.
If you’ve already built the DIY Side Joystick Frame, Item F311, or if you haven’t built one yet, these 5 Modifications for a DIY HOTAS Chair can enhance your home flight simulator experience for years to come.
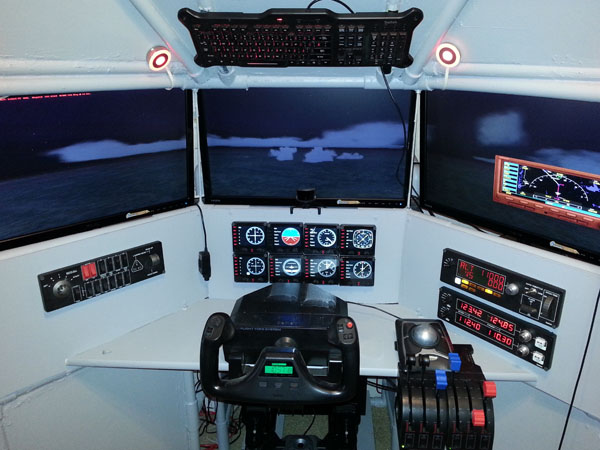
Our customer, Tom, sent in these pictures of his completed project. He installed a Saitek Pro Flight Instrument Panel in a DIY Triple Screen Flight Sim. Actually these are eight separate units that combine to work as a complete instrument panel, therefore he has the standard six flight gauges, plus two VOR displays.
T440 Triple Screen Flight Sim customer completion
Saitek Pro Flight Instrument Panel
The Saitek Pro Flight Instrument Panel you see in the picture is eight separate flight instruments. Each unit can be set individually to display whatever instrument you choose, in addition, you have 15 different displays to choose from. The units cost $170 to $190 USD depending on where you purchase from.
The instrument panel is the perfect addition to Tom’s DIY Flight Sim. He says: “Had great fun building this triple screen, with your instructions and videos even I couldn’t mess it up!”
Out of Stock. There is a massive, world-wide, back-order situation on all Saitek Pro Flight merchandise. All orders will be filled on a first-come, first-served basis. Order now to reserve your spot in line. You will not be charged until the order ships and you can cancel at any time prior to shipment. Orders placed now are expected to be shipped in 6 to 12 weeks.
MadCatz recently sold Saitek to Logitech. Gameindustry.biz reports that MadCatz purchased Saitek in 2007 for $30 million, but is now selling it to Logitech for only $13 million. We can only hope that Logitech can keep the Saitek product line in production and going strong for years to come. I’ve owned several Logitech products (keyboards, mice, etc.) and I’ve always been happy with their reliability and functionality. I know that there have been concerns lately about the workmanship in Saitek products and consequently I hope the sale to Logitech improves the reliability of the entire Saitek product line.


Recent Comments