Proper flight sim painting will make your home flight simulator look finished and professional. The paint has an almost magical transformative effect. Most importantly, it turns a framework of pipes, wood, and foam into a complete, comprehensive aviation solution. Check out these # tips for flight sim painting.
Tip 1: Materials
It’s actually inexpensive to paint a DIY Flight Sim project, so it’s well worth doing it. Here’s what you’ll need for flight sim painting:
Latex primer. Ask the paint associate at the store to tint this to your desired color. Latex primer covers well and it dries with a flat sheen (not glossy).
Paper towels and a household cleaner like Formula 409 or something similar. Clean the PVC pipe frame before painting. PVC pipe can be rather dusty, even when it’s brand new.
Disposable 2″ wide paint brushes for the pipe frame. These can be re-used and then later thrown away.
3″ wide paint rollers (and handle) for foam body panels. If you have many wood boards to paint, then also use the rollers for those. If you only have a couple of boards, the brush will do.
Paint tray for the rollers.
Plastic drop cloths to catch drips.
Scrap boards to prop up the frame for painting.
Quart ziplock bags and gallon ziplock bags.
Tip 2: Tint
Yes, you can tint latex primer. The store clerk might tell you that the color may not turn out exactly the same as the paint chip because it’s primer. That’s ok, just tell them you are a pro at flight sim painting and you know what you’re doing.
Here are the colors I use:
Dover Gray D58-4 by Olympic. This is a light gray that I use for nearly all of my DIY Flight Sim projects.
Knight’s Armor D25-5: This is a dark gray that I use for the windows of the DIY Flight Sim Pod and the frame for the DIY Deluxe Desktop Flight Sim.
You don’t have to use these exact colors for your flight sim painting project. One builder reported a problem using Olympic paint + primer combo on PVC pipes. He said it did not to adhere adequately to the PVC. On the other hand, I haven’t heard of any other builders that encountered that problem. It might be best to just stick with regular latex primer.
Tip 3: How Many Coats?
I usually end up putting three coats on a flight sim painting project. Especially when it is a simple PVC frame like Item #F311 DIY Side Joystick Frame. First of all, start painting the frame right side up and allow it to dry. Next, turn the framework upside down and you’ll see all the places you missed. Apply another coat and allow it to dry. Finally, flip the framework right side up again and apply the final coat.
Usually, I remove the wood boards from the frame, label them, and then paint them separately. That’s actually much easier than keeping them in place.
Tip 4: Keep Fresh
You can use your brush and roller multiple times without worrying about them drying out. Simply put the brush in a quart size ziplock bag and keep it in your refrigerator between coats. Push out as much air as you reasonably can from the bag. The same works for the paint roller, but use a gallon sized ziplock bag. Therefore, you can use the brush and roller as many times as you need during your flight sim painting project. Finally, then throw away the brush and roller when you’re finished.
Tip 5: Why not Spray Paint?
Why don’t I recommend spray paint for flight sim painting? Using spray paint on a PVC pipe frame is actually pretty difficult. It’s hard to paint pipes, because you always miss a spot and you end up applying 5 or 6 or more coats. Plus, you need adequate ventilation for spray paint.
Latex primer, on the other hand, is safe to use indoors. This is especially important because many DIY builders work on their projects during the winter months.
Tip 6: Light
Finally, make sure you have good lighting so you can catch the drips or any areas you may have missed. This is common sense, but many people ignore it. I recommend you set up additional lights around your flight sim painting project.
Flight Sim Painting Tips
You can learn more about this topic and many others in the Builder Academy. You’ll also receive updates about new, free DIY Flight Sim content.
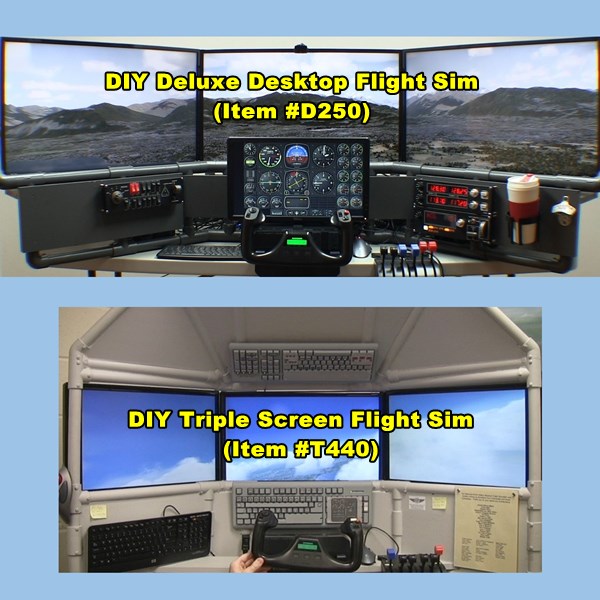
You’re looking for a home flight simulator for sale and you come across two similar DIY projects. How do you tell the two apart? The DIY Deluxe Desktop Flight Sim and the DIY Triple Screen Flight Sim are similar, but there are some significant differences too. Here are 7 ways to choose the best multi-screen DIY Flight Sim for you.
The D250 Deluxe is much more adaptable than the T440 Triple Screen.
D250: You can build the D250 with a yoke and throttle quadrant, or pair it with one of the DIY floor frames so you can use HOTAS style controls or even a helicopter collective. Match the D250 with the #F311 Side Joystick Frame, the #F321 Center Joystick Frame, or the #F331 Easy Helicopter Collective.
T440: On the other hand, the T440 is great with a yoke and throttle quadrant as originally designed. But if you want a joystick and side throttle, you would need to invent some modifications.
2. Recent Work
The D250 instructional video is much newer than the T440.
T440: I produced the T440 video in 2011 as a part of a successful Kickstarter campaign. I had a very short amount of time to design and build the project and a short time to film, edit, and publish the video. It’s still a great project though.
D250: I produced the D250 video in 2016 so it has better lighting, better sound, I used a better camera, and I had more experience editing than I did in 2011.
Deluxe Desktop Flight Sim with Side Joystick Frame
3. Displays
The D250 has larger screens.
D250: I used 32” HDTVs for the three main displays. The combined screen width is over 6 feet wide.
T440: I used 24” monitors for the three main displays. The combined screen width is less than the D250, but still impressive.
4. Keyboard Modification
The T440 was designed to have an overhead panel like an airliner. For this reason, the T440 Triple Screen bundle includes the DIY Airliner Keyboard Modification. The D250 doesn’t have a place for an overhead panel.
Home flight simulator for sale
5. Styrofoam
The T440 has Styrofoam, the D250 does not.
Builders use ½” styrofoam sheets when constructing the T440 Triple Screen project. Styrofoam may be cheap or expensive depending on where you live in the world.
6. Instrument Panel on a 4th Monitor
T440: You will see several builders in the Customer Gallery added a 4th monitor to display the flight instruments. I didn’t include anything about that in the instructions, those clever builders modified their projects on their own.
D250: I included instructions to add an optional 4th monitor for the flight instruments.
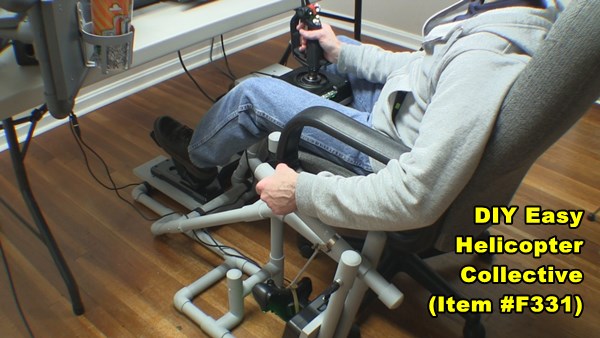
DIY Easy Helicopter Collective paired with the Deluxe Desktop Flight sim
7. Ease of construction
I think the D250 is easier to build than the T440.
D250: The project doesn’t require gluing any Styrofoam panels in place. But the D250 does include 1×8 boards. If your saw won’t cut 1×8 boards, you’ll need to get that done at the store when you buy them.
T440: The project doesn’t require you to cut any lumber wider than a 1×6. You do cut Styrofoam with a utility knife, but it is not difficult just a little time-consuming.
Home Flight Simulator for Sale
You have a lot of choices when it comes to your home flight sim project. I hope this comparison helps you.
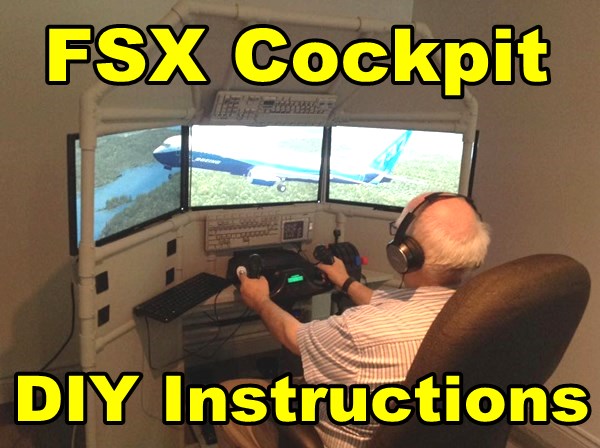
This is the greatest difference between Roger Dodger Aviation and the other guys: my customers actually complete their projects! My online courses include instructions for each step of the project including video clips, diagrams, pictures, and printouts. You can build a FSX cockpit DIY project like these guys!
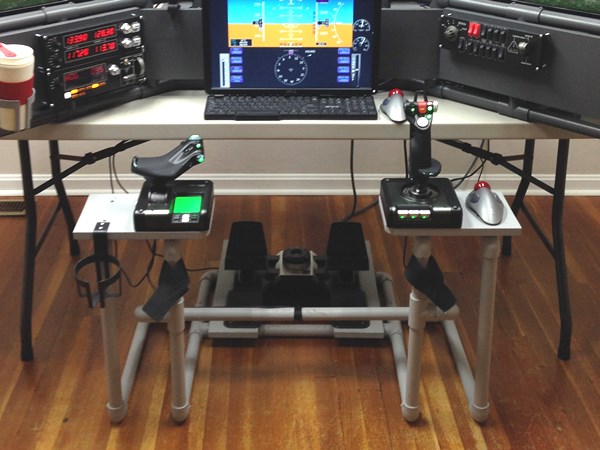
DIY Deluxe Desktop Flight Sim
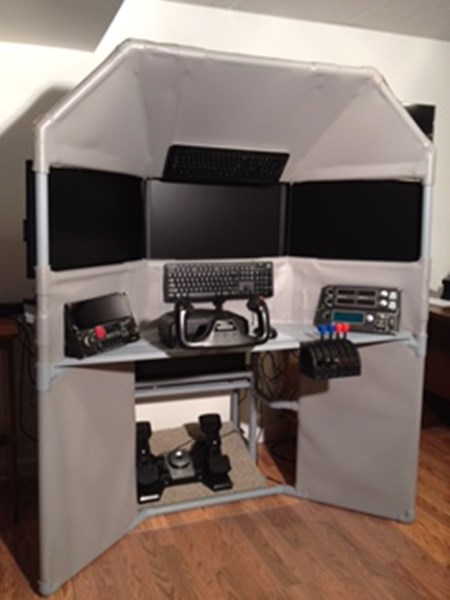
First of all, look at this beautiful DIY Deluxe Desktop Flight Sim item #D250. It was built by Greg in Savannah Georgia, USA. This is one of my favorite designs because it is so versatile. Builders can create exactly the type of home cockpit they need to match their flying interests. You can install a yoke and throttle quadrant in the #D250. On the other hand, you can also use a HOTAS joystick and throttle or even a helicopter collective.
The DIY Triple Screen Flight Sim, item #T440 is still my most popular DIY course. As a result, I get more T440 pictures than any other project. Two customers recently sent me pictures of their completed projects (see below). Wayne and Richard both build the same project but built it to suit their particular simulation requirements.
DIY Triple Screen Flight Sim built by Wayne
DIY Triple Screen Flight Sim built by Richard
Help Spread the Word: FSX Cockpit DIY Projects
Don’t let Facebook bury these success stories! These men worked hard on their FSX cockpit DIY projects and deserve to be congratulated. When I post on Facebook, the message only goes out to 10% of my fans. Please LIKE, COMMENT, and SHARE to spread the word. If you are reading this as a blog post, please link to it or share it with friends. Let’s show these guys our community appreciates a job well done.
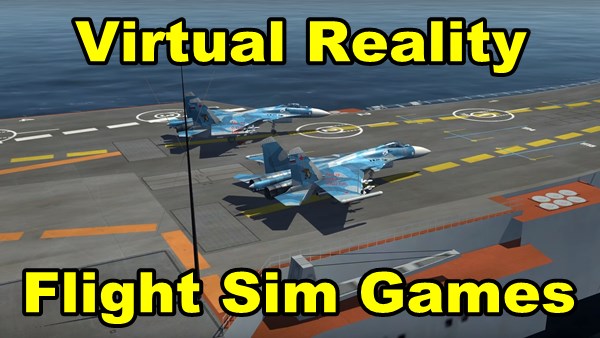
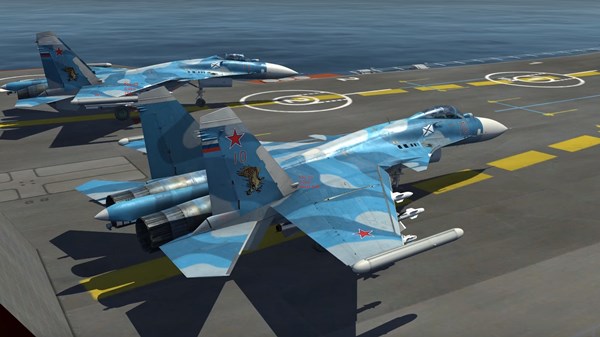
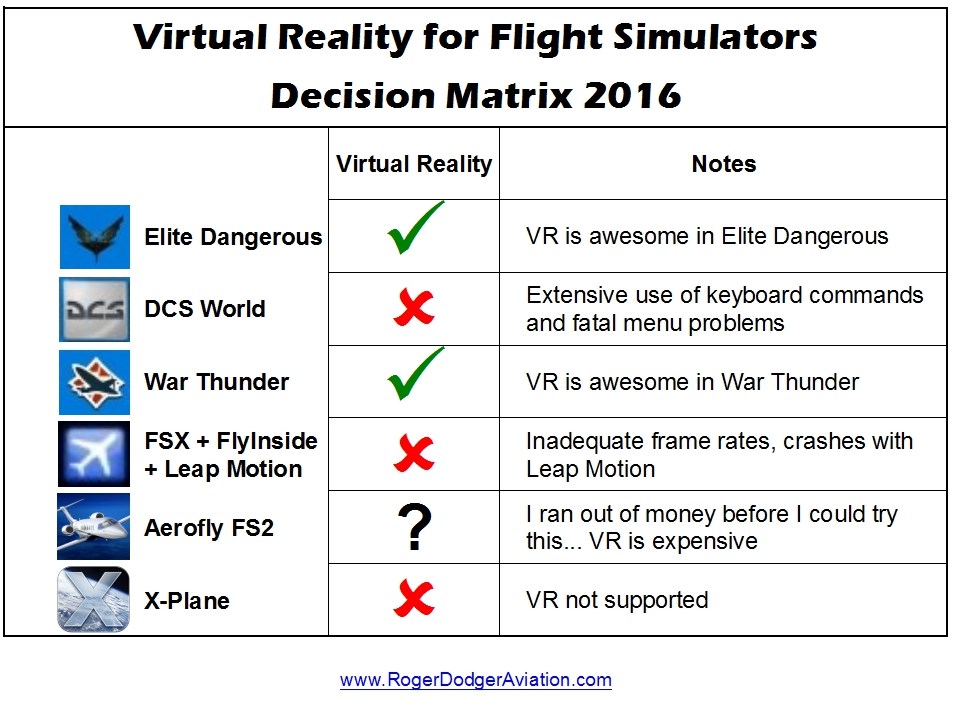
There are two types of virtual reality flight simulator games. One type includes titles with native support from the developer. The other type includes titles that need third party technology to work with VR. Virtual Reality brings with it exciting possibilities, but also significant performance challenges for developers.
Why is VR challenging for developers? Frame rates. Any software must provide at least 60 frames per second in order to be used with VR, and preferably over 90. Flight sim software has always struggled to provide high frame rates because of the expansive and detailed environment it models. Consequently, the software choices come down to a trade-off between performance and features, and I’ll elaborate on that more next.
DCS World
Aerofly FS2
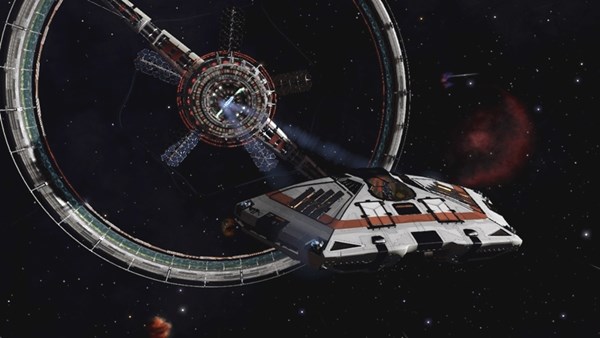
Elite Dangerous
Titles with Native VR Support
First of all, here are the flight sim titles with native VR support (as of Nov 2017): DCS World (modern military), IL-2 Sturmovik and War Thunder (both WW2), Aerofly FS2 (civil and military airplanes) and Elite Dangerous (sci-fi). These titles have good VR performance, which means they operate at high frame rates and look stunning.
The tradeoff is their limited features for flight simmers. They do not have global maps, weather options are limited, aircraft systems are not completely modeled, and they have limited choices in aircraft. Now before I get angry messages, DSC World is deeply detailed in aircraft systems and environmental fidelity, but only with the limited choices of aircraft and geographic area.
Furthermore, I’m not saying these virtual reality flight simulator games are undesirable. Each one is spectacular in its own way and the immersion is breathtaking. Indeed, once you try these titles in VR, you may never go back to a flat screen again.
Titles Without Native VR Support
The flight sim purists will point out that the titles I mentioned above were games, and the ones I discuss next are SIMULATORS. The three full-featured titles are Prepar3D, X-Plane 11, and FSX Steam. Can you fly these in VR? Yes, but only with Fly-Inside software and a Leap Motion device. Again, performance becomes a problem because these titles can’t hit consistently high frame-rates for VR.
Lastly, Dovetail Games’ Flight Sim World currently has no VR capability at all.
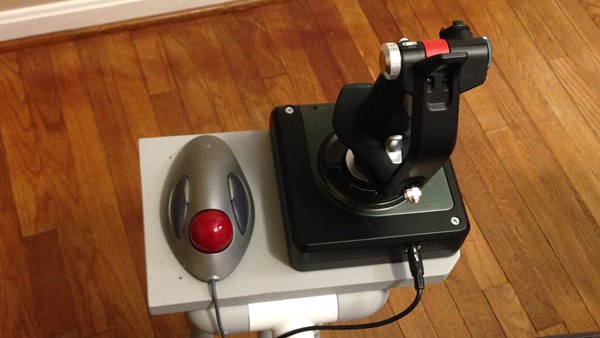
DIY Side Joystick Frame with trackball mouse
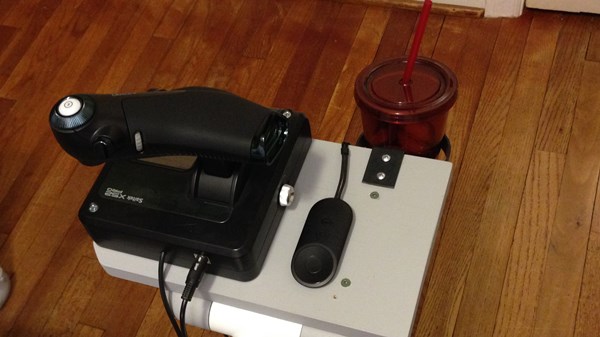
DIY Side Joystick Frame with drink holder
Using Virtual Reality in the Real Word
Once you strap on a VR headset, that is your new world. Forget using keyboard commands, you can’t see the keyboard. You may even lose track of your mouse or beverage. Everything must stay in the same place so you can put your hands on it without looking. This is why I strongly recommend a framework to hold your controls in place, like the DIY Side Joystick Frame, the DIY Center Joystick Frame, and the DIY Easy Helicopter Collective. These projects are for serious flying, so they include a mounting point for rudder pedals.
Add a trackball mouse, because it is priceless for VR flying. Use a drink holder and note it is hard to drink from a regular travel mug while wearing a VR headset. Use a cup with a straw. Also, set up a fan because VR headsets are warm and they make you warm too.
All DIY Flight Sim products are produced by me, Matt Thomas, here at Roger Dodger Aviation. These flight simulator build plans were originally sold as downloaded products. The customer would buy the instructional videos, manuals, and templates, and then download all contents in a big zip file. The customer would then open the files on a PC to view all the content.
That was a great idea in 2007, but not such a good idea 10 years later. Customers wanted better access to the content, and modern e-learning was the answer. With online tutorial courses, a student doesn’t have to sit through a giant video or sift through a 100+ pages of flight simulator build plans. I re-formatted all the content so each step in the building process has a short video clip, and the illustrated instructions for that step only. The plan drawings and printouts are presented with that step, instead of buried in an appendix.
You can now access the DIY Flight Sims courses with any device, even tablets and smart phones. This means you can bring all the instructions with you to the garage or workshop when you work on the project.
DIY Flight Sims made a huge leap forward in 2017.
How to Get the Updated Flight Simulator Build Plans
If you purchased an old Download version of a DIY Flight Sims product, you can get a free update to the new online course. The flight simulator build plans are in a better, learner-centered format, and many courses have additional material now.
Want the update? Simply email me at DIYflightsims@rogerdoger.net and tell me what product you bought and what email address you used. This will help me track down your order. Also tell me where you bought it if you purchased from a 3rd party vendor. I’ll send you a coupon code that will give you free access to the course.
New online courses are available for the following products:
You will have access to the original content for that product, but in the new format as an online e-learning course. I’ve updated and improved some of the projects, so you also get any new material that I’ve added. In addition, you also get a monthly notification of any future updates I make to the products in the Roger Dodger Insider. Finally, you also get free access to Builder Academy, which is where you learn all the basic skills for building DIY Flight Sims.
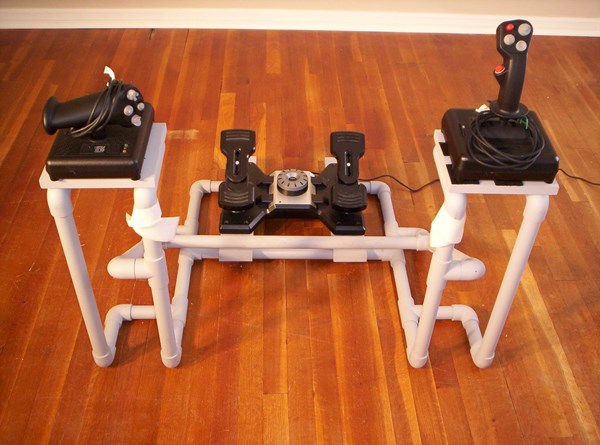
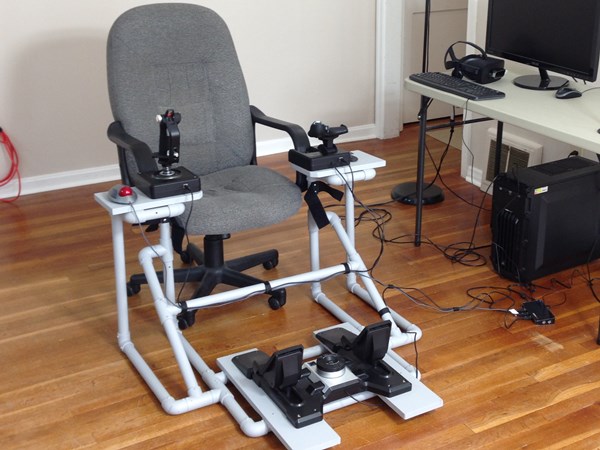
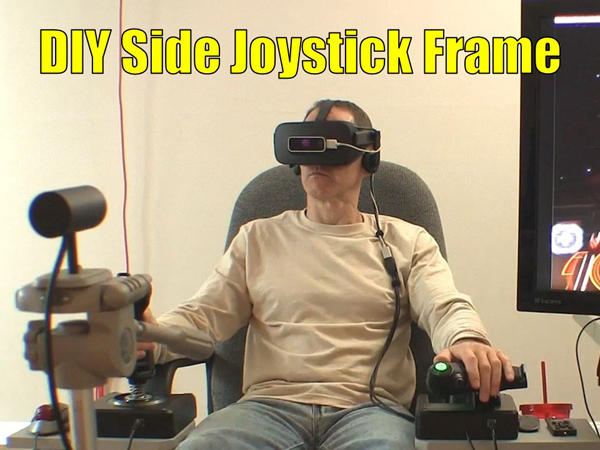
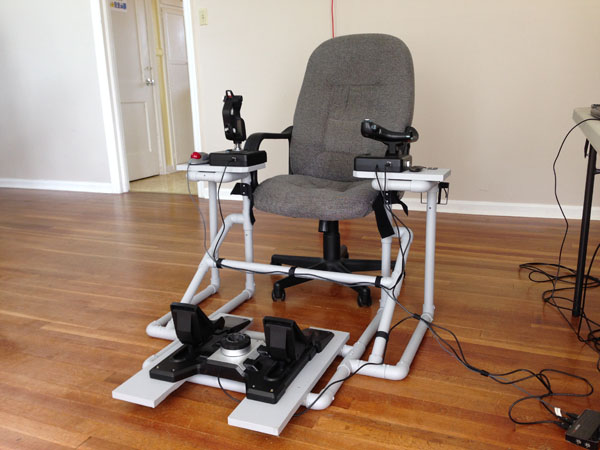
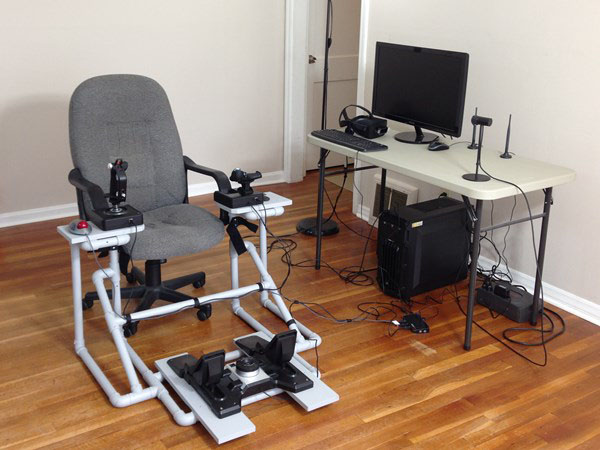
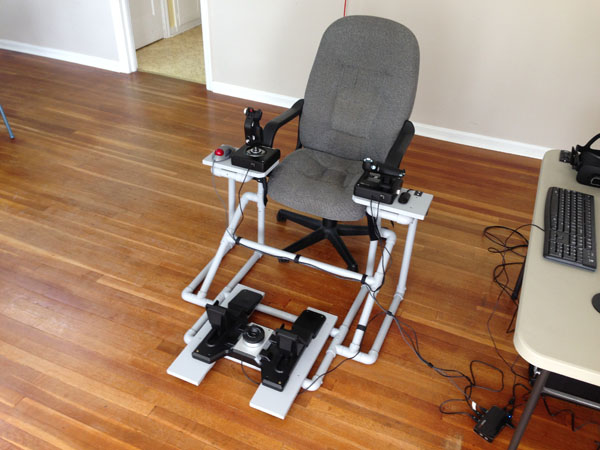
The F311 DIY Side Joystick Frame project demonstrates how to build a simple and useful DIY HOTAS mount for your flight simulator controls. You can attach the joystick, throttle, and rudder pedals to this sturdy framework. Furthermore, you don’t have to modify your office chair or desk! The new upgrade provides more room on the side stands which is especially helpful when you wear a Virtual Reality headset.
How to build a DIY HOTAS mount. Online tutorial
Original DIY HOTAS mount
Update for DIY HOTAS mount instructions
Update for DIY HOTAS mount
Learn how to build a DIY HOTAS mount for flight sim
How Do You Get the Upgrade?
The project upgrade is FREE if you already purchased the F311 DIY Side Joystick Frame. Just email me at DIYflightsims@rogerdodger.net to get your upgraded version. Be sure to tell me what email address you used so I can verify your order. Then, I’ll send you a coupon code that will allow you free access to the project.
You can get the updated F311 project here and then access the plans on any device. The F311 instructions are completely online, so you don’t have to download anything. The instructions, streaming videos, pictures, and printouts are all included with this online training course.
More about the DIY HOTAS Mount
I realized that I needed to make a few changes to the F311 frame when I tried the Oculus Rift VR headset. Remember, you can only see things inside the headset when you use VR, so it’s difficult to tap a keyboard key or find your mouse. As a result, my solution was to attach a trackball mouse beside the joystick. It’s always in the same place, so I don’t have to look for it. I tested (e.g. played with) this solution for many hours on Elite Dangerous.
Even in its original configuration, the F311 Side Joystick Frame works well with many types of flight sim setups. It’s easy to slide the frame under a desk or table, and then roll up to the frame with your office chair. Hold your chair in place with the Velco straps. Remember, you don’t have to modify your chair or desk to use this DIY HOTAS mount. This is a great addition to your home flight sim and works well with Lockheed Prepar3D, X-plane, Flight Sim World, FSX Steam, and others.
Marcin Strzyzewski invited me to do an interview for Onet online in Poland. Onet posts articles on a wide range of topics so I was happy to provide info about building flight simulator cockpit. Below are Marcin’s questions and my answers. Please let me know what you think of my responses.
1. What is the biggest fun in flight simulation?
Flight simulators can do many different things so that depends on what interests you. Think of the flight sim pilot population as three parts: Part 1 are the people that enjoy flying airliners with their flight simulator. Many of these users join Virtual Airlines and fly the same routes in the simulator as they would in real life. They fly online with other users that serve as air traffic control. Part 2 are all the pilots that used to fly in real life, or plan to fly later in real life, or they are active pilots now. You see these people using their simulator for civil airplanes and helicopters like the ones you would find at a flight school. Active pilots can fly a lesson in real life, then practice the same lesson at home with their simulator. Part 3 are the gamers and casual users. They fly space simulators or air combat simulators or maybe they just play around and fly for fun. This also a large and important population.
For me personally, I enjoy all the above. But most of all, I enjoy designing and building cockpit enclosures for home flight sims. I call these Do-It-Yourself (DIY) Flight Sims.
2. If some of our readers want to start making their own simulator, what is your advice?
First of all, know what type of aircraft you simulate the most. For example, a helicopter simulator project will look a lot different than an airliner simulator project.
Second, know your budget. If you live in a country where PVC pipe or lumber is really expensive, you should know that before you start. If you will buy new displays or new controls, start looking for sales. Retailers usually run a sale every month or two.
Third, and perhaps most important: negotiate with your spouse. A flight simulator will take up space in your home that can’t be used for other things. I designed both large and small DIY Flight Sims, but they all take up some measure of space. I recommend you talk this over with your spouse prior to construction. Note: if you can make the case that your children or grandchildren will somehow benefit from your flight simulator, this can help.
DIY Deluxe Desktop Flight Sim with 4 screens, yoke and throttle quad
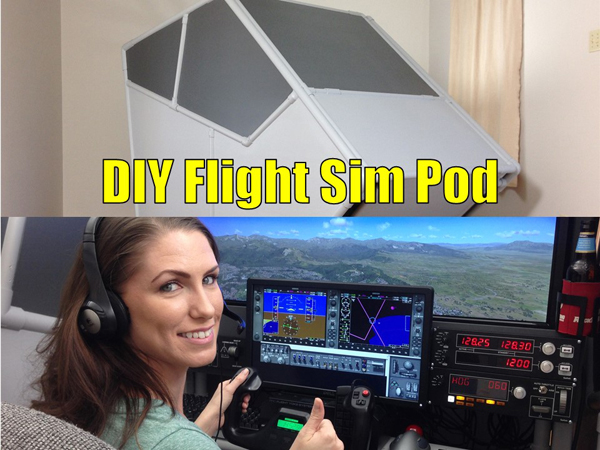
DIY Flight Sim Pod is a enclosed flight sim for maximum immersion
DIY Roll-Away Flight Sim is a compact full-featured sim that can fit anywhere
DIY Side Joystick Frame is a HOTAS chair that works well for VR
3. What is a most common mistake of the beginners?
The most common mistake is never starting the project. Actually, just getting started can be the most difficult part. No matter how large or small the project, you finish them all the same way: one step at a time, over and over, until you are done. I think my DIY videos help because you can see the building process before you personally start construction on your project. Just. Get. Started.
4. Building flight simulator cockpit sounds pricey is it in fact?
The most expensive components are the ones that keep going down in price: computers, graphics cards, touch-screens, and large HD displays. Therefore, these items get better and cheaper every year for building flight simulator cockpit. Other components are the flight controls and switch panels which can be good retail models, or more expensive premium models to fit your budget. My videos show how to build cockpit enclosures with materials from a home improvement store. Those materials are inexpensive in the USA, UK and Canada, but maybe not in other countries. For example, PVC pipe is expensive in New Zealand. I produce videos because they are the best way to teach building flight simulator cockpit.
5. What software is the best for simulators?
The flight simulator community (including third party developers) is unique because it mainly built up around Microsoft Flight Simulator X (FSX) for over a decade. Dovetail Games gave FSX new life by developing a version for Steam, however it’s still old software. As a result, we have wondered for years what will replace FSX, and today we have some newer options. Prepar3D Lockheed Martin’s Prepar3D (P3D) was developed by fixing and modernizing the old FSX code. P3D is an excellent flight sim platform, but some activities are prohibited because of Lockheed’s odd licensing agreement with Microsoft. X-Plane Laminar Research’s X-Plane 10 is also a solid flight sim platform with all the options of FSX, but with a smaller user base and somewhat fewer options from third party developers. X-Plane 11 was just released this month so it will be interesting to see how it performs in the market. Will X-Plane 11 be the ultimate replacement for FSX? We shall see.
Building flight simulator cockpit
6. Since now the best option was multiple monitors setting. Is this better now to use VR headset?
That is an excellent question, and the answer really depends on what type of flying you want to do. If you want to fly combat missions or spaceships, VR is a great option if you can afford it and if you don’t wear glasses. For example, Elite Dangerous and War Thunder are awesome in VR. The depth of field and the immersion are astonishing. Keep in mind, when you wear a VR headset, you can no longer see your actual controls, or a keyboard, or mouse. So your best option is HOTAS (Hands On Throttle And Stick) flying. Basically, if you can do everything you need to do in the sim without removing your hands from the joystick and throttle, and if you can memorize all the button assignments, then that sim could be a good option for VR.
If you fly airliners, civil training airplanes, or helicopters you will be performing a lot of tasks where you need to reach out with your hand and touch the control panel. You will tune radios, adjust the GPS, set the navigation headings, set the autopilot, and more. As of right now, it’s really difficult to do these tasks in VR so traditional flight simulators are best for this type of flying. In traditional flight simulators we use actual retail switch panels, modified keyboards, a touch screen, a real checklist, a real aviation map, or all of these things. I think it will stay that way for a long time and more people will be building flight simulator cockpit.
7. How looks your simulator, can you share some pictures with us?
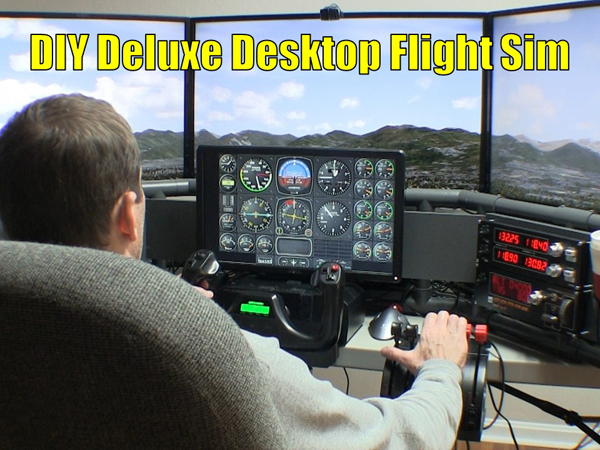
Sure, here are pictures from four very different DIY flight simulators (see the slideshow gallery on this page).
The DIY Side Joystick Frame is one of my most popular projects, and it’s very versatile. Even though I published this project 6 years ago, the design has stood the test of time. Yet, as great as it is, I have recently made a few modifications to the design that you might find helpful for your project. Read on for 5 Modifications for a DIY HOTAS Chair for Virtual Reality and More.
A True HOTAS for your Flight Sim
The DIY Side Joystick Frame, Item #F311, makes a true HOTAS (Hands On Throttle And Stick) possible for your flight simulator because the project also includes rudder pedals. True pilots use rudder pedals, not joystick twisty grips so always remember that. I originally envisioned the F311 as useful primarily for jet fighter simulators, but now, many customers are using it for space sims like Elite Dangerous and Star Citizen.
Use the F311 in combination with a Virtual Reality headset. Remember, when you wear a VR headset, you can’t see your keyboard any more and any functions you have assigned to your keyboard keys are literally out of sight. You can also use the F311 with a traditional multi-monitor setup like the DIY Deluxe Desktop Flight Sim (Item D250). The F311 is delightfully versatile and useful. Use these 5 Modifications for a DIY HOTAS Chair to update the F311.
5 Modifications for a DIY HOTAS Chair
F311 HOTAS with a multiple screen flight simulator
F311 HOTAS in combination with VR
DIY Side Joystick frame with a quad screen flight sim
F311 HOTAS chair for flight sims, Saitek X52 and trackball mouse
F311 Side Joystick Frame with D250 Deluxe Desktop Flight Sim
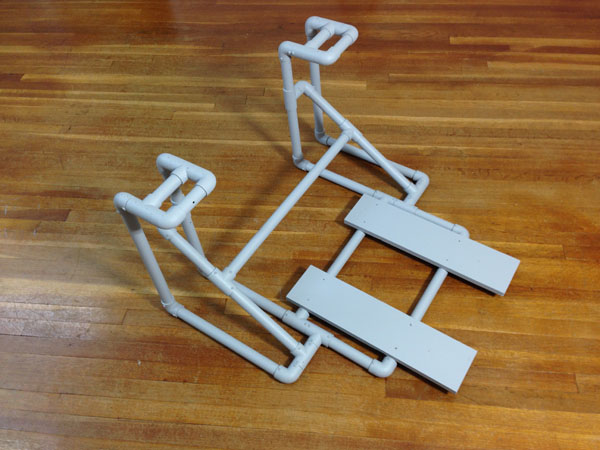
F311 Side Joystick frame without the Side Stand platforms
5 Modifications for a DIY HOTAS Chair
I made five main modifications to adapt the F311 Side Joystick Frame for my current requirements. None of these modifications are difficult. If you can build the F311 in the first place, you can certainly make these modifications or include these changes during the initial build.
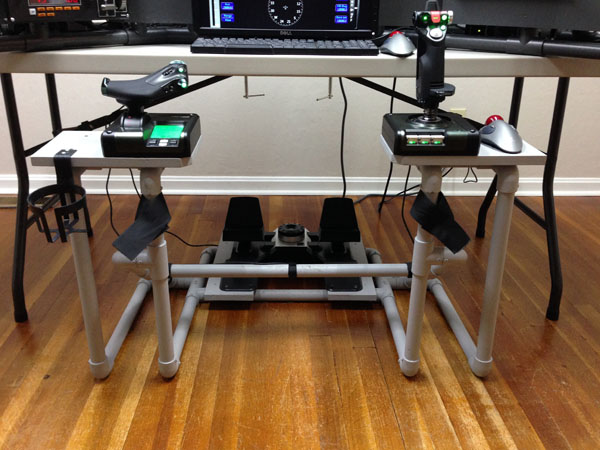
1. Wider Side Stand Platforms
First of all, I installed wider side stand platforms, cut from 1×8 boards. To be clear, the PVC pipe side stands did not change, just the the boards that attach to the top of the stands. I topped the side stands with 1×8 boards, 12″ long. The wider boards give you room for a trackball mouse next to the joystick and give you room next to the throttle to set down your phone or whatever. Most importantly, you can place the controls in a more ergonomic location. This means placing the joystick and throttle in line with the chair’s arm rests. This is so important! Place the joystick and throttle so that your arms sit straight on the chair’s arm rests. This will allow you to fly comfortably for hours.
In addition, I attached the joystick and throttle with wood screws instead of Velcro. I also trimmed the inside corners of the 1×8 boards by 1″ and sanded the edges so my legs wouldn’t get caught on the corners.
2. Longer floor boards
I use the Saitek Pro Flight Cessna Rudder Pedals, and I really like them, but they have to be positioned further away from the pilot. The rudder pedals attach to the Floor Boards with Velcro, but the original boards were too short. Therefore, I replaced them with two 1×6 boards, 22″ long. You might not need to make this change for your rudder pedals.
3. Raised center stabilizer
I also raised the center stabilizer bar to allow room for the Saitek Pro Flight Cessna Rudder Pedals. Specifically, the back of my ankles banged into the stabilizer bar, so I had to move it. It is now 6.5″ higher than it was before.
4. Self-drilling screws
I now use self-drilling screws in everything I build. Back in 2010 when I designed this project, I used Liquid Nails Project Glue to attach all the PVC pipes and fittings. This allowed for some cost-savings, but self-drilling screws are far superior. The screws allow for a simpler assembly with no overnight dry time. In addition, the screws create a much stronger frame. Lastly, you can remove the screws later if you decide to modify the frame. I absolutely recommend using 1/2″ self-drilling screws to build DIY Flight Sims from PVC pipe.
Don’t fly thirsty! I include a cup holder with almost every project I design. The cup holder is located next to the throttle and it’s easy to find it, even when wearing a VR headset. I use these inexpensive cup holders from Amazon.
If you’ve already built the DIY Side Joystick Frame, Item F311, or if you haven’t built one yet, these 5 Modifications for a DIY HOTAS Chair can enhance your home flight simulator experience for years to come.
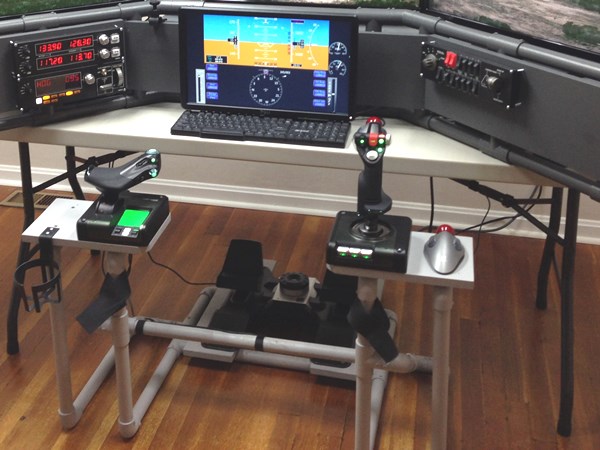
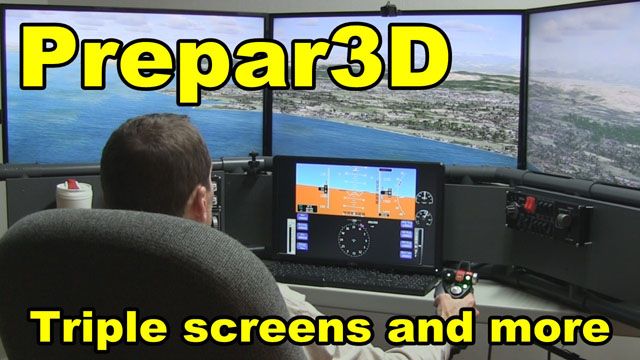
What you’re seeing here is Lockheed Martin Prepar3D with triple screens and more. The software is Prepar3D version 3.4, the DIY Deluxe Desktop Flight Sim, the DIY Side Joystick Frame, Air Manager is running the instruments on the 4th display. The installation of P3D was straightforward and you’re looking at a stock installation with no add-ons (yet).
The three main displays are inexpensive 32″ HDTVs connected to a single Nvidia GeForce mid-level graphics card. The system specs are at the end of this blog post.
Prepar3D Installation
P3D recognized the Saitek X52 Pro and properly assigned its functions, which was very nice. For other flight simulator programs, assigning the controls correctly is an awful awful chore, but not for P3D. This is the first flight simulator software I’ve ever seen that correctly identified rudder pedals and successfully assigned them to the correct function. Including the toe brakes. So, kudos to Lockheed Martin. They also build spaceships, by the way. Just so you know.
It’s easy to combine the DIY Side Joystick Frame, (item 311), with the Deluxe Desktop Flight Sim project. I’m using the Saitek Pro Flight Cessna rudder pedals. Great rudder pedals. I updated the drivers for my Saitek switch panels that enabled them to work with P3D. That was easy.
You’ll notice that nothing here is expensive or exotic… or even new. For example, I’m using a second-hand computer to display the flight instruments. The second computer is so old it’s running Windows Vista.
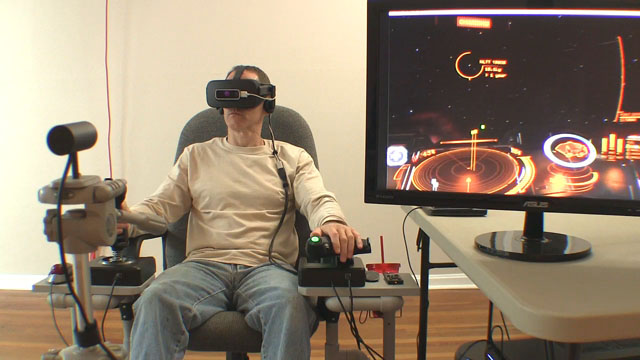
Is is time to take the leap into Virtual Reality and incorporate it into your flight simulator? Maybe not, depending on what you like to simulate. In this article I continue my exploration of Virtual Reality for Flight Simulator and discuss Flight Simulator X, War Thunder, some physical and financial issues, and system specs. In Part 1 of this article, I experimented with DCS World and Elite Dangerous in Virtual Reality. You can read it here.
Flight Simulator X with FlyInside and Leap Motion
This is the big one! FlyInside FSX is an ambitious project to make Microsoft Flight Simulator X compatible with VR. Leap Motion is an infrared sensor that can detect the location and position of your hands, so you can see your hands in Virtual Reality. Put FlyInside and Leap Motion together and you can activate airplane switches with your hands in the FSX virtual cockpit! If that is difficult to imagine, here is a video that demonstrates it.
Disclaimer: I discovered it’s really difficult to take good screen shots in Virtual Reality for flight simulator, so for this article I borrowed representative pics from other sources. This has no impact on the validity of my findings.
FlyInside FSX is a rather new project and even though it didn’t work for me, I still think it’s important to support the developer. The first flight I tried was the simple default flight around Friday Harbor in a Piper Cub. It was pretty cool to look around in VR, as long as I didn’t move my head too fast. Virtual Reality works best when the images are rendered at 90 frames per second or more. The stock FSX can’t consistently provide fps nearly that fast, but FlyInside has a trick to get around that. Unfortunately, it didn’t work well enough. When I moved my head, the images lagged. Lagging equals motion sickness, remember that. When the images you see with your eyes do not match your head movement, you can get motion sickness very quickly. I’m not prone to motion sickness, so I was able to do a few takeoffs and landings without barfing, but the experience is not nearly as good as VR in other flight sim software. On the other hand, I found that it’s easier, and it feels more realistic to land an airplane in VR.
I tried to trim the airplane during flight, and that’s when it all went sour. Recall that I also used Leap Motion, so I could literally see my hands while flying in the virtual Piper Cub. This is supposed to give me the ability to manipulate controls and switches in the cockpit, much like it’s possible now with the mouse. I reached out to adjust the elevator trim and…. FSX crashed. I re-booted and tried the same thing again… another crash. And that’s it. After two crashes, I’m done.
Conclusion: support this project. I did, but I won’t use it again until it’s more reliable.
War Thunder
Combat in Elite Dangerous made me miss my old online squadron. I had never played War Thunder before, but it’s free to sign up so I enlisted and went back to World War 2 for the first time in several years. This game was much more menu-friendly to VR than DCS world was. I wasn’t familiar with War Thunder, so it took a while to get my controls and buttons assigned. Apparently, the game isn’t expecting many users to have rudder pedals, so that really throws it for a loop.
Once I had my controls set up, I launched into battle with my pathetic P-26 Peashooter (that’s how you start out). Even with my crappy plane, I had blast in War Thunder. I had a level of spatial orientation that I’ve never had before in a flight simulator. VR is a game changer for air combat because of the way I could look above, below, behind, and around the cockpit frame. Even though I was a rookie, most of the guys in the Arcade level don’t know anything about energy fighting so I was able to use that to my advantage and I leveled-up rather quickly, or at least I think I did. The flurry of levels and tokens and things are still a mystery to me.
War Thunder also has a Realistic mode that I tried, but I didn’t get my controls completely set up. A Saitek X-52 looks nothing like the controls you would have in a WW2 airplane, so this means I need to assign mixture, prop and some other functions to the knobs on the throttle, which I wasn’t all that excited about. I’m sure I’ll revisit that at some point.
I experienced my first strong physical reactions in Virtual Reality while playing War Thunder. My heart was pounding and I was sweating profusely during combat. I had to take breaks between sorties for my heart rate to come down and I pointed a fan at myself to cool off. This is serious fun!
Conclusion: I will only play War Thunder in VR. That’s how good it is.
Edit: the recent update of War Thunder failed because the sound no longer works. As a result, I won’t be playing this again until they fix it.
Matrix: Virtual Reality for Flight Simulator
Here is a summary of my findings with the flight sim software. Read on for financial and physical implications.
Virtual Reality for Flight Simulators Decision Matrix 2016
Virtual Reality: Financial Issues
The FlyInside developer recommends FSX Steam because it works better with FlyInside for some reason. I would like to try it, but I’m simply out of money. Virtual Reality costs real money. It is expensive. The Oculus Rift headset was over $600 with shipping, but I also needed a new computer to run it. I shopped smart but still spent over $1160 on a new gaming computer (specs below) and that still wasn’t enough. I’ll need to spend another $600 on a new graphics card before I can run the Rift at high definition 1080p. I bought Leap Motion on sale, but I can’t use it because of the problem with FlyInside FSX. I couldn’t afford to even try Aerofly FS2.
Notice that Virtual Reality did best with games, not simulators. Flight Simulator X was not usable and X-plane doesn’t support VR at all. Think long and hard about spending your money. VR is for gaming, not for simulating.
Virtual Reality: Physical Issues
You can’t wear glasses with the Oculus Rift. Well, technically you can, there is an awkward way to do it, but the headset will push the glasses against your face, which is very uncomfortable. Realistically, it’s contact lenses or nothing and that’s just the way it is right now. Maybe there will be helpful remedies in the future.
Motion sickness is a risk if you’re prone to motion sickness in general. If you typically feel nauseous in a plane or boat or car, you may feel the same in VR. Furthermore, if your computer can’t render VR in 60 frames per second (at least), you may feel nauseous in Virtual Reality for flight simulator. Luckily, motion sickness if easily remedied because you can just take a break and remove the headset for a while.
Pounding heart, sweaty armpits, residual headset heat, dry eyes. Clinical flight simulator research shows that pilots start to have involuntary physical responses to professional flight simulators when the images are rendered higher than 60 fps. In other words, their palms sweat. In my experience, my heart was pounding, I was breathing heavy, and my whole body sweat during combat in War Thunder. I took breaks between sorties to calm down, it was that intense. Sometimes my eyes would get dry in VR because I probably don’t blink as much as I should. Lastly, the Oculus Rift headset gets warm during use, so I needed a fan blowing on me to help me stay comfortable. That’s unusual for me, I typically have a lower than average body temperature.
Virtual Reality: Emotional Responses
I didn’t expect to have any emotional reactions to VR but I did. Virtual Reality for flight simulator wasn’t the only thing I tried, I also looked at some 360 degree videos. When you view these videos, it’s like you are inside the video and you can turn any direction to see what’s happening around you. Several little clips are included in the Oculus library.
One clip showed a young couple on a gondola ride in Venice. The camera was in the boat with them so it seemed like I was riding along with them too. It was a vacation I can’t afford in a city I’ll probably never visit and yet, I was there… virtually.
Another 360 video clip showed a family in Asia somewhere and their house was basically a little shack on stilts in the water and again, I was there… virtually. I was reminded of how lucky I am to even experience VR because my computer and VR headset probably cost more than their annual income.


Recent Comments