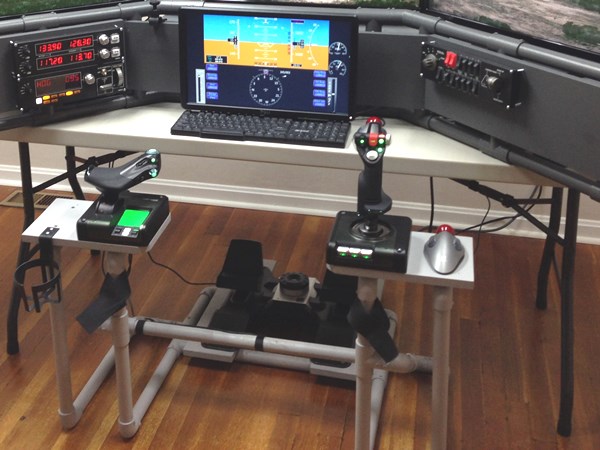
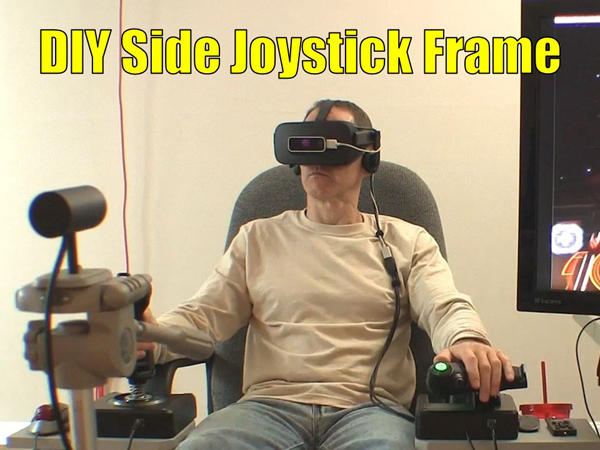
The F311 DIY Side Joystick Frame project demonstrates how to build a simple and useful DIY HOTAS mount for your flight simulator controls. You can attach the joystick, throttle, and rudder pedals to this sturdy framework. Furthermore, you don’t have to modify your office chair or desk! The new upgrade provides more room on the side stands which is especially helpful when you wear a Virtual Reality headset.
How to build a DIY HOTAS mount. Online tutorial
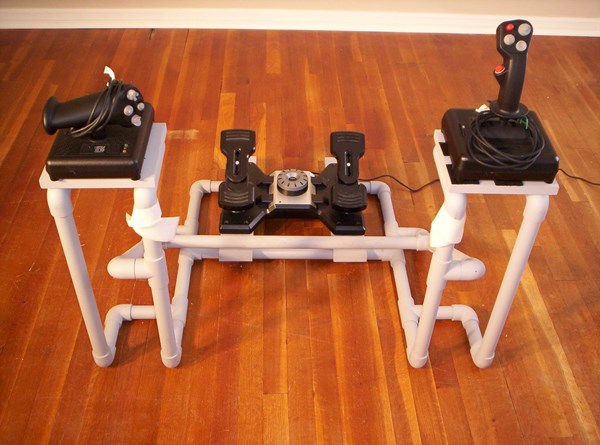
Original DIY HOTAS mount
Update for DIY HOTAS mount instructions
Update for DIY HOTAS mount
Learn how to build a DIY HOTAS mount for flight sim
How Do You Get the Upgrade?
The project upgrade is FREE if you already purchased the F311 DIY Side Joystick Frame. Just email me at DIYflightsims@rogerdodger.net to get your upgraded version. Be sure to tell me what email address you used so I can verify your order. Then, I’ll send you a coupon code that will allow you free access to the project.
You can get the updated F311 project here and then access the plans on any device. The F311 instructions are completely online, so you don’t have to download anything. The instructions, streaming videos, pictures, and printouts are all included with this online training course.
More about the DIY HOTAS Mount
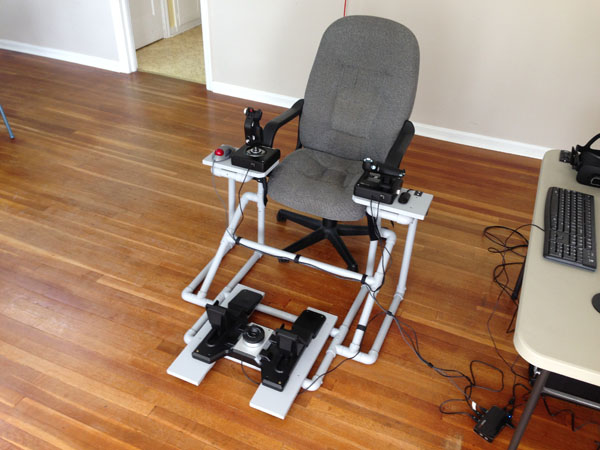
I realized that I needed to make a few changes to the F311 frame when I tried the Oculus Rift VR headset. Remember, you can only see things inside the headset when you use VR, so it’s difficult to tap a keyboard key or find your mouse. As a result, my solution was to attach a trackball mouse beside the joystick. It’s always in the same place, so I don’t have to look for it. I tested (e.g. played with) this solution for many hours on Elite Dangerous.
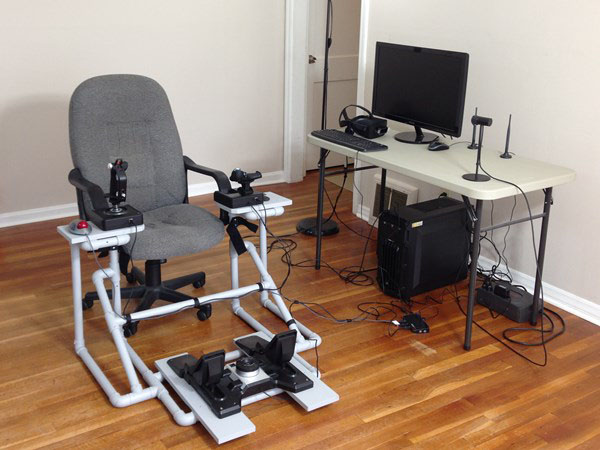
Even in its original configuration, the F311 Side Joystick Frame works well with many types of flight sim setups. It’s easy to slide the frame under a desk or table, and then roll up to the frame with your office chair. Hold your chair in place with the Velco straps. Remember, you don’t have to modify your chair or desk to use this DIY HOTAS mount. This is a great addition to your home flight sim and works well with Lockheed Prepar3D, X-plane, Flight Sim World, FSX Steam, and others.
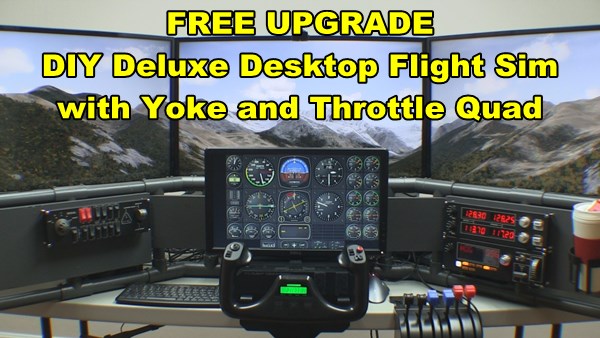
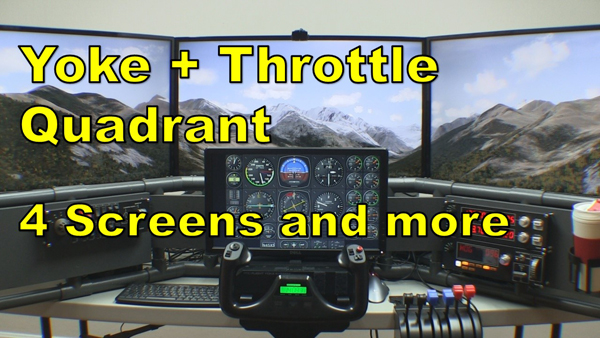
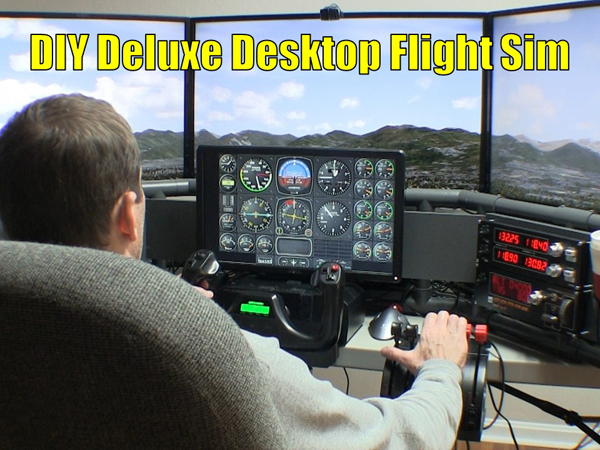
The D250 DIY Deluxe Desktop Flight Sim project shows you how to build a multiple monitor flight simulator for your home. Until now the project was only used with a joystick and side throttle. However, this update makes it possible to use the D250 frame with an airplane yoke and throttle quadrant. The instructions show you how to raise the center instrument panel to make room for the yoke. Also, the Saitek switch panels are mounted in a different configuration which are detailed in the new plan drawings. The new switch panel placement is better for a pilot that is flying with a yoke. Use the D250 home cockpit with your FSX multiple monitors setup… or P3D, or X-plane, or Flight Sim World. The project is platform independent so you can use it with any flight sim program.
Flight Sim FSX multiple monitors
online DIY flight sim training
FSX multiple monitors
View the Builder Academy on your phone or tablet or anything
How To Get Your Upgrade
This is a FREE upgrade if you already purchased the D250 Deluxe Desktop Flight Sim. Email me at DIYflightsims@rogerdodger.net to get your update. Tell me what email address you used when you ordered the project so I can verify your order. I’ll send you a coupon that will allow you free access to the project.
You can get the updated D250 project here and then access the plans on any device. The D250 instructions are now 100% online, so there are no downloads to worry about. The instructions, videos, pictures, and printouts are all categorized for easy access. You will receive ALL of the instructions, so scroll down to “Instrument Panels: Yoke and Throttle Quadrant” to see the updated material.
FSX Multiple Monitors
The new upgrade means that the DIY Deluxe Desktop can be combined with the F311 Side Joystick HOTAS Frame, the F321 Center Joystick Frame, or utilize the yoke + throttle quadrant option. It’s a multiple monitors flight simulator project that works with three screens. In addition, you can add a fourth smaller screen for the flight instruments. This project is one of the most versatile DIY Flight Sim projects I’ve ever created. I’m very excited to present it to you in this new mobile format.
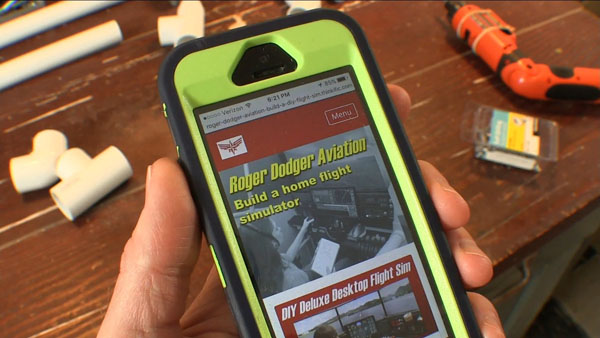
I can now teach you how to build a home flight simulator in a online streaming format instead of selling downloads! This is a huge step forward for my little company. Look at the picture above… you can actually view an entire DIY Flight Sims project on a phone or tablet!
9 Reasons Why this is Awesome:
The video and text content is now integrated. For each step, there is a video clip and the corresponding text it there with it. So in one example, I chopped up a 40 minute video into smaller segments. Each video clip appears with the corresponding step in the text.
Accessible on any device: phones and tablets as well as laptops and desktops. There were no smart phones when I started making these DIY projects 10 years ago. But now, you can take the lesson to the workshop with you.
A real affiliate program! My fans can also be my partners. If you have a blog or website, you can sell DIY Flight Sims products and earn a commission!
No more cumbersome downloads. 95% of the emails I get from customers are people that lost their downloaded material and I have to manually send them a new download link. So then they have to wait on me to get their message and get to my computer. Well they don’t have to wait any more.
Standard password recovery. Lose your password? No problem. Just re-set it like on any other website.
Free updates for existing customers. I can give free access to customers that purchased the download version of these products. I can simply issue a 100% off coupon and that gives them access.
Freebies! I used to include many basic training videos in a “Free Video” folder with each purchase. I’ve moved all of this content, and added new content to the Builder Academy.
We still have printouts! People are already asking me, how do they print out the templates or button sheets? The online format still allows you to print Adobe pdf files. It’s just as easy as ever.
It’s a secure website with SSL protection. Browse safely, and then build safely.
I made four simple, yet significant changes to the D250 Deluxe Desktop home built flight simulators. Consequently, these changes bring me back into the beloved world of general aviation. See me in the video flying a Beechcraft Baron once agian.
1. Added a Yoke and Throttle Quadrant
I removed the side-mounted HOTAS joystick and throttle and added a Saitek flight yoke and throttle quadrant. I attached the trim wheel underneath the throttle quadrants, and that is the perfect location. Once again, I can fly multi-engine airplanes like the Beech Baron, or light general aviation airplanes like the Cessna 172.
Home built flight simulators with new mods
2. Raised the Instrument Panel Display
I use an inexpensive 19″ monitor to display the flight instruments on the D250. The yoke housing did not fit under the 19″ monitor, so I raised the monitor mount a few inches. I simply replaced the board for the Center Instrument Panel and attached an adapter board for the monitor mount.
Raised monitor mount for instrument display
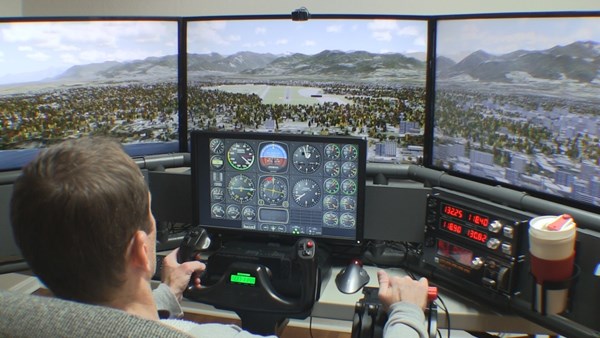
3. Moved all Saitek Switch Panels
When you fly an airplane with a yoke, your left hand is typically on the yoke and your right hand is free to adjust the radio frequencies, dial in nav headings, and more. The D250 wasn’t set up like this because I used it to fly helicopters. As a result, the radios were on the left side of the cockpit, because a helicopter pilot typically keeps his right hand on the cyclic (joystick) and the left hand is free. I cut new 1×8 boards for the Left and Right Side Instrument Panels and re-arranged, and re-mounted the Saitek switch panels.
Yoke and throttle quadrant mod for the DIY flight sim
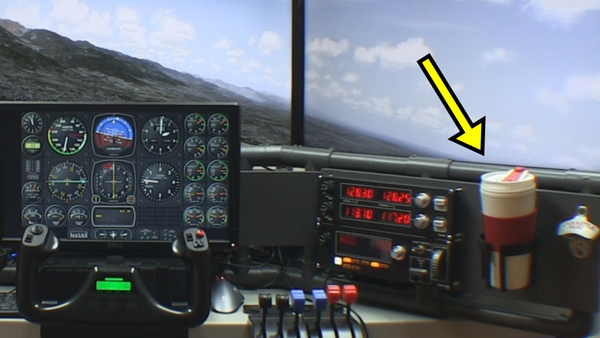
4. I Moved the Drink Holder
Don’t fly thirsty! I moved the drink holder to the right side of the cockpit so I could easily reach it with my right hand. The drink holder is the right size for a travel mug or a bottle with a drink coozie.
Important drink holder in the home flight sim
Plans for Home Built Flight Simulators
Do you want to build this same flight simulator for your home? If I get enough interest from my DIY community then I will create an additional Instruction Manual and include it with the original plans. In addition, customers who have already purchased this project will get the new plans for free.
System Specs and Peripherals
Notice these computers are not especially strong or new. You don’t have to spend $2000 on a computer to have great home built flight simulators.
DIY Deluxe Desktop Flight Sim, item #D250 Primary computer: Powerspec B634 with Intel i5-3450 Nvidia GeForce GTX 950 SSC Windows 7, 64 bit Flight yoke: Saitek Pro Flight Saitek throttle quadrant Saitek Pro Flight trim wheel Pro Flight Cessna rudder pedals from Saitek
Switch panels: Saitek PZ55, PZ69, PZ70
Marcin Strzyzewski invited me to do an interview for Onet online in Poland. Onet posts articles on a wide range of topics so I was happy to provide info about building flight simulator cockpit. Below are Marcin’s questions and my answers. Please let me know what you think of my responses.
1. What is the biggest fun in flight simulation?
Flight simulators can do many different things so that depends on what interests you. Think of the flight sim pilot population as three parts: Part 1 are the people that enjoy flying airliners with their flight simulator. Many of these users join Virtual Airlines and fly the same routes in the simulator as they would in real life. They fly online with other users that serve as air traffic control. Part 2 are all the pilots that used to fly in real life, or plan to fly later in real life, or they are active pilots now. You see these people using their simulator for civil airplanes and helicopters like the ones you would find at a flight school. Active pilots can fly a lesson in real life, then practice the same lesson at home with their simulator. Part 3 are the gamers and casual users. They fly space simulators or air combat simulators or maybe they just play around and fly for fun. This also a large and important population.
For me personally, I enjoy all the above. But most of all, I enjoy designing and building cockpit enclosures for home flight sims. I call these Do-It-Yourself (DIY) Flight Sims.
2. If some of our readers want to start making their own simulator, what is your advice?
First of all, know what type of aircraft you simulate the most. For example, a helicopter simulator project will look a lot different than an airliner simulator project.
Second, know your budget. If you live in a country where PVC pipe or lumber is really expensive, you should know that before you start. If you will buy new displays or new controls, start looking for sales. Retailers usually run a sale every month or two.
Third, and perhaps most important: negotiate with your spouse. A flight simulator will take up space in your home that can’t be used for other things. I designed both large and small DIY Flight Sims, but they all take up some measure of space. I recommend you talk this over with your spouse prior to construction. Note: if you can make the case that your children or grandchildren will somehow benefit from your flight simulator, this can help.
DIY Deluxe Desktop Flight Sim with 4 screens, yoke and throttle quad
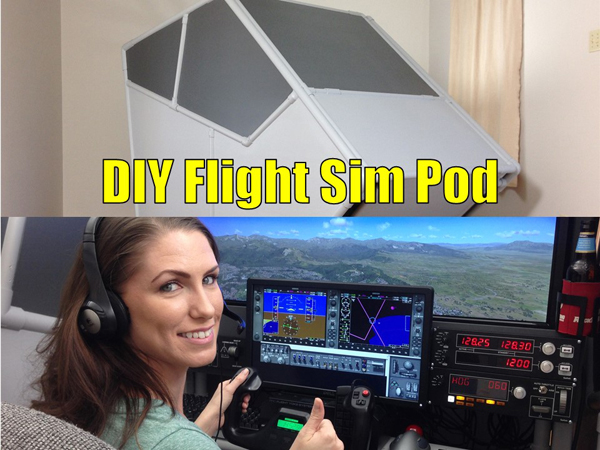
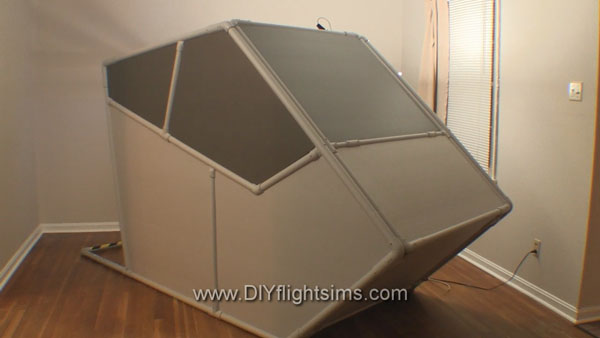
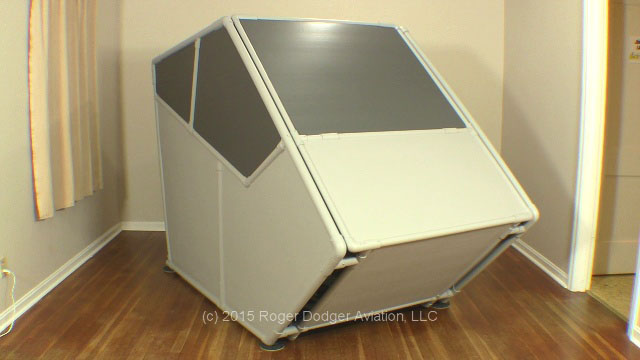
DIY Flight Sim Pod is a enclosed flight sim for maximum immersion
DIY Roll-Away Flight Sim is a compact full-featured sim that can fit anywhere
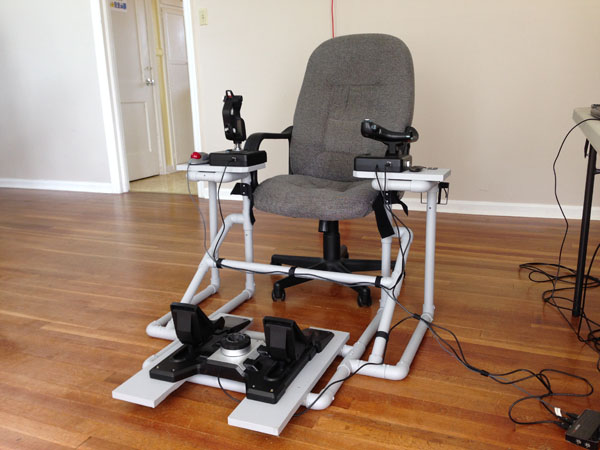
DIY Side Joystick Frame is a HOTAS chair that works well for VR
3. What is a most common mistake of the beginners?
The most common mistake is never starting the project. Actually, just getting started can be the most difficult part. No matter how large or small the project, you finish them all the same way: one step at a time, over and over, until you are done. I think my DIY videos help because you can see the building process before you personally start construction on your project. Just. Get. Started.
4. Building flight simulator cockpit sounds pricey is it in fact?
The most expensive components are the ones that keep going down in price: computers, graphics cards, touch-screens, and large HD displays. Therefore, these items get better and cheaper every year for building flight simulator cockpit. Other components are the flight controls and switch panels which can be good retail models, or more expensive premium models to fit your budget. My videos show how to build cockpit enclosures with materials from a home improvement store. Those materials are inexpensive in the USA, UK and Canada, but maybe not in other countries. For example, PVC pipe is expensive in New Zealand. I produce videos because they are the best way to teach building flight simulator cockpit.
5. What software is the best for simulators?
The flight simulator community (including third party developers) is unique because it mainly built up around Microsoft Flight Simulator X (FSX) for over a decade. Dovetail Games gave FSX new life by developing a version for Steam, however it’s still old software. As a result, we have wondered for years what will replace FSX, and today we have some newer options. Prepar3D Lockheed Martin’s Prepar3D (P3D) was developed by fixing and modernizing the old FSX code. P3D is an excellent flight sim platform, but some activities are prohibited because of Lockheed’s odd licensing agreement with Microsoft. X-Plane Laminar Research’s X-Plane 10 is also a solid flight sim platform with all the options of FSX, but with a smaller user base and somewhat fewer options from third party developers. X-Plane 11 was just released this month so it will be interesting to see how it performs in the market. Will X-Plane 11 be the ultimate replacement for FSX? We shall see.
Building flight simulator cockpit
6. Since now the best option was multiple monitors setting. Is this better now to use VR headset?
That is an excellent question, and the answer really depends on what type of flying you want to do. If you want to fly combat missions or spaceships, VR is a great option if you can afford it and if you don’t wear glasses. For example, Elite Dangerous and War Thunder are awesome in VR. The depth of field and the immersion are astonishing. Keep in mind, when you wear a VR headset, you can no longer see your actual controls, or a keyboard, or mouse. So your best option is HOTAS (Hands On Throttle And Stick) flying. Basically, if you can do everything you need to do in the sim without removing your hands from the joystick and throttle, and if you can memorize all the button assignments, then that sim could be a good option for VR.
If you fly airliners, civil training airplanes, or helicopters you will be performing a lot of tasks where you need to reach out with your hand and touch the control panel. You will tune radios, adjust the GPS, set the navigation headings, set the autopilot, and more. As of right now, it’s really difficult to do these tasks in VR so traditional flight simulators are best for this type of flying. In traditional flight simulators we use actual retail switch panels, modified keyboards, a touch screen, a real checklist, a real aviation map, or all of these things. I think it will stay that way for a long time and more people will be building flight simulator cockpit.
7. How looks your simulator, can you share some pictures with us?
Sure, here are pictures from four very different DIY flight simulators (see the slideshow gallery on this page).
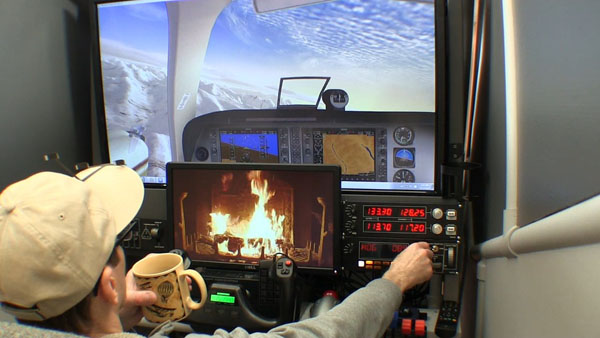
This project combines two of my favorite things: a cozy fireplace and my flight simulator. Why not simulate a nice cozy fireplace inside a flight simulator?!
This DIY flight sim is ready for winter! I combined the warm atmosphere of a crackling fireplace with the fun of flying my simulator. It’s just the thing for those freezing winter months. You can do this too, it’s easy to set up.
Create a Fireplace Inside a Flight Simulator
My flight simulator has two displays connected to the graphics card. The large display is a 40″ HDTV and the smaller display is a 19″ VGA computer monitor. Typically, I display the flight simulator outside view on the large screen and the flight instruments on the smaller screen. For today’s project, I’m only running FSX on the large screen. Start FSX and start a flight. Select Windowed Mode from the View Menu and resize the window so it fits on one screen (the large screen in my example).
Next start a web browser on the second monitor and find a fireplace video on YouTube. Play the video and select full screen. This is how I my smaller display shows a cozy, crackling fireplace.
All we need now is a nice hot apple cider. I recently discovered sugar free apple cider from Alpine. It doesn’t need any sugar because of what we add next: cinnamon flavored bourbon. Apple and cinnamon… oh it’s so, so good! Leave the ice and snow outside, you’re flying in comfort. Happy Landings!
The DIY Side Joystick Frame is one of my most popular projects, and it’s very versatile. Even though I published this project 6 years ago, the design has stood the test of time. Yet, as great as it is, I have recently made a few modifications to the design that you might find helpful for your project. Read on for 5 Modifications for a DIY HOTAS Chair for Virtual Reality and More.
A True HOTAS for your Flight Sim
The DIY Side Joystick Frame, Item #F311, makes a true HOTAS (Hands On Throttle And Stick) possible for your flight simulator because the project also includes rudder pedals. True pilots use rudder pedals, not joystick twisty grips so always remember that. I originally envisioned the F311 as useful primarily for jet fighter simulators, but now, many customers are using it for space sims like Elite Dangerous and Star Citizen.
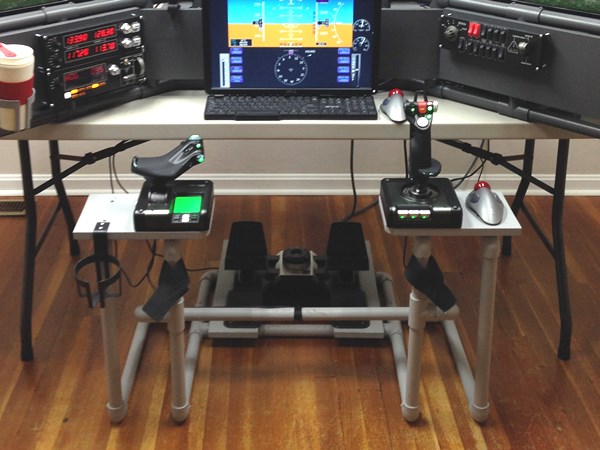
Use the F311 in combination with a Virtual Reality headset. Remember, when you wear a VR headset, you can’t see your keyboard any more and any functions you have assigned to your keyboard keys are literally out of sight. You can also use the F311 with a traditional multi-monitor setup like the DIY Deluxe Desktop Flight Sim (Item D250). The F311 is delightfully versatile and useful. Use these 5 Modifications for a DIY HOTAS Chair to update the F311.
5 Modifications for a DIY HOTAS Chair
F311 HOTAS with a multiple screen flight simulator
F311 HOTAS in combination with VR
DIY Side Joystick frame with a quad screen flight sim
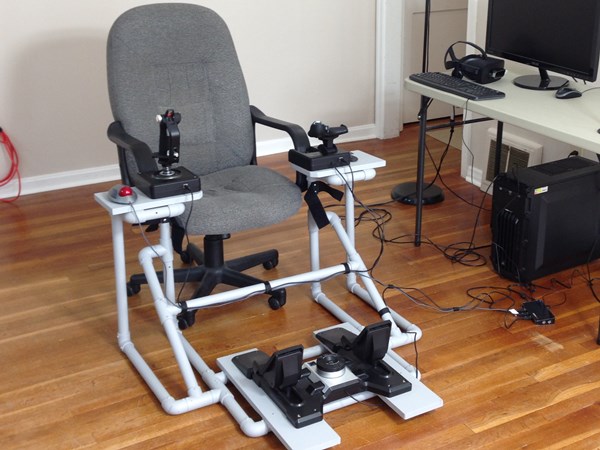
F311 HOTAS chair for flight sims, Saitek X52 and trackball mouse
F311 Side Joystick Frame with D250 Deluxe Desktop Flight Sim
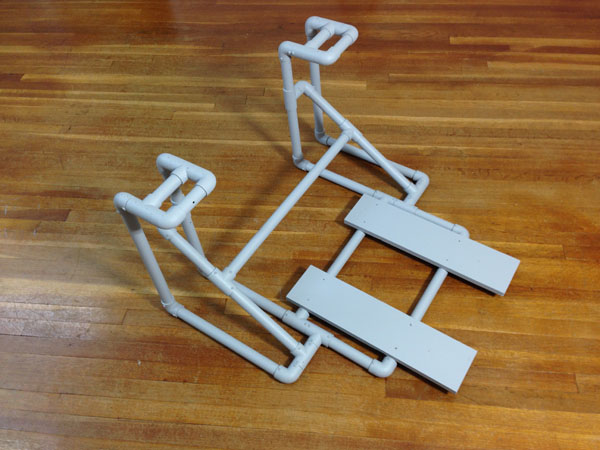
F311 Side Joystick frame without the Side Stand platforms
5 Modifications for a DIY HOTAS Chair
I made five main modifications to adapt the F311 Side Joystick Frame for my current requirements. None of these modifications are difficult. If you can build the F311 in the first place, you can certainly make these modifications or include these changes during the initial build.
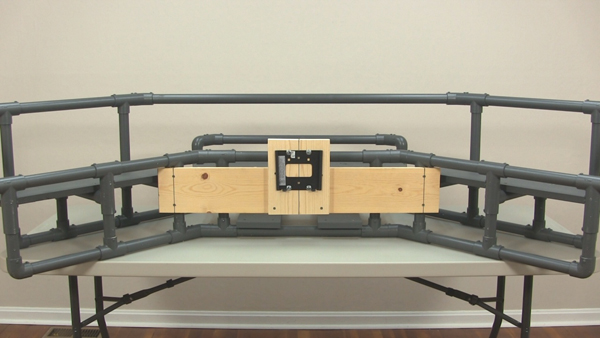
1. Wider Side Stand Platforms
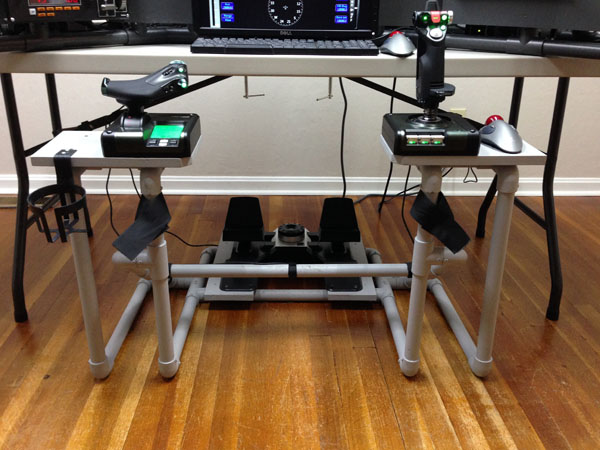
First of all, I installed wider side stand platforms, cut from 1×8 boards. To be clear, the PVC pipe side stands did not change, just the the boards that attach to the top of the stands. I topped the side stands with 1×8 boards, 12″ long. The wider boards give you room for a trackball mouse next to the joystick and give you room next to the throttle to set down your phone or whatever. Most importantly, you can place the controls in a more ergonomic location. This means placing the joystick and throttle in line with the chair’s arm rests. This is so important! Place the joystick and throttle so that your arms sit straight on the chair’s arm rests. This will allow you to fly comfortably for hours.
In addition, I attached the joystick and throttle with wood screws instead of Velcro. I also trimmed the inside corners of the 1×8 boards by 1″ and sanded the edges so my legs wouldn’t get caught on the corners.
2. Longer floor boards
I use the Saitek Pro Flight Cessna Rudder Pedals, and I really like them, but they have to be positioned further away from the pilot. The rudder pedals attach to the Floor Boards with Velcro, but the original boards were too short. Therefore, I replaced them with two 1×6 boards, 22″ long. You might not need to make this change for your rudder pedals.
3. Raised center stabilizer
I also raised the center stabilizer bar to allow room for the Saitek Pro Flight Cessna Rudder Pedals. Specifically, the back of my ankles banged into the stabilizer bar, so I had to move it. It is now 6.5″ higher than it was before.
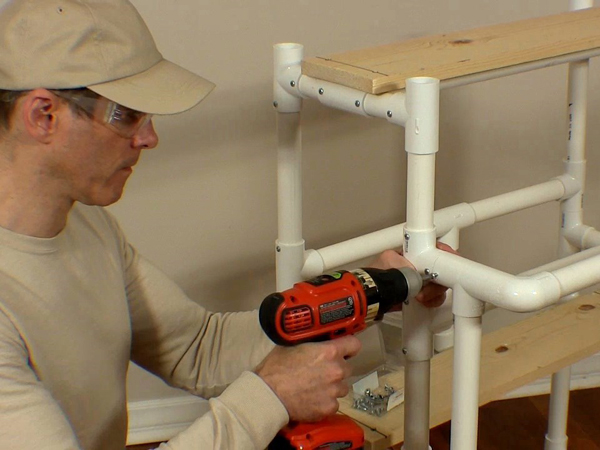
4. Self-drilling screws
I now use self-drilling screws in everything I build. Back in 2010 when I designed this project, I used Liquid Nails Project Glue to attach all the PVC pipes and fittings. This allowed for some cost-savings, but self-drilling screws are far superior. The screws allow for a simpler assembly with no overnight dry time. In addition, the screws create a much stronger frame. Lastly, you can remove the screws later if you decide to modify the frame. I absolutely recommend using 1/2″ self-drilling screws to build DIY Flight Sims from PVC pipe.
Don’t fly thirsty! I include a cup holder with almost every project I design. The cup holder is located next to the throttle and it’s easy to find it, even when wearing a VR headset. I use these inexpensive cup holders from Amazon.
If you’ve already built the DIY Side Joystick Frame, Item F311, or if you haven’t built one yet, these 5 Modifications for a DIY HOTAS Chair can enhance your home flight simulator experience for years to come.
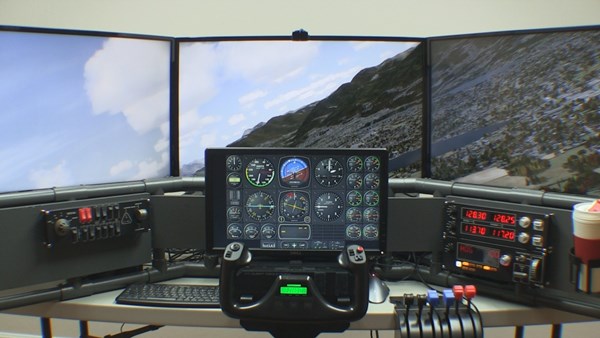
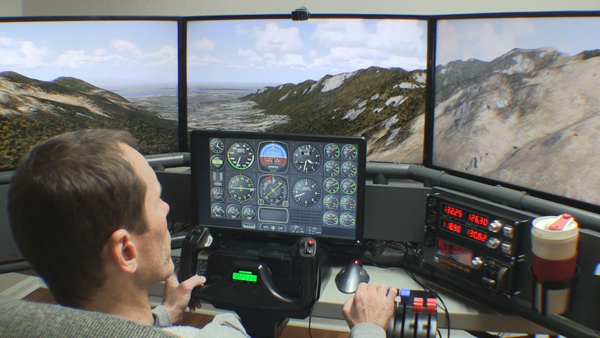
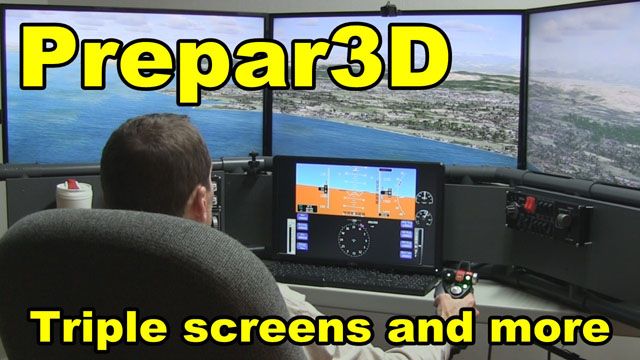
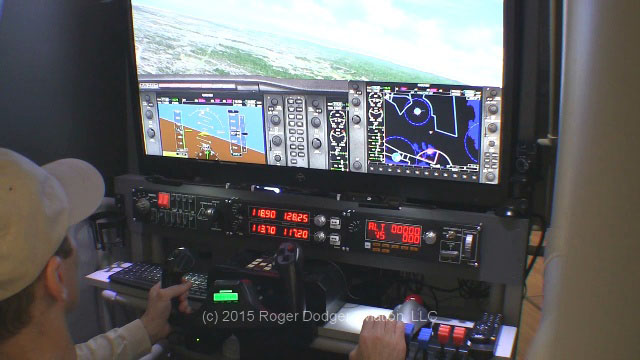
What you’re seeing here is Lockheed Martin Prepar3D with triple screens and more. The software is Prepar3D version 3.4, the DIY Deluxe Desktop Flight Sim, the DIY Side Joystick Frame, Air Manager is running the instruments on the 4th display. The installation of P3D was straightforward and you’re looking at a stock installation with no add-ons (yet).
The three main displays are inexpensive 32″ HDTVs connected to a single Nvidia GeForce mid-level graphics card. The system specs are at the end of this blog post.
Prepar3D Installation
P3D recognized the Saitek X52 Pro and properly assigned its functions, which was very nice. For other flight simulator programs, assigning the controls correctly is an awful awful chore, but not for P3D. This is the first flight simulator software I’ve ever seen that correctly identified rudder pedals and successfully assigned them to the correct function. Including the toe brakes. So, kudos to Lockheed Martin. They also build spaceships, by the way. Just so you know.
It’s easy to combine the DIY Side Joystick Frame, (item 311), with the Deluxe Desktop Flight Sim project. I’m using the Saitek Pro Flight Cessna rudder pedals. Great rudder pedals. I updated the drivers for my Saitek switch panels that enabled them to work with P3D. That was easy.
You’ll notice that nothing here is expensive or exotic… or even new. For example, I’m using a second-hand computer to display the flight instruments. The second computer is so old it’s running Windows Vista.
DIY Flight Sim Pod Final Assembly Video Transcript
This is an excerpt from the DIY Flight Sim Pod instructional video. The video and associated manual show you every step in building this home flight simulator project.
In this final section, we’re going to populate the Inner Frame with computer hardware. Furthermore, we will assemble all the pieces of the Flight Sim Pod. Your new flight simulator will soon be finished!
We see here the Inner Frame, all painted and masking tape removed, lt’s look at the right side of the frame. Here on the Computer Shelf we can set a desktop computer, and a powerstrip on the Top Shelf.
Next: the monitor or HDTV. It is a very good idea to get help from a friend while mounting the HDTV. You can’t actually see the bracket when you clip onto it, so it helps to have a second pair of eyes watching. Make sure it’s centered in the frame also.
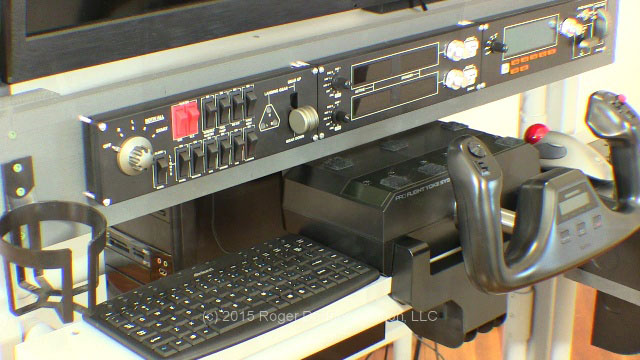
Install the switch panels and then add the yoke, and beside the yoke, the throttle quadrant. I have attached Velcro to the top of the throttle quadrant for the trackball mouse. There is enough room on the yoke housing for a mini-keyboard, or it can go beside the yoke. Don’t forget a drink holder!
Attach the rudder pedals, and add the speakers. Remember the Chair Staytheres? I painted these also. They have Velcro that loops over this horizontal bar. Notice when you use the Chair Staythere you have to reach way down to get it and you might want an easier way. I simply measured 7” from the end of the pipe and drilled two holes and then I tied on a piece of boot string and hung it from the pipe above. I did this on both sides.
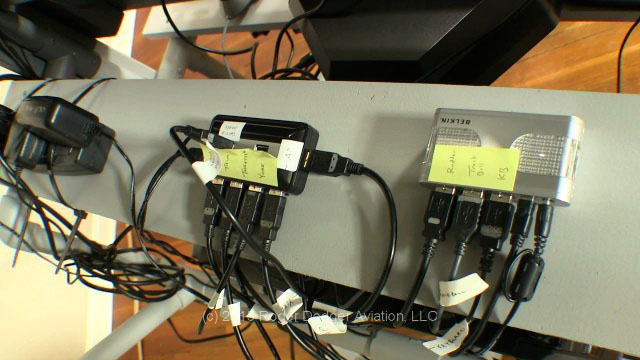
Now I don’t have to reach down so far. With all the peripheral equipment on this machine, we end up with a lot of wires. I loop the wires and use strips of Velcro to keep them organized. If I need a USB extension, I use Velcro straps to help keep it secure. Use it for the rudder pedals so the wire won’t get tangled up with your feet. I secured the USB hubs with Velcro too. I recommend labeling the USB wires, there are so many of them
Once everything is hooked up, it’s time for a test drive! Make sure all the peripherals work correctly.
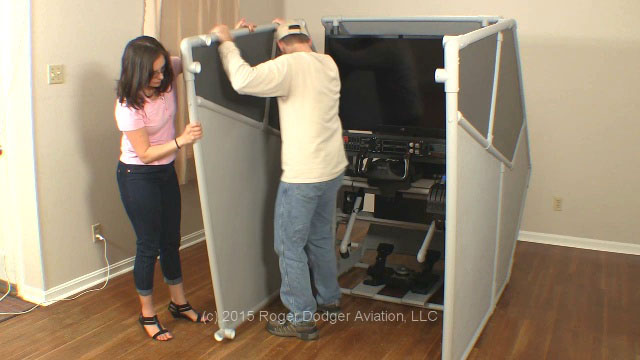
We’re almost finished with the DIY Flight Sim Pod Final Assembly. For the final step, I really recommend you get help from a friend because you’ll need someone to hold the Side Wall in place while you attach it to the three interface points. The first point is near the Side Boards. There are two points in the front that slide into place also
Secure each interface point with a self-drilling screw. That Side Wall will stand by itself so you can attach the other Side Wall. Attach all three interface points with self-drilling screws. Next replace this bottom support pipe, or the tail end extension, your choice. Secure with self-drilling screws.
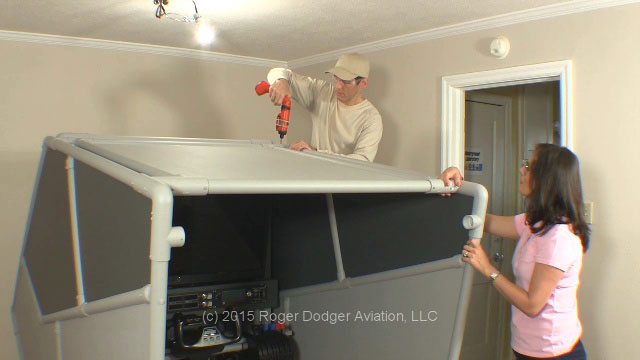
Carry in the Top Canopy, and set the 1×4 board on the ledge near the top of the support pillars. Have your partner hold the back of the Top Canopy while you attach the front. Once the front two corners are in, you can attach one of the back corners. Secure the front two corners with self-drilling screws.
Now we can attach the top support pipe. First insert it in the left side. Remember, we left the right side of the Top Canopy loose for this reason. Attach both pipes simultaneously. Attach four self-drilling screws: The two back corners of the Top Canopy, and both sides of the top support pipe.
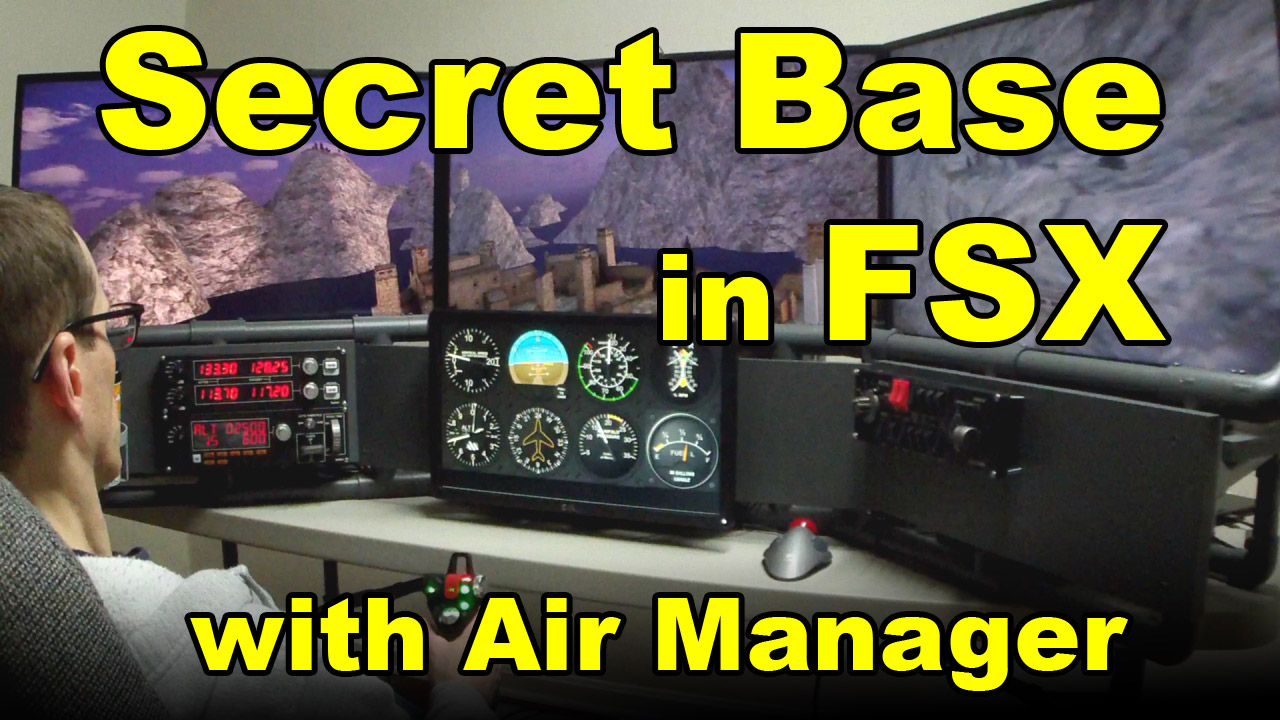
The FSX Secret Base and the surrounding islands are featured in the second half of the Tokyo Executive Transport mission. The islands only appear during that mission so if you try to fly there during free flight, you will find only empty ocean. Try flying the mission. Sure, you get to see the islands and the Secret Base in FSX, but you have to fly the assigned Lear jet.
So how do you fly to the Secret Islands in free flight? How do you fly your choice of aircraft? You noticed in the video I was flying the Robinson R22. If you want to do something similar, you should add the Secret Islands as a scenery object. Fortunately, this is very easy.
Add the Secret Base in FSX
Add the Secret Islands (including the Base) as a scenery object in FSX. Check out this link: this is a freeware FSX scenery download that installs the Secret Base as a regular scenery object. Don’t forget to read the Read Me file.
The file installs the Secret Islands, the Secret Base, death ray guns on the mountain peaks, and some sort of suspicious weather station on the top of the highest mountain. The only object that is not included is the retractable water runway that leads to the hangar. The runway is present during the Tokyo mission, but not when you fly to the Secret Islands in free flight.
Air Manager
I use Air Manager software from Sim Innovations in the embedded video. This is a clever piece of software that makes it easy to display instruments on a separate monitor. I’m using it for the Robinson R22, but it works for a variety of default and add-on aircraft. Use it in FSX, FSX Steam, Prepar3D and X-Plane. Air Manager features over 300 flight instruments to choose from and more on the way.


Recent Comments