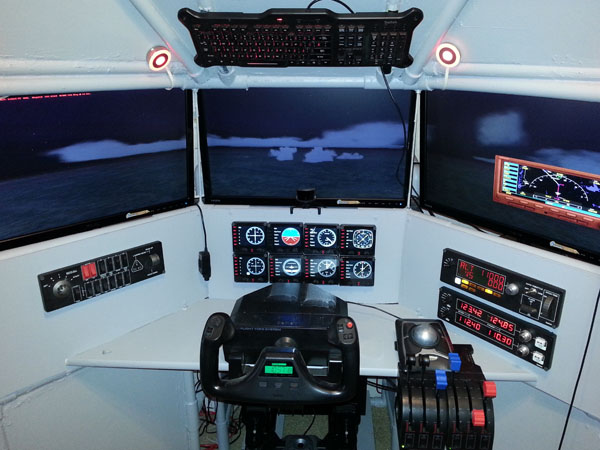
Our customer, Tom, sent in these pictures of his completed project. He installed a Saitek Pro Flight Instrument Panel in a DIY Triple Screen Flight Sim. Actually these are eight separate units that combine to work as a complete instrument panel, therefore he has the standard six flight gauges, plus two VOR displays.
T440 Triple Screen Flight Sim customer completion
Saitek Pro Flight Instrument Panel
The Saitek Pro Flight Instrument Panel you see in the picture is eight separate flight instruments. Each unit can be set individually to display whatever instrument you choose, in addition, you have 15 different displays to choose from. The units cost $170 to $190 USD depending on where you purchase from.
The instrument panel is the perfect addition to Tom’s DIY Flight Sim. He says: “Had great fun building this triple screen, with your instructions and videos even I couldn’t mess it up!”
Out of Stock. There is a massive, world-wide, back-order situation on all Saitek Pro Flight merchandise. All orders will be filled on a first-come, first-served basis. Order now to reserve your spot in line. You will not be charged until the order ships and you can cancel at any time prior to shipment. Orders placed now are expected to be shipped in 6 to 12 weeks.
MadCatz recently sold Saitek to Logitech. Gameindustry.biz reports that MadCatz purchased Saitek in 2007 for $30 million, but is now selling it to Logitech for only $13 million. We can only hope that Logitech can keep the Saitek product line in production and going strong for years to come. I’ve owned several Logitech products (keyboards, mice, etc.) and I’ve always been happy with their reliability and functionality. I know that there have been concerns lately about the workmanship in Saitek products and consequently I hope the sale to Logitech improves the reliability of the entire Saitek product line.
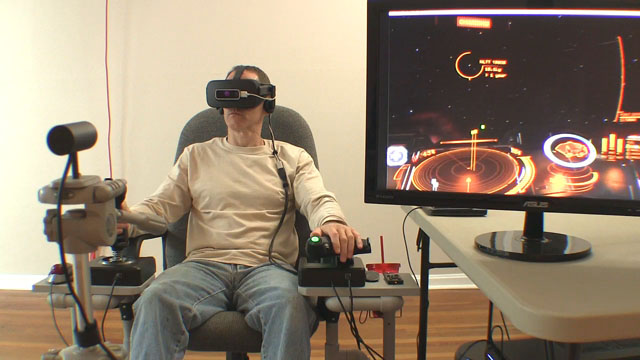
Is is time to take the leap into Virtual Reality and incorporate it into your flight simulator? Maybe not, depending on what you like to simulate. In this article I continue my exploration of Virtual Reality for Flight Simulator and discuss Flight Simulator X, War Thunder, some physical and financial issues, and system specs. In Part 1 of this article, I experimented with DCS World and Elite Dangerous in Virtual Reality. You can read it here.
Flight Simulator X with FlyInside and Leap Motion
This is the big one! FlyInside FSX is an ambitious project to make Microsoft Flight Simulator X compatible with VR. Leap Motion is an infrared sensor that can detect the location and position of your hands, so you can see your hands in Virtual Reality. Put FlyInside and Leap Motion together and you can activate airplane switches with your hands in the FSX virtual cockpit! If that is difficult to imagine, here is a video that demonstrates it.
Disclaimer: I discovered it’s really difficult to take good screen shots in Virtual Reality for flight simulator, so for this article I borrowed representative pics from other sources. This has no impact on the validity of my findings.
FlyInside FSX is a rather new project and even though it didn’t work for me, I still think it’s important to support the developer. The first flight I tried was the simple default flight around Friday Harbor in a Piper Cub. It was pretty cool to look around in VR, as long as I didn’t move my head too fast. Virtual Reality works best when the images are rendered at 90 frames per second or more. The stock FSX can’t consistently provide fps nearly that fast, but FlyInside has a trick to get around that. Unfortunately, it didn’t work well enough. When I moved my head, the images lagged. Lagging equals motion sickness, remember that. When the images you see with your eyes do not match your head movement, you can get motion sickness very quickly. I’m not prone to motion sickness, so I was able to do a few takeoffs and landings without barfing, but the experience is not nearly as good as VR in other flight sim software. On the other hand, I found that it’s easier, and it feels more realistic to land an airplane in VR.
I tried to trim the airplane during flight, and that’s when it all went sour. Recall that I also used Leap Motion, so I could literally see my hands while flying in the virtual Piper Cub. This is supposed to give me the ability to manipulate controls and switches in the cockpit, much like it’s possible now with the mouse. I reached out to adjust the elevator trim and…. FSX crashed. I re-booted and tried the same thing again… another crash. And that’s it. After two crashes, I’m done.
Conclusion: support this project. I did, but I won’t use it again until it’s more reliable.
War Thunder
Combat in Elite Dangerous made me miss my old online squadron. I had never played War Thunder before, but it’s free to sign up so I enlisted and went back to World War 2 for the first time in several years. This game was much more menu-friendly to VR than DCS world was. I wasn’t familiar with War Thunder, so it took a while to get my controls and buttons assigned. Apparently, the game isn’t expecting many users to have rudder pedals, so that really throws it for a loop.
Once I had my controls set up, I launched into battle with my pathetic P-26 Peashooter (that’s how you start out). Even with my crappy plane, I had blast in War Thunder. I had a level of spatial orientation that I’ve never had before in a flight simulator. VR is a game changer for air combat because of the way I could look above, below, behind, and around the cockpit frame. Even though I was a rookie, most of the guys in the Arcade level don’t know anything about energy fighting so I was able to use that to my advantage and I leveled-up rather quickly, or at least I think I did. The flurry of levels and tokens and things are still a mystery to me.
War Thunder also has a Realistic mode that I tried, but I didn’t get my controls completely set up. A Saitek X-52 looks nothing like the controls you would have in a WW2 airplane, so this means I need to assign mixture, prop and some other functions to the knobs on the throttle, which I wasn’t all that excited about. I’m sure I’ll revisit that at some point.
I experienced my first strong physical reactions in Virtual Reality while playing War Thunder. My heart was pounding and I was sweating profusely during combat. I had to take breaks between sorties for my heart rate to come down and I pointed a fan at myself to cool off. This is serious fun!
Conclusion: I will only play War Thunder in VR. That’s how good it is.
Edit: the recent update of War Thunder failed because the sound no longer works. As a result, I won’t be playing this again until they fix it.
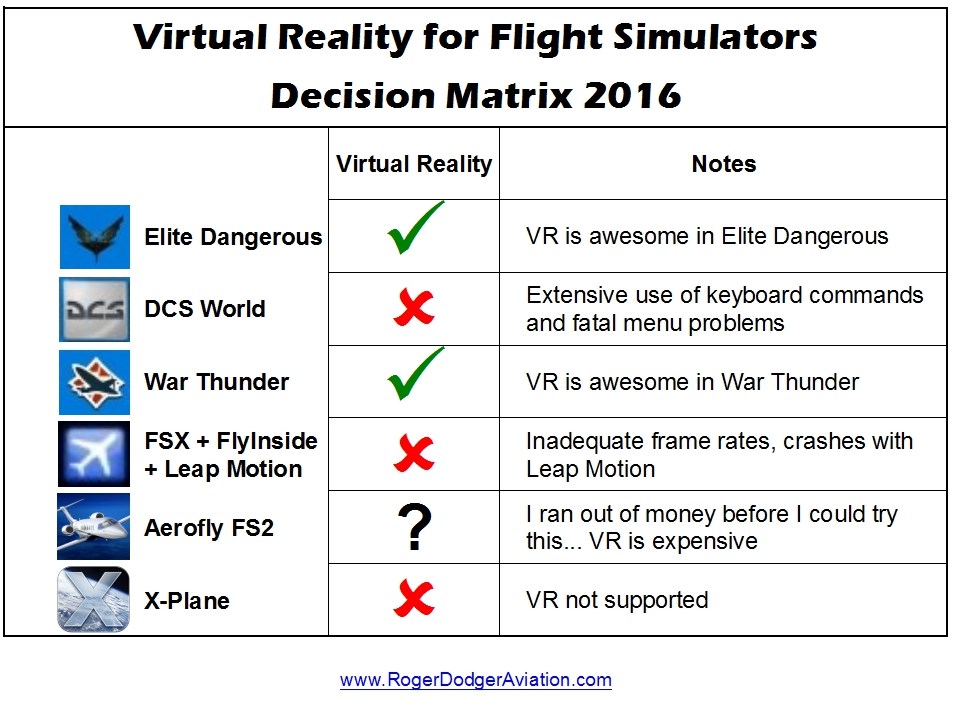
Matrix: Virtual Reality for Flight Simulator
Here is a summary of my findings with the flight sim software. Read on for financial and physical implications.
Virtual Reality for Flight Simulators Decision Matrix 2016
Virtual Reality: Financial Issues
The FlyInside developer recommends FSX Steam because it works better with FlyInside for some reason. I would like to try it, but I’m simply out of money. Virtual Reality costs real money. It is expensive. The Oculus Rift headset was over $600 with shipping, but I also needed a new computer to run it. I shopped smart but still spent over $1160 on a new gaming computer (specs below) and that still wasn’t enough. I’ll need to spend another $600 on a new graphics card before I can run the Rift at high definition 1080p. I bought Leap Motion on sale, but I can’t use it because of the problem with FlyInside FSX. I couldn’t afford to even try Aerofly FS2.
Notice that Virtual Reality did best with games, not simulators. Flight Simulator X was not usable and X-plane doesn’t support VR at all. Think long and hard about spending your money. VR is for gaming, not for simulating.
Virtual Reality: Physical Issues
You can’t wear glasses with the Oculus Rift. Well, technically you can, there is an awkward way to do it, but the headset will push the glasses against your face, which is very uncomfortable. Realistically, it’s contact lenses or nothing and that’s just the way it is right now. Maybe there will be helpful remedies in the future.
Motion sickness is a risk if you’re prone to motion sickness in general. If you typically feel nauseous in a plane or boat or car, you may feel the same in VR. Furthermore, if your computer can’t render VR in 60 frames per second (at least), you may feel nauseous in Virtual Reality for flight simulator. Luckily, motion sickness if easily remedied because you can just take a break and remove the headset for a while.
Pounding heart, sweaty armpits, residual headset heat, dry eyes. Clinical flight simulator research shows that pilots start to have involuntary physical responses to professional flight simulators when the images are rendered higher than 60 fps. In other words, their palms sweat. In my experience, my heart was pounding, I was breathing heavy, and my whole body sweat during combat in War Thunder. I took breaks between sorties to calm down, it was that intense. Sometimes my eyes would get dry in VR because I probably don’t blink as much as I should. Lastly, the Oculus Rift headset gets warm during use, so I needed a fan blowing on me to help me stay comfortable. That’s unusual for me, I typically have a lower than average body temperature.
Virtual Reality: Emotional Responses
I didn’t expect to have any emotional reactions to VR but I did. Virtual Reality for flight simulator wasn’t the only thing I tried, I also looked at some 360 degree videos. When you view these videos, it’s like you are inside the video and you can turn any direction to see what’s happening around you. Several little clips are included in the Oculus library.
One clip showed a young couple on a gondola ride in Venice. The camera was in the boat with them so it seemed like I was riding along with them too. It was a vacation I can’t afford in a city I’ll probably never visit and yet, I was there… virtually.
Another 360 video clip showed a family in Asia somewhere and their house was basically a little shack on stilts in the water and again, I was there… virtually. I was reminded of how lucky I am to even experience VR because my computer and VR headset probably cost more than their annual income.
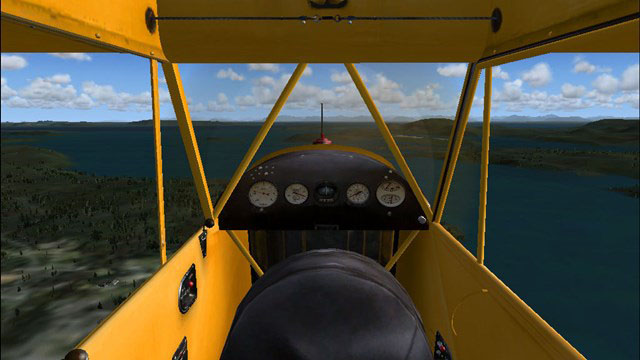
DIY triple screen flight simulator with HOTAS by Ola
Great to see this innovative build from Ola! He made several modifications to the DIY Triple Screen Flight Simulator project to better match the type of flying he enjoys. You can see from the screen shot he is flying a Piper Cub over the summer countryside. He is also running Flight Simulator X. The stock project from DIY Flight Sims calls for a yoke and throttle quadrant, but Ola designed two podiums on either side that support HOTAS (Hands On Throttle and Stick) flight controls. I fully support modifying the designs to match your needs. It’s exciting to see all the variations that builders can create. I never predicted I would see a Triple Screen Flight Simulator with HOTAS.
Logitech G940
Ola is using the Logitech G940 HOTAS flight system with his home flight sim cockpit. I’ve always wanted to try out this system but I haven’t had the opportunity yet. I’ve owned lots of Logitech products and I’ve always been pleased with their reliability and affordability. For some reason, I’m not finding this available on Amazon or Newegg. Amazon actually does have it listed at $620 USD, which is way too expensive, but could be an indication this product is discontinued. I hope it’s not discontinued, but it is a force-feedback joystick, and it’s hard for those to sell successfully in the already competitive joystick market.
Especially relevant are the 2″ Velcro strips on either side of the triple screen flight simulator with HOTAS. You might not know this unless you’ve experienced it, but if you use rudder pedals while sitting in an office chair, you immediately find that pushing on the pedals, results in you rolling away in the chair. The remedy is to strap the chair in place with sturdy Velcro strips. Most of all, you literally get to “strap in” when preparing to fly your simulator.
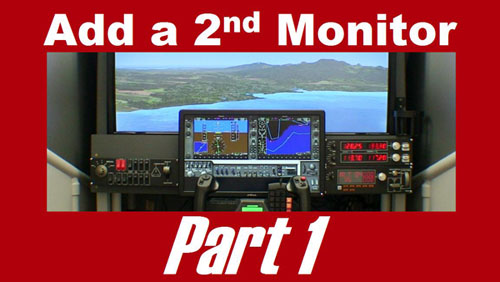
Now we will paint the board, install the monitor, and configure Microsoft Flight Simulator X to run on two monitors
Video Transcript
This is where we left off. Now I know all the components will fit correctly, so next I’ll paint the board.
I removed the mounting bracket and all components, but I left the tee nuts in place. I’m painting with tinted primer like I do with all my projects.
After one side has dried, flip it over and paint the other side.
The paint is dry to the touch, but it can still stick to the support boards when it sits overnight so I’m putting a few screws between the boards to allow the paint to dry completely.
I want a layer of masking tape (or something similar) between the new board and this attachment board. If I don’t separate the two boards like this, the paint will stick the boards together almost like glue.
Attach the board with deck screws,
Test fit the monitor to make sure it fits correctly.
You may or may not need an adapter for the monitor cable. This cheap little monitor only has a VGA plug.
Now that the monitor cable and power are hooked up, we can slide the monitor into place and turn on the computer.
The operating system should be smart enough to recognize the second monitor.
If not, right-click the desktop and choose “Screen Resolution” you may need to prompt the operating system to detect the monitors.
I recommend setting the large screen as Display 1
Also select “Extend these displays” here.
You know it’s working correctly if you can drag a window from one monitor to another.
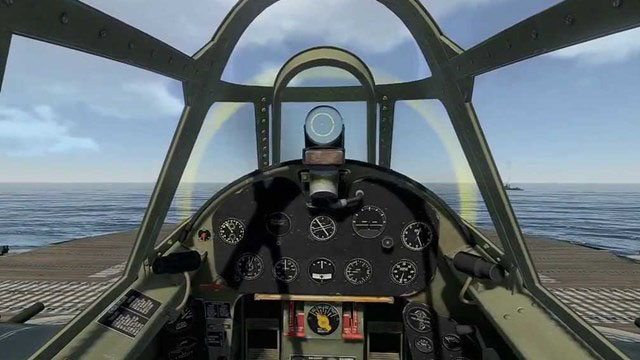
Start Microsoft FSX. For this example, I’ll use the default G1000 Beechcraft Baron.
Select the 2D cockpit view. Right-click just above the instrument panel and select “Close window”
Next, select Shift + 4 to show the Primary Flight Display in a more manageable shape.
Now I can left click and drag it over to the smaller monitor and drag the edges to re-size the window.
Next, do the same thing with the Multi Function Display
I also like to display the Landing Gear Panel because it shows the elevator trim setting. Check out the Saitek trim wheel (I love this thing). Now I can see the trim setting for takeoff.
A quirky thing about this setup is that even if you save the flight, and exit, FSX will not save the locations of the instruments. The next time you start the flight, the instruments will have to be moved and re-sized again. You can remedy this by using Air Manager from Sim Innovations to display the instruments on your second monitor.
If you use TrackIR, a second monitor can still help you. Here I have the Virtual Cockpit on the main screen and the flight instruments on the small monitor. It works quite well. It was a great experience to add a second monitor to my flight simulator and I hope your project goes well too.
This was a great project and really enhanced the Flight Sim Pod. Dual monitors allow you to display the flight instruments on a smaller screen and show the outside view on a large monitor, or even an HDTV as shown here. Most noteworthy: quality flat panel monitors are wonderfully inexpensive now!
Video Transcript
You can display your flight instruments on an auxiliary monitor and use your main monitor for the outside view. This increases your outside visibility and makes it easier to read the instruments.
This is nothing new. People have been running flight simulator on multiple monitors for years, but I wanted to show you some specific issues for mounting a second monitor.
I’ll literally show you the nuts and bolts of this process.
Part 2 of this video will show you what to expect when you run Microsoft Flight Simulator X on two monitors.
To start off, I removed the 1×6 board from the flight simulator and used a 1×8 board instead. I needed this taller board to mount these two Saitek switch panels vertically.
If you don’t have a miter saw that can cut a 1×8 board you can usually get that done at the store. Many home improvement stores will cut lumber for you.
Now lets look at the monitor mounting bracket. This small bracket is appropriate for this size monitor. One half of the bracket attaches to the monitor, the other half will attach to the board.
This is the Dell 19 inch monitor that I’m using for this project. It was very inexpensive.
This is how the bracket will fit on the monitor…. but look here: the bottom edge of the monitor can not hang below the bottom edge of the board….
Because, I have to allow room for the Saitek yoke below it.
Unfortunately, that puts the top attachment holes on the bracket too close to the top edge of the board, so we can’t use those holes.
No problem. We will simply drill new holes into the steel bracket! It’s not difficult. First, I measure where the new holes will be: three quarters of an inch on center, below the existing holes.
Next I tap the center points with a punch and hammer.
I drilled pilot holes first with a 1/8” drill bit. Use cutting fluid if you have it, or a lubricant like WD-40.
Next, use a ¼” drill bit to make the holes larger. Notice that I clamped the bracket in place.
The drill bit generates a lot of heat, so take your time. Drill a little, then back off for a moment to allow the bit to cool. Then repeat.
The drill press I’m using is not expensive or fancy. You could probably even do this with a hand drill if you clamped the bracket to a work bench. Either way, remember to take your time and be safe.
Use a 5/16” drill bit to make the holes larger one last time. So yes, I used three different drill bits for these holes. Yes, there is an easier way, a step bit will allow you drill holes in steel without changing drill bits.
Wear safety glasses. Wear safety glasses. Look, you can actually see bits of hot metal shooting in different directions.
Are dual monitors worth going through all this trouble? Yes! You will love having your flight instruments on a separate monitor.
Be sure to clean up the bracket after you’re done drilling.
Attach the mounting bracket to the back of the monitor according to the manufacturer’s instructions. This model already has mounting screws for this purpose.
The bracket slides on easily.
Measure the distance from the bottom edge of the monitor to the top edge of the bracket. In this case, it’s 7 ½”
I want the monitor in the center of the board, so I’m measuring the halfway point here.
Again, I want the top of the mounting bracket to be 7 ½” above the bottom of the board.
Hold the bracket in place and trace where your four mounting holes will be.
Drill pilot holes with a 1/8” drill bit, then final holes with a 5/16” drill bit
Now we can use ¼-20 screws to attach the bracket…. However, there’s another issue to address.
The ends of these screws will be too close to my 40” HDTV. I’m not comfortable with that.
So I used these ¼” tee nuts for the top two holes.
Flip the board over, and bang in the tee nuts with a hammer and a block of wood.
You can use shorter screws now. 1 inch long ¼-20 screws with washers.
Make sure the bracket is straight and attach ¼-20 screws to the bottom two holes. These screws are an inch and a half long, attach with nuts, washers and lock washers.
Slide on the monitor and see how it fits.
This is how it will sit in relation to the switch panels.
In part 2 of this video, we will paint the board and attach it to the flight simulator. I’ll also show you how to relocate the aircraft instruments to your new monitor in Microsoft Flight Simulator X.
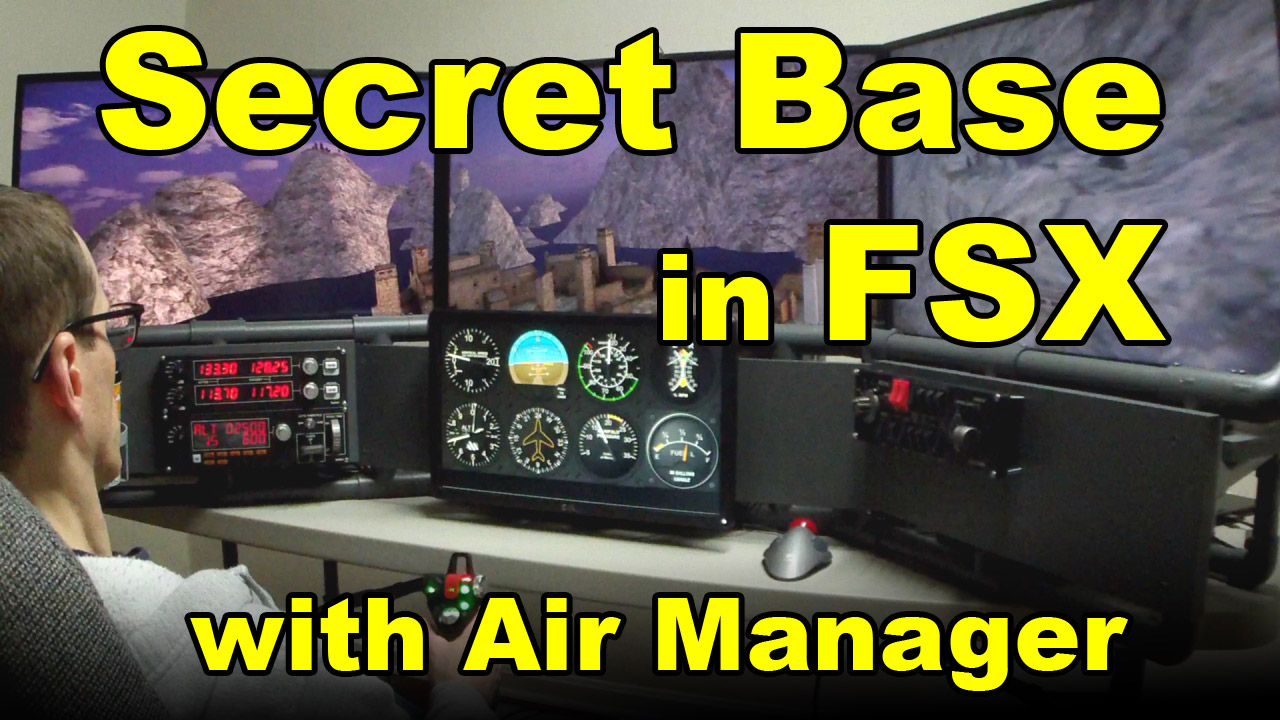
The FSX Secret Base and the surrounding islands are featured in the second half of the Tokyo Executive Transport mission. The islands only appear during that mission so if you try to fly there during free flight, you will find only empty ocean. Try flying the mission. Sure, you get to see the islands and the Secret Base in FSX, but you have to fly the assigned Lear jet.
So how do you fly to the Secret Islands in free flight? How do you fly your choice of aircraft? You noticed in the video I was flying the Robinson R22. If you want to do something similar, you should add the Secret Islands as a scenery object. Fortunately, this is very easy.
Add the Secret Base in FSX
Add the Secret Islands (including the Base) as a scenery object in FSX. Check out this link: this is a freeware FSX scenery download that installs the Secret Base as a regular scenery object. Don’t forget to read the Read Me file.
The file installs the Secret Islands, the Secret Base, death ray guns on the mountain peaks, and some sort of suspicious weather station on the top of the highest mountain. The only object that is not included is the retractable water runway that leads to the hangar. The runway is present during the Tokyo mission, but not when you fly to the Secret Islands in free flight.
Air Manager
I use Air Manager software from Sim Innovations in the embedded video. This is a clever piece of software that makes it easy to display instruments on a separate monitor. I’m using it for the Robinson R22, but it works for a variety of default and add-on aircraft. Use it in FSX, FSX Steam, Prepar3D and X-Plane. Air Manager features over 300 flight instruments to choose from and more on the way.


Recent Comments